Tag Archives: Amateur Radio

NBEMS/FLDIGI Sound Card Calibration

9/26/2017 update: This is a less effective way of calibrating Fldigi.

The officially recommended calibration method is to use a time standard such as WWV and WWVB.  Details are in the Fldigi manual.

I’ll update or create a post as time permits with more details.  This post and instructions below will be left for reference and should be considered archived.


Archived from: pa-sitrep [dot] com

Archive reason: domain expired, server shutdown, or otherwise unaccessible.

Notes: I had a copy of both the program and the text, I am re-posting both.  Unfortunately it only is available for Windows.

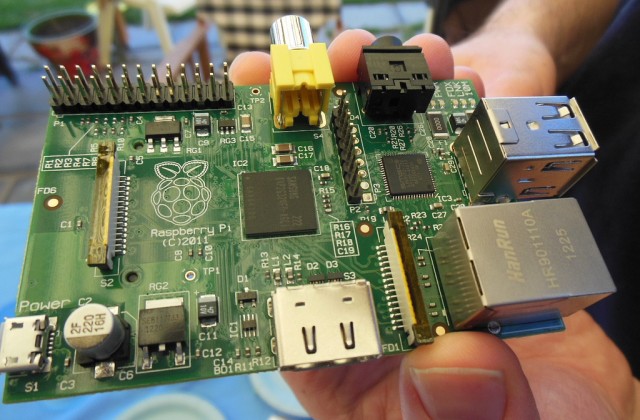
Check the Fldigi tag for my posts running it on the Raspberry Pi or how to use Fldigi.

If you’re concerned about downloading the exe, it was analyzed by VirusTotal and showed 0 detections. The hashes are below and the SHA256 can be compared against the VirusTotal link.

SHA1

396A6ADB43BC76CB48E72A532B2E2E8FE9834551

396a6adb43bc76cb48e72a532b2e2e8fe9834551

SHA256

EE8BA2B907CBCF2551899808ECF717BE61CA76971499CD9EF63F53413114F494

ee8ba2b907cbcf2551899808ecf717be61ca76971499cd9ef63f53413114f494

I do not take any credit for the content or make any claim of accuracy.


1) Download and save CheckSR.exe to your desktop. This is a small, standalone, application that consist of a single exe file. When you double click on it, once it’s saved to your desktop, it provides the capability of analyzing your sound card offsets and gives you the corrections in parts per million (ppm):

http://www.k8jtk.org/drive/ham_radio/digital_modes/checksr/CheckSR.exe

checksr-01-fldigi_audio_devices

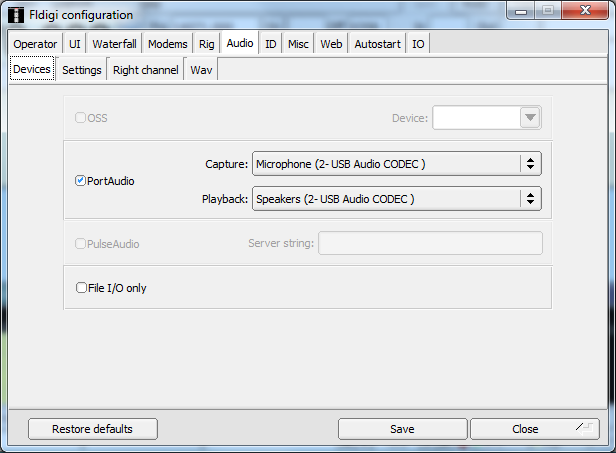
2) Open NBEMS/FLDIGI, go to configure, defaults, sound card, audio devices tab and make sure you have the sound card you use for your interface properly selected from the capture and playback drop down choices. Then click the audio settings tab.

checksr-02-fldigi_audio_settings_native

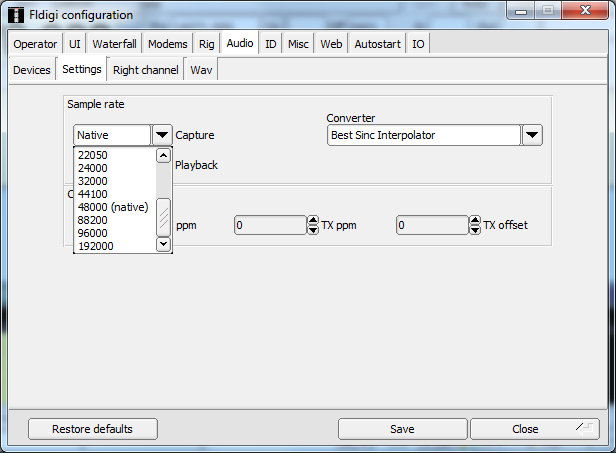
3) Under the audio settings tab, you should see a sample rate drop down box for capture and playback. Under each drop down box, select the sample rate that has (native) listed after it and take note of this figure. Click save config, then click save. Close FLDIGI.

Note: the ‘capture’ sample rate is the only one that seems to have the ‘native’ designation. The playback and capture should be the same.

checksr-04-checksr_input_output_sample_rate

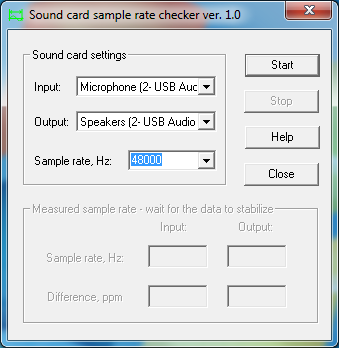
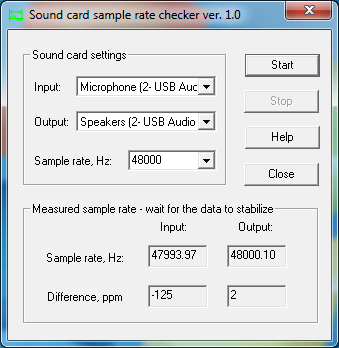
4) Going back to CheckSR, open the application (if it’s not already open, double click on the desktop icon now) and from the drop down boxes for sound card settings, Input and Output, choose the sound card you are using with FLDIGI. Next, select the sample rate from the drop down box in CheckSR for the sample rate that FLDIGI showed as “Native” then click start.

checksr-05-checksr_stop

5) Let the application run for about 15-20 minutes. You will notice that the numbers will progressively stabilize. After about 15-20 minutes, click stop then write down the resulting figures on input and output for the measurements in Hz and PPM. Keep this record.

checksr-06-fldigi_audio_devices_corrections

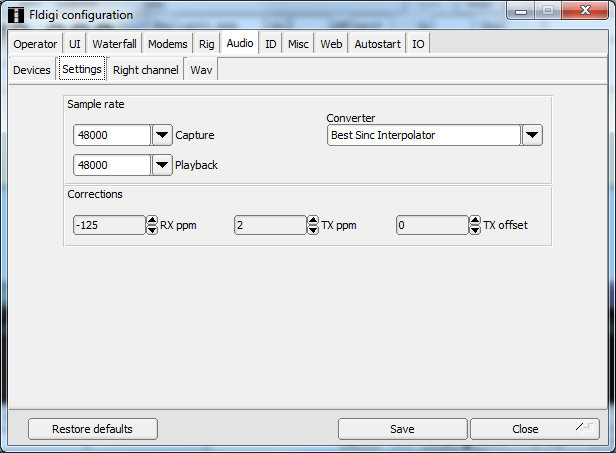
6) Open FLDIGI, go to configure, defaults, sound card and click on the audio settings tab. Enter the PPM figures for RX ppm (CheckSR ppm Input figure) and TX ppm (CheckSR ppm Output figure). If you had a figure that resulted in a minus from CheckSR, enter the PPM setting with the minus symbol followed directly by the figure with no space. Then click save config, then close.

Although this procedure does not seem to be necessary for MT63 2k long on FM, it is advisable that anyone using FLDIGI, regardless of modes used, should perform this procedure immediately following setup. Once these calibrations are applied to the software, no changes should ever have to be made again, unless you change your software to radio interface sound card.

Ohio Section Journal – The Technical Coordinator – October 2015 edition

One of the responsibilities of the Technical Coordinator in the Ohio Section is to submit something for the Section Journal. The Section Journal covers Amateur Radio related things happening in and around the ARRL Ohio Section. It is published by the Section Manager Scott – N8SY and articles are submitted by cabinet members.

Once my article is published in the Journal, I will also make it available on my site with a link to the published edition.

You can receive the Journal and other Ohio Section news by joining the mailing list Scott has setup. You do not need to be a member of the ARRL, Ohio Section, or even a ham to join the mailing list. Please sign up!

If you are an ARRL member and reside in the Ohio Section, update your mailing preferences to receive Ohio Section news in your inbox.  Those residing outside the section will need to use the mailing list link above.
Updating your ARRL profile will deliver news from the section where you reside (if the leadership chooses to use this method).
Go to www.arrl.org and logon.
Click Edit your Profile.
You will be taken to the Edit Your Profile page. On the first tab Edit Info, verify your Email address is correct.
Click the Edit Email Subscriptions tab.
Check the News and information from your Division Director and Section Manager box.
Click Save.

Now without further ado…


Read the full edition at: http://n8sy2.blogspot.com/2015/10/october-edition-of-ohio-section-journal.html

THE TECHNICAL COORDINATOR
Jeff Kopcak – TC
k8jtk@arrl.net

DSCF5081 K8JTKHey Gang,

Where to start?  Lot has gone on the last month.  First up was the Cleveland Hamfest on the 27th.  The weather was great for a change – which, I thought, brought more people.  Seemed to be more flea market and vendor spaces taken up which is always good.  I heard from HAC that it was a successful hamfest this year.  I got to say howdy to a few in the Ohio Section cabinet.  I know I’ll forget someone but thanks to everyone that said hi and congratulated me.  Helped out with some of the local clubs, organizations, and shot the breeze with them.  Spent a couple of bucks too, mostly on connectors and accessories I was looking for.  You can always use more connectors.  Had just as much fun at the after party.

You didn’t know there is an after party?  Oh, there is… just some of my closest buddies getting together afterwards for some lunch.

The following day, I gave my Raspberry Pi presentation for the Geauga Amateur Radio Club and had a blast!  If you’re on the east side of Cleveland, be sure to check them out.  Made for a long day with work but was totally worth it!  There are two versions of this presentation available for viewing on my website at http://K8JTK.org.

The Northern Ohio Amateur Radio Society (NOARS, Lorain Co.) has asked me to put on the Pi presentation for their group too.  I’m scheduled to be the presenter at the November 16 meeting.  If you haven’t seen this thing yet, don’t miss it!  More info: noars.net.

Welcome to Dave KD8TWG as the newest Technical Specialist!  I’ve known Dave since about the time he became licensed because he’s been very active.  In addition to being AEC for Geauga County, he is into embedded systems, computers, and networking.  He plays around with APRS a lot too.

Aside from all that goodness, QSL cards and certificates are coming in from the 13 Colonies and Katrina 10th Anniversary special event stations.  I just dropped off certificate requests and QSL cards for the Route 66 and Pope Francis special event stations.  Groups really put in a lot of work doing these special event stations and do a great job getting the certificates and reply QSL cards out quickly.  The certificates really make great wallpaper for your shack too!  I find special event stations by watching Ham Nation or spots on DX clusters.

The Hurricane Watch Net is celebrating 50 years of service.  It was started in Cleveland by Jerry Murphy – K8YUW as an informal net to provide communication to affected areas.  They activate on the HF bands anytime a hurricane is expected to make landfall.  They can be heard on 14.325 MHz and 7.268 MHz.  Remember to stay clear of these frequencies while the net is activated.  More info: http://hwn.org.

LEARA is in line for a Yaesu Fusion repeater under their promotional deal.  We are eagerly awaiting the arrival of the box and can’t wait to get it on the air.  The promotional deal is a great opportunity for your club to replace aging repeater equipment or experiment with digital modes.  I can’t tell you how excited members of the club are to get into System Fusion.  From the other clubs that have contacted me regarding Fusion, the excitement is contagious.  Give it a shot!  The repeater can be configured: full digital (digital in – digital out only), full analog (analog in – analog out only), or auto detect (eg: analog or digital in – analog out, digital in – digital out, analog in – analog out).

Yaesu has extended the promotion once again until the end of the year, so you or your club has some time to decide.  Details and application are available through yeasu.com -> select Products -> click Digital.  Click DR-1X (model of the repeater).  Click the Files tab -> click “DR-1X Installation Program Application form.”

Thanks for reading

73… de Jeff – K8JTK

Running Fldigi Flmsg and Flwrap on the Raspberry Pi 2

With the popularity of the Raspberry Pi and the growing need of NBEMS, I wondered if it was possible to run NBEMS programs on the Pi. This maybe of interest to those who want to make a Go Kit (box) with digital or a club wants to replace older computers in their operations center with more efficient devices.

Fldigi is the program used and developed for Narrow Band Emergency Messaging System, but it does so much more. It’s also the standard for many Ham Radio operators because of the number of modes the software will operate.

Fldigi stands for Fast Light Digital modem application created by W1HKJ (David Freese, Jr.) and associates. Flmsg is a forms manager with standardized forms like MARS, plaintext messages, Radiograms, Red Cross, and Weather report forms. Flwrap is a file encapsulation and compression tool allowing for reception of a file exactly like the original.

The Fldigi application is open source, public license software meaning it’s free and available for auditing. With the source code available for Linux, I wondered if it was possible to compile the application on the Raspberry Pi.

At first I had some problems with the project. After (wasting) alot of time on it, I had given up. Only to find out the power supply I had been using was the cause of the issues.

Requirements

Work with my SignaLink USB. As a standard with my projects, the Pi can administered through SSH and VNC if needed. On Windows, I use PuTTY and TightVNC.

Assumptions

This guide is step-by-step in nature, meant for beginners, with brief explanations of the steps. It will help to have an understanding of Linux commands and scripting. Capitalization is important in Linux!

Check my other posts for setup guides on using your radio interface (though written for Windows) and Fldigi, Flmsg, and Flwrap.

Program versions

Applications and versions used in this writeup:

  • Windows 7 64 bit
  • Raspbian Jessie 2015-09-24
  • Win32DiskImager 0.9.5
  • PuTTY 0.65
  • TightVNC 2.7.10 64 bit
  • Fldigi 3.23.04
  • Flmsg 2.0.12
  • Flwrap 1.3.4

Build times

I did a face off for build times between the later model Pi versions: B+, 2, and 3. Later iterations will be faster. The results are in the format of the Linux command time, which contrary to it’s name does not set the time. It gives statistics about this program run. They consist of the elapsed real time between invocation and termination, the user CPU time, and the system CPU time. Later versions than listed above were used in this face off: Raspbian Jessie 2016-05-27, Fldigi 3.23.10, Flmsg 3.0.0, Flwrap is the same at 1.3.4.

Raspberry Pi B+

Failed. Apparently there is an issue running the Make command for Fldigi with versions later than the ones I originally used in this writeup. By the error messages this is an internal g++ compiler error. Make does not fail on the Pi 2 and 3 which probably means it’s a hardware issue (out of memory).

The error is “Warning: partial line at end of file ignored” for dialogs/fldigi-confdialog.o.

Raspberry Pi 2

real 21m49.783s
user 72m9.970s
sys 2m39.290s

Raspberry Pi 3

real 12m50.129s
user 42m8.980s
sys 1m19.160s

Parts list

Listed below are all the parts needed to get this project working. It is noted when items can be left out or substituted.

That’s all the parts needed for this project. Check out the AdaFruit Raspberry Pi page for other hardware that might be useful, like the USB to PS/2 adapter for example. Many of these parts are included in the Raspberry Pi Starter Pack.

If the Pi is setup where there may not be Internet, want to consider purchasing a Real Time Clock (RTC) addon. The Pi will keep time after power has been removed. Of course the time would just have to be set each time.

Flmsg custom forms

In order for custom forms to be used in Flmsg, version 2.0.17 or later must be used. There was a bug in previous versions that didn’t allow the forms to be parsed correctly. In addition, another browser needs to be installed as the default is unable to connect to the webserver created by Flmsg. Thanks to Ken – W0KAH for determining this issue and getting it resolved with the program author.

Linux package installer

The version available from the package manager could be installed but that version is several revisions behind which won’t have the latest enhancements. Some repositories don’t have Flmsg and Flwrap which makes it hard for NBEMS operation.

sudo apt-get -y install fldigi

sudo apt-get -y install flmsg flwrap
If it doesn’t work, you’ll get a message like:

E: Unable to locate package flmsg

Ohio Section Journal – The Technical Coordinator – September 2015 edition

One of the responsibilities of the Technical Coordinator in the Ohio Section is to submit something for the Section Journal.  The Section Journal covers Amateur Radio related things happening in and around the ARRL Ohio Section.  It is published by the Section Manager Scott – N8SY and articles are submitted by cabinet members.

Once my article is published in the Journal, I will also make it available on my site with a link to the published edition.

You can receive the Journal and other Ohio Section news by joining the mailing list Scott has setup.  You do not need to be a member of the ARRL, Ohio Section, or even a ham to join the mailing list.  Please sign up!

If you are an ARRL member and reside in the Ohio Section, update your mailing preferences to receive Ohio Section news in your inbox.  Those residing outside the section will need to use the mailing list link above.
Updating your ARRL profile will deliver news from the section where you reside (if the leadership chooses to use this method).
Go to www.arrl.org and logon.
Click Edit your Profile.
You will be taken to the Edit Your Profile page. On the first tab Edit Info, verify your Email address is correct.
Click the Edit Email Subscriptions tab.
Check the News and information from your Division Director and Section Manager box.
Click Save.

Now without further ado…


Read the full edition at: http://n8sy2.blogspot.com/2015/09/september-edition-of-ohio-section.html

THE TECHNICAL COORDINATOR
Jeff Kopcak – TC
k8jtk@arrl.net

DSCF5081 K8JTKHey Gang.

Normally in this space you would find a well put together article written by Jim W8ERW. If you didn’t catch last month’s Ohio Section Journal, Jim is moving on to bigger and better things. That would be Texas. Jim is one of Fort Worth’s newest residents! The fine folks in the North Texas Section have a great guy coming their way. He’s probably enjoying the warm weather down there right now. Congratulations Jim! So ‘why are we seeing this other guy writing in Jim’s place’ you’re probably asking yourself? I don’t know either.

Seriously though, I have to give a lot of credit to my predecessor, Jim – W8ERW and to our Section Manager, Scott – N8SY. These guys are excellent at answering all my questions from my time as a Technical Specialist and transitioning me into the Technical Coordinator position. Thank you.

I look forward to serving the Ohio Section and seeing what you guys have in store. I’ve already received a number of questions on computers, digital modes, and D-STAR. Happy to answer them. My bio is posted on the Ohio Section website if you missed it.

raspberry-pi-intro-640x420Last month, I gave a presentation on the Raspberry Pi computer at the LEARA meeting in Cleveland. This presentation was an introductory look at the device. It included history, hardware specs, setting up the Pi, and ham radio projects. There was a larger than usual turnout for the meeting and even a few non-hams in attendance. The presentation is available on my website if you would like to take a look. I gave a shortened version at the QCWA Chapter 1 meeting in July. If you missed either meeting, fear not! I am scheduled to be at the GARA (Geauga Co.) club meeting on September 28th as they celebrate 38 years! See you there.
Couple events to note… the Cleveland Hamfest is coming up on September 27th. This is in my backyard so I will be in attendance and hope to meet all of you. You can join the Hamfest Association of Cleveland and help out next year via their website hac.org.

The TAPR Digital Communication Conference is coming up October 9th – 11th near Chicago. Want to go to one of these at some point because it looks like another excellent lineup of forums. Topics include: Digital Voice and Network systems, DATV, Arduino CAT controller for the HPSDR, an Amateur Radio Digital Open Protocol, remote operation of your radio, 3D modeling in Ham Radio, and introductory sessions on a number of topics. ARRL’s own Ward Silver – N0AX is the banquet speaker. Head over to www.tapr.org/dcc.html for the complete schedule and to register.

Thanks to everyone who wrote and congratulated me on my appointment. It really means a lot!
Thank you for reading..

73, K8JTK

New Technical Coordinator (TC) has been appointed for the Ohio Section

This announcement came on September 1, 2015 as I am the newly appointed Technical Coordinator for the Ohio Section of the ARRL.  This is quite the honor and I cannot thank enough my predecessor Jim W8ERW, the Ohio Section Manager Scott N8SY, and my family.

The original press release is available.  Below is a copy.

Tuesday, September 1, 2015
New Technical Coordinator (TC) has been appointed..
Hey Gang..

I have a big announcement to make.. The Ohio Section has a new Technical Coordinator!!!!

As you all know Jim, W8ERW stepped down several weeks ago so that he could go off and get married and become a Texan.. We wish Jim a hearty ya-hooo on his upcoming marriage and going off into the sunset with his new bride!

Anyway, I’ve been talking with a very bright and upcoming young fellow from the Cleveland area about taking over.. and sure enough, he’s agreed.. Yes, I did have several other candidates for the job, but they really couldn’t hold a candle to this fellow..

Let me introduce you to Jeffrey (Jeff) Kopcak, K8JTK..

So, without further Aude, let me share with you his BIO..

DSCF5081 K8JTKMy name is Jeffrey Kopcak and my call is K8JTK. I was born, raised, and live in Westlake, Ohio, a western suburb of Cleveland. I got interested in amateur radio at a young age through my father, Tom N8ETP, after tagging along to public service events, meetings, and listening on his HT. I became licensed right before my sophomore year of high school in 1999 and currently hold an Amateur Extra license. My interests are using computers in Ham Radio and digital modes.

I am a member of: The Lake Erie Amateur Radio Association (LEARA); Life Member of the Wood County Amateur Radio Club (WCARC) and American Radio Relay League (ARRL); and member of the Dayton Amateur Radio Association (DARA). In addition to these clubs, I’m a Volunteer Examiner (VE), Skywarn spotter, and net control for the Ham Nation D-STAR After Show Net.

Computers have been an interest of mine from a very young age and I work as an Analyst/Programmer. I brought my knowledge of computers into television production at WHBS in high school and WBGU in college. During my television career I got to work for Fox Sports Ohio and work on four programs that received Emmy nominations. One of those won an Emmy award.

I graduated from Cleveland State University with an undergraduate business degree in Information Systems & Technology and a Masters of Business Administration.

My free time is spent learning technologies and watching technology related podcasts. On the air I operate mostly digital modes and special event stations on HF. I hope to work you on the air!

Contact:
Web: K8JTK.org
Email: K8JTK@arrl.net

Let’s all congratulate Jeff in his new endeavor.. Even though Jeff didn’t mention it in his Bio, he is/was a Technical Specialist in Ohio already. So, as you can see, he has all the qualifications needed and I’m sure he’ll be great as our new Technical Coordinator..

Posted by n8sy at 6:57 AM

Getting Started with MMSSTV

Table of Contents

Introduction – page 1

Download and installation – page 2

Configuration – page 3

RX – page 4
-Logging

History – page 5
-Saving images

TX – page 6
-Modes
-Loading images
-Picture clipper
-Transmitting an image from s.pix
-Transmit loaded image

Template editing- page 7

Introduction

This document will demonstrate installation, setup, and basic use of MMSSTV. MMSSTV stands for Makoto Mori (JE3HHT, creator) Slow Scan TV. It has been the defacto standard SSTV application for many years.

This is written with the beginner in mind and many concepts outlined step-by-step. It will provide direction for further experimentation on your own or on the net and direction for troubleshooting.  For SignaLink and audio setup, visit the Radio Interface Setup post.

Prepared for The Lake Erie Amateur Radio Association’s Digital Net (http://www.leara.org/).

Program versions

Program versions used in this document.

Windows 7 – 64 bit
MMSSTV 1.13A – only available on the Windows platform.

Resources

http://en.wikipedia.org/wiki/Slow-scan_television – Wikipedia, history and current systems.

http://hamsoft.ca/pages/mmsstv.php – MMSSTV homepage, sample audio files (to route through the Windows audio system), and help files.

http://www.wb9kmw.com/WB9KMW/sstv_files/tutorial/SSTV_tutorial.pdf – SSTV for beginners. WB9KMW answered some questions with MMSSTV. I’ll plug his introduction. His website has a collection of HF SSTV receivers that can be used to check reception and propagation.

Calibration

Sound card calibration is important in SSTV.  See the “Sound card clock calibration” section in the “Radio Interface Setup – For getting started with Ham Radio Sound Card digital modes” document.  MMSSTV methods: http://www.wb9kmw.com/WB9KMW/sstv_files/tutorial/That_Pesky_Slant.pdf. I prefer this method: http://www.wb9kmw.com/WB9KMW/sstv_files/tutorial/That_Pesky_Slant_WWV_Alternative.pdf.

Getting Started with Fldigi – Including Flmsg and Flwrap

Updated: 03/26/2017

Table of Contents

Introduction – page 1

Download and installation – page 2
-All 3 programs

Configuration – page 3
-Fldigi
-Flmsg

Receiving
-Fldigi – page 4
-Flmsg – page 5
-Flwrap – page 6

Transmitting
-Fldigi – page 7
-Flmsg – page 8
-Flwrap – page 9

Introduction

This document will show installation, setup, and basic use of Fldigi, Flmsg, and Flwrap. Fldigi stands for Fast Light Digital modem application created by W1HKJ (David Freese, Jr.) and associates. Flmsg is a forms manager with standardized forms like MARS, plaintext messages, Radiograms, Red Cross, and Weather report forms. Flwrap is a file encapsulation and compression tool allowing for reception of a file exactly like the original.

The Fldigi suite has many applications and can operate many, many different modes. For the list of modes, click the “Op Mode” menu in Fldigi. A quick description of the Fldigi suite from W1HKJ:

Fldigi – Digital modem program.
Flarq – AutomaticReQuest file transfer program (works with Fldigi).
Flamp – Amateur Multicast Protocol file transfer program.
Flwrap – File encapsulation for error free transfers over amateur radio.
Flmsg – Formatted message manager – 25 forms including Radiogram.
Flrig – Transceiver control program.
Flwkey – Winkeyer control program.
Fllog – Logbook program – works with Fldigi, Flwkey etal.
Flnet – Net management and database program.

The Digital Net typically operates Fldigi using NBEMS standard methods for VHF and UHF communication. NBEMS stands for Narrow Band Emergency Messaging System (or Software) (http://www.arrl.org/nbems). NBEMS VHF/UHF operating mode is MT63-2KL and Olivia 8/500 or 16/500 for HF operation. HF digital operation is considerably different than VHF/UHF FM digital. HF station operating tips are not covered however application usage is similar.

Flwrap is no longer considered part of NBEMS but is a useful program to send small files.  If only operating NBEMS, Flwrap can be omitted and ignored.

This is written with the beginner in mind and many concepts outlined step-by-step. It will provide direction for further experimentation on your own or on the net and direction for troubleshooting.  For SignaLink and audio setup, visit the Radio Interface Setup post.

Prepared for The Lake Erie Amateur Radio Association’s Digital Net (http://www.leara.org/).

Program versions

Program versions used in this document.

Windows 7 – 64 bit

Fldigi 3.23.21

Flmsg 4.0.1

Flwrap 1.3.4

Resources

http://www.w1hkj.com/beginners.html – Beginners guide to Fldigi.

http://www.w1hkj.com/FldigiHelp/index.html – Fldigi help.

http://www.w1hkj.com/flmsg-help/index.html – Flmsg help.

http://www.w1hkj.com/Flwrap/index.html – Flwrap help.

Calibration

Sound card calibration for some modes Fldigi supports is important; it is recommended regardless of mode. See the “Sound card clock calibration” section in the “Radio Interface Setup – For getting started with Ham Radio Sound Card digital modes” document. Fldigi method: http://www.k8jtk.org/2015/10/19/nbemsfldigi-sound-card-calibration/.

Radio Interface Setup – For getting started with Ham Radio Sound Card digital modes

Table of Contents

Introduction – page 1

Configuration
-Playback settings – page 2
-Recording settings – page 3

Testing and troubleshooting – page 4
-Transmit
-Receive

Recording with Audacity – page 5
-Recording settings
-Record all received and transmitted audio
-Timer recording
-Saving
-Playback

Sound card clock calibration – page 6

Introduction

This document will demonstrate basic setup of a radio interface device in the Windows Sound Control Panel to use with Ham Radio Sound Card digital modes. Programs include: Ham Radio Deluxe DM780, MMSSTV, Fldigi, wsjtx, FreeDV, Easypal. In addition, it will demonstrate how to record digital transmissions and play them back.

This is written with the beginner in mind and many concepts outlined step-by-step. It will provide direction for further experimentation on your own or on the net and direction for troubleshooting.

The SignaLink USB was used but these instructions can be adopted for similar devices. Those using other methods may find the settings and techniques useful.

SignaLink and many other external interfaces have external volume controls. Set these controls at half to start. Adjust these controls first as they are the easiest to adjust and fine tune while operating. If a situation occurs where you have too much/little audio with the volume controls set low/high, then adjust the Windows audio levels second.

It is important to point out:

  • Plugging the same device into a different USB port will be recognized as a new device by the system. This means the audio settings will need to be re-configured. In addition, the audio device settings in the digital mode program may need to be re-configured as well.
  • The process of setting audio levels is not exact.  Each system is different, drivers are programmed differently, hardware interacts differently with the operating system. It will take some time to fine tune audio levels.

Prepared for The Lake Erie Amateur Radio Association’s Digital Net (http://www.leara.org/).

Program versions

Windows 7 – 64 bit
Audacity 2.0.6

Resources

Still having trouble after using this tutorial? Read through the product manual and support documentation. Below are links for popular devices.

Specific instructions can be found online typically by searching: [name of application] [radio interface device]. Example: Fldigi SignaLink USB.

SignaLink

Homepage: http://www.tigertronics.com/

General support, operating tips, manuals, and modifications (all models): http://www.tigertronics.com/sl_suprt.htm

SL USB troubleshooting: http://www.tigertronics.com/slusbts.htm

Rigblaster

Homepage: http://www.westmountainradio.com/

Knowledge base: http://www.westmountainradio.com/knowledge_base.php

Drivers and manuals: http://www.westmountainradio.com/content.php?page=wmr-downloads

SSTV Transmissions from the International Space Station – April 2015 edition

The ARISS team planed to activate SSTV from the ISS again on April 11.  Check the ISS tag for my other ISS SSTV posts.

Station setup: MP Antennas Classic Mobile NMO Antenna – This is a local company in Cleveland and were reviewed in QST. Been using their antennas for a long time with great success. Since the antenna is multi-polarized (the MP in the company name), it is supposed to be a good substitution for receiving satellite transmissions without a directional antenna and not worrying about Doppler Shift (which needs to be accounted for in some cases). The height is about 15 feet.

The antenna was connected to my ICOM IC-7000 with DSP settings turned off on 145.800 MHz FM. Used this radio only because my SignaLink USB is connected to it and the one I use for digital operation on all bands. MMSSTV is the Slow-Scan TV program I use.

I have tutorials available to help get your station setup and getting started with MMSSTV to receive images from the ISS.

Many of the passes weren’t great or even over the U.S.  I received 7 images total from my location near Cleveland (EN91bl).

SSTV-Transmissions-from-the-International-Space-Station-2015-04-11-2334
2015-04-11 2334 UTC
SSTV-Transmissions-from-the-International-Space-Station-2015-04-12-0114
2015-04-12 0114 UTC
SSTV-Transmissions-from-the-International-Space-Station-2015-04-12-0247
2015-04-12 0247 UTC
SSTV-Transmissions-from-the-International-Space-Station-2015-04-12-0253
2015-04-12 0253 UTC
SSTV-Transmissions-from-the-International-Space-Station-2015-04-12-0428
2015-04-12 0428 UTC
SSTV-Transmissions-from-the-International-Space-Station-2015-04-12-0601
2015-04-12 0601 UTC
SSTV-Transmissions-from-the-International-Space-Station-2015-04-12-2105
2015-04-12 2105 UTC


SSTV Transmissions from the International Space Station – February 2015 edition 2

The ARISS team planed to activate SSTV from the ISS again, February 21 through February 23.  However, spacewalks delayed transmissions until February 22 and February 23, 2015.  Check the ISS tag for my other ISS SSTV posts.

Station setup: MP Antennas Classic Mobile NMO Antenna – This is a local company in Cleveland and were reviewed in QST. Been using their antennas for a long time with great success. Since the antenna is multi-polarized (the MP in the company name), it is supposed to be a good substitution for receiving satellite transmissions without a directional antenna and not worrying about Doppler Shift (which needs to be accounted for in some cases). The height is about 15 feet.

The antenna was connected to my ICOM IC-7000 with DSP settings turned off on 145.800 MHz FM. Used this radio only because my SignaLink USB is connected to it and the one I use for digital operation on all bands. MMSSTV is the Slow-Scan TV program I use.

I have tutorials available to help get your station setup and getting started with MMSSTV to receive images from the ISS.

I received 15 images total from my location near Cleveland (EN91bl).

SSTV-Transmissions-from-the-International-Space-Station-2015-02-22-1719
2015-02-22 1719 UTC
SSTV-Transmissions-from-the-International-Space-Station-2015-02-22-1853
2015-02-22 1853 UTC
SSTV-Transmissions-from-the-International-Space-Station-2015-02-22-1858
2015-02-22 1858 UTC
SSTV-Transmissions-from-the-International-Space-Station-2015-02-22-2032
2015-02-22 2032 UTC
SSTV-Transmissions-from-the-International-Space-Station-2015-02-22-2210
2015-02-22 2210 UTC
SSTV-Transmissions-from-the-International-Space-Station-2015-02-23-1626
2015-02-23 1626 UTC
SSTV-Transmissions-from-the-International-Space-Station-2015-02-23-1805
2015-02-23 1805 UTC
SSTV-Transmissions-from-the-International-Space-Station-2015-02-23-1941
2015-02-23 1941 UTC
SSTV-Transmissions-from-the-International-Space-Station-2015-02-23-2116
2015-02-23 2116 UTC
SSTV-Transmissions-from-the-International-Space-Station-2015-02-23-2257
2015-02-23 2257 UTC
SSTV-Transmissions-from-the-International-Space-Station-2015-02-24-0031
2015-02-24 0031 UTC
SSTV-Transmissions-from-the-International-Space-Station-2015-02-24-1534
2015-02-24 1534 UTC
SSTV-Transmissions-from-the-International-Space-Station-2015-02-24-1707
2015-02-24 1707 UTC
SSTV-Transmissions-from-the-International-Space-Station-2015-02-24-1848
2015-02-24 1848 UTC
SSTV-Transmissions-from-the-International-Space-Station-2015-02-24-2025
2015-02-24 2025 UTC