Tag Archives: Fldigi

Ohio Section Journal – The Technical Coordinator – September 2022 edition

One of the responsibilities of the Technical Coordinator in the Ohio Section is to submit something for the Section Journal. The Section Journal covers Amateur Radio related things happening in and around the ARRL Ohio Section. It is published by the Section Manager Tom – WB8LCD and articles are submitted by cabinet members.

Once my article is published in the Journal, I will also make it available on my site with a link to the published edition.

You can receive the Journal and other Ohio Section news by joining the mailing list Tom has setup. You do not need to be a member of the ARRL, Ohio Section, or even a ham to join the mailing list. Please sign up!

If you are an ARRL member and reside in the Ohio Section, update your mailing preferences to receive Ohio Section news in your inbox. Those residing outside the Ohio section will need to use the mailing list link above.  Updating your ARRL profile will deliver news from the section where you reside (if the leadership chooses to use this method).

  • Go to www.arrl.org and click the Login button.
  • Login
  • When logged in successfully, it will say “Hello <Name>” in place of the Login button where <Name> is your name.  Click your Name.  This will take you to the “My Account” page.
  • On the left hand side, under the “Communication” heading (second from the bottom), click Opt In/Out
  • To the right of the “Opt In/Out” heading, click Edit
  • Check the box next to “Division and Section News.”  If it is already checked, you are already receiving the Ohio Section Journal.
  • Click Save
  • There should now be a green check mark next to “Division and Section News.”  You’re all set!

Now without further ado…


Read the full edition at:

THE TECHNICAL COORDINATOR
Jeff Kopcak – TC
k8jtk@arrl.net

Hey gang,

I was cleaning out my E-mail inbox, apparently no one else does this, and came across a request from a couple years ago. Mike – AB8MW contacted me wanting to know if it was possible to run multiple copies of Fldigi at one time. The scenario would be one copy for HF and one for VHF/UHF. For example: an EmComm event where they might want to monitor HF frequencies in addition to local VHF/UHF using a single PC.

Starting multiple copies of Fldigi & Flmsg will open multiple windows. Regardless of how many windows can be opened, all use the same user configuration directory to store settings. Mike wanted Fldigi to retain settings for each use. Settings such as soundcard inputs/outputs and rig control (if used). One radio might be using a SignaLink/RIGblaster/other soundcard interface and have no rig control. Another radio maybe using virtual audio cables (typical for SDR radios) and Hamlib for rig control. When multiple Fldigi & Flmsg windows use the same settings directory, last window closed wins. When the program is restarted, those settings are loaded. Additional Fldigi & Flmsg windows have to be configured all over again. Not convenient, especially with many uses on a single PC, in a pinch, or during a real operating event.

Why would someone want to run multiple copies (or instances) of Fldigi programs? Some operators use HF and VHF/UHF differently, including sound interfaces and rig controls. Instead of switching around configurations depending on band, have two instances configured, one for each radio. Other reasons could be a single all-band all-mode radio is used but have very different operating styles, personalities, or users – like in a club setting. Operating styles could be EmComm and contesting, or using different macros. Monitoring multiple repeaters or multiple HF frequencies during an EmComm exercise would be desired or any combination of these examples. Creating separate instances will allow each to have its own configuration settings.

Keeping separate settings is very doable, but it takes some work. There are additional issues when adding Flmsg (or other Fldigi programs) to the mix as one would use for NBEMS. Flmsg & Fldigi use a local IP port (often referred to as a “socket”) to facilitate communications between programs. The default IP and port for Flmsg to Fldigi is 127.0.0.1:7362. 127.0.0.1, also referred to as loopback or localhost, is a reserved IP address. This IP address is used by programs to communicate with other programs and services running on the same system. In Flmsg, when the operator hits AutoSend, it’s a crapshoot which Fldigi window will transmit the message when multiple windows are open. A message intended for VHF could go out over the HF radio. Not good, as that causes unnecessary confusion to other stations. Each pairing of Fldigi & Flmsg needs a unique set of IP ports.

According to the author of the Fldigi suite, Dave – W1HKJ, port/socket parameters for Fldigi, Flarq, Flmsg and Flamp are specified on the command line. Other TCP ports are configured in the Fldigi Configuration options under Misc -> TCP-IP sessions. There is some overlap between command line options and graphical interface options including KISS, ARQ, and XML settings.

When AB8MW originally contacted me, we worked out the configuration details over E-mail and he was going to get it working. I, of course, said ‘I am going to write this up’ and never did. That is until I came across those messages and finally sat down to document a procedure. My procedure outlines changes needed to run multiple instances in a NBEMS operational situation for both Fldigi and Flmsg. This might be useful for those participating in the upcoming October SET. This will also work for Fldigi instances without the use of Flmsg. The posting is on my site: Running multiple instances of Fldigi and Flmsg.

My write up labels one instance for “HF,” a second instance for “VHF/UHF.” There is no limit on how many instances can be created. I’ve heard stations using as many as six. The problem becomes manageability. When a setting is to be changed universally, it has to be done independently for each separate instance. When a new version is installed, shortcuts must be updated manually.

Multiple copies of Fldigi & Flmsg transmitting messages independently

My process creates separate directories for both Fldigi and Flmsg to save their settings. Copying of existing configuration settings is accomplished, if desired. Then creating and customizing shortcuts to use specific configuration directories. Finally, making unique configuration changes for each instance.

Running multiple instances of Fldigi programs is completely doable. It takes a little effort to configure the directories, IP ports, and settings. Once configured, clicking AutoSend in Flmsg will send that message to the paired Fldigi instance. I even show how to send messages received on HF to the VHF instance and vice-versa. No more guessing if it will go out over the correct radio!

If you were an early adopter of Hamshack Hotline and no longer have a green light for the HH extension, you probably need to make a configuration change. Another symptom, when the phone is rebooted, the phone gets stuck on “Checking DNS” and never moves past that screen.

Back when HH first started, the domain name wizworks.net was set by HH in the configuration file loaded onto everyone’s phones. The US server was hhus.wizworks.net. Since then, they transitioned to using the domain hamshackhotline.com, where the US server was changed to: hhus.hamshackhotline.com. The hhus.wizworks.net DNS record has been removed and is now invalid (NXDOMAIN). If a HH configured phone or device has stopped working around the end of August, check the registration domain.

  • In a web browser, go to:
    http://<IP Address of phone>/admin/advanced/
  • Click the “Ext 1” tab – or whichever extension Hamshack Hotline is configured
  • Under “Proxy and Registration” look for: (1) Proxy & (2) Outbound Proxy
  • If they show: hhus.wizworks.net, change both to:
    hhus.hamshackhotline.com
  • Click Submit All Changes
Cisco SPA phone configuration changes for Hamshack Hotline

The phone will reboot and be back online again after about 60 seconds. Verify the Hamshack Hotline extension is now green. Green means the phone was able to register successfully with the Hamshack Hotline server. If that doesn’t work, having trouble, or not sure, open a ticket with the Hamshack Hotline Help Desk.

I discovered this issue after powering down the shack due to storms. When I powered the phone back on, it stayed on the “Checking DNS” screen. I figured something fried during power off or the power supply was dying. There was no change after changing network cables and power sources.

I found the phone was getting an IP address by looking at my router/firewall and seeing an IP address handed out by DHCP. This meant it was accessing the network and I could do a packet capture. Packet captures capture network data for analysis and troubleshooting. These shed light on network problems such as DNS issues, firewall blocked traffic, packet size/MTU, retransmissions, etc. A capture won’t show problems with the application itself because it just looks like regular traffic/packets on the wire. Captures are often run on routers or firewalls as they are passing the traffic to and from the Internet or other networks. A switch with ‘port mirroring’ can send copies of data to a separate Ethernet port. A device connected to the mirror port, such as a PC with Wireshark, captures the traffic.

For my phone not finishing its boot, I identified the issue immediately in the capture. The phone was requesting the record for hhus.wizworks.net. The DNS server responded with “no such name.” That means the DNS record for hhus.wizworks.net, which ties the name to an IP address, does not exist. It was removed, as my phone worked previously.

Packet capture: first line is the DNS query for hhus.wizworks.net. Second line is the response “no such name”

Since my phone had an IP address, I could access its web-based configuration making the changes above. I probably could have guessed the new domain name. However, I was even luckier. I setup Hamshack Hotline on my softphone a couple of months earlier and their documentation had the new server name. Simply changing domains from “wizworks.net” to “hamshackhotline.com” was the only change I made.

A while back they told everyone to re-provision their devices. I thought I did. Thinking later, I probably didn’t because I configured additional extensions on my phone. Either way, making that change resolved my issue and my phone is operational once again.

Thanks for reading and 73… de Jeff – K8JTK

Running multiple instances of Fldigi and Flmsg

There are situations where it would be easier for an operator to run multiple instances (copies) of Fldigi and Flmsg at one time.  These programs are often used for NBEMS handling over a repeater and the HF bands.

Why would anyone want to run multiple copies (or instances) of Fldigi programs? Some operators use HF and VHF/UHF differently including sound interfaces and rig controls. Instead of switching them around depending on which bands, have two instances configured differently for each radio. Other reasons could be using a single-all band-all mode radio but have different operating styles or personalities. Those could be Emcomm and contesting, or different macros and settings for each operating style. Monitoring multiple repeaters or HF frequencies during an Emcomm exercise. Or any combination of these examples. Creating separate instances will allow each to have separate settings, macros, and log books.

Fldigi and Flmsg with the default configurations are not setup to run multiple instances on a single computer.  While the programs can be started multiple times, all instances share the same configuration directory.  Setting different configuration directories allows one computer to run multiple instances all with different settings (rig control, audio devices, even Fldigi software versions).  All instances can transmit and receive independently of each other on any combination of radios, bands, frequencies that can be connected to a single PC.

I’m demonstrating using the popular combination of NBEMS programs: Fldigi and Flmsg. It appears possible to run multiple instances of the other Fldigi suite of applications, such as flrig, fllog, flamp. Configuration changes for each program and communication between the programs would be needed.  Additional programs are beyond the scope of this write up. Look at the program documentation for command line parameters, running multiple copies, I/O configuration page, and posts on groups.io support forums.

I will use the distinction of “HF” for an example instance connected to an HF radio, and “VHF” for an example instance connected to a VHF/UHF radio.  There can be any number of instances created for however many radios or bands or operating styles are desired.  The issue is manageability of settings, received files, and program updates.

This will work in Windows and Linux/Raspberry Pi.  Substitute C:\Users\<Username> (Windows) with  /home/<Username> (Linux) where <Username> is the logon for the user.

Program versions

Program versions used in this document.

Windows 7 – 64 bit

Fldigi 4.1.23

Flmsg 4.0.20

It appears Fldigi 4.0.18 and Flmsg 4.0.9 and greater support the command line options needed to run multiple instances.

Ohio Section Journal – The Technical Coordinator – February 2019 edition

One of the responsibilities of the Technical Coordinator in the Ohio Section is to submit something for the Section Journal. The Section Journal covers Amateur Radio related things happening in and around the ARRL Ohio Section. It is published by the Section Manager Scott – N8SY and articles are submitted by cabinet members.

Once my article is published in the Journal, I will also make it available on my site with a link to the published edition.

You can receive the Journal and other Ohio Section news by joining the mailing list Scott has setup. You do not need to be a member of the ARRL, Ohio Section, or even a ham to join the mailing list. Please sign up!

If you are an ARRL member and reside in the Ohio Section, update your mailing preferences to receive Ohio Section news in your inbox. Those residing outside the section will need to use the mailing list link above.
Updating your ARRL profile will deliver news from the section where you reside (if the leadership chooses to use this method).
Go to www.arrl.org and logon.
Click Edit your Profile.
You will be taken to the Edit Your Profile page. On the first tab Edit Info, verify your Email address is correct.
Click the Edit Email Subscriptions tab.
Check the News and information from your Division Director and Section Manager box.
Click Save.

Now without further ado…


Read the full edition at:

THE TECHNICAL COORDINATOR
Jeff Kopcak – TC
k8jtk@arrl.net

DSCF5081 K8JTKHey gang,

A couple months ago, I received a question regarding digital mode transmissions. This ham was using Fldigi and wondered about “strange” transmissions at the start of a BPSK-63 transmission. BPSK-31 looked OK.

Strange tones (circled in orange) on the Fldigi waterfall

These tones are known as RSID, Reed Solomon IDentifier, designed by Patrick Lindecker, F6CTE. RSID tones are codes used to automatically identify digital signals and often precede a digital transmission. These are a burst of tones lasting 1.4 seconds with a bandwidth of 172 Hz. They are robust being decoded down to -16 dB, which is better than most digital modes. According to the W1HKJ documentation for Fldigi, programs that support RSID are:

  • PocketDigi, Vojtech, OK1IAK
  • FDMDV, Cesco, HB9TLK
  • DM780, Simon, HB9DRV – part of Ham Radio Deluxe
  • fldigi, Dave, W1HKJ
  • Multipsk, Patrick, F6CTE

The documentation link has a table of all RSID codes. Not all variations of baud, tones, and bandwidth are assigned a code because RSID is limited to a total of 272 unique codes. The programs listed support RSID, not necessarily all modes assigned an RSID code. Typically, that means the program will not react to codes for which it does not support.

RX RSID enabled

To detect RSID alongside the desired operating mode, digital programs will run a separate detector listening for these tones while the main detector focuses on decoding the selected mode. To receive RSID tones in Fldigi, the option on the main screen in the upper-right “RxID” needs to be green (enabled).

RSID announcement

The default behavior of Fldigi, I think, is a little weird. When an RSID is received, an announcement will be displayed in the receive pane (tan box). The blue clickable text takes you back to the previous frequency at the time the RSID was received. It does not move you to the frequency of the received RSID. An example, RSID was received at 1300 Hz on the waterfall. The cursor is currently on 1500. The clickable link in the receive pane will return the cursor back to 1500. Fldigi will search for RSID in the vicinity of the cursor (about +/- 200 Hz), not across the entire waterfall.

Useful configuration options are available in the Configure menu -> Other -> IDs. The “Searches passband” option will listen across the entire waterfall. “Notify only” will display a popup box when an RSID is received. You’ll have the option to click “go to” that frequency.

TX RSID enabled

Consequently, on the transmit side, “TxID” needs to be enabled for Fldigi to transmit RSID tones. Fldigi offers an option other programs don’t, transmit RSID at the end of the transmission. I don’t see much use for this as your signal is gone but someone might want to be ready for the next station in the exchange or break-in.

Why wouldn’t a station see RSID tones for a (B)PSK-31 signal? Two reasons: PSK-31 is a common mode that most hams, who have operated digital on the air for any period of time, would encounter. No need to keep identifying commonly used digital signals. According to Fldigi, CW, RTTY, and BPSK-31 are the only supported ones that fall into this category. The second reason is bandwidth. Transmitting an RSID of 172 Hz will clobber more than a couple nearby PSK-31 transmissions.

Transmission mode list

On the same configuration page, click “Transmission modes.” This list indicates which modes have RSID enabled. Clearing the checkbox will not transmit RSID for that mode. For example, operating a lot of BPSK-63 and the RSID annoys you, but not for MT63-2000, uncheck BPSK-63 in the list.

Transmitting RSID helps ensure receiving stations are tuned and decoded for modes like MFSK. Modes like JT65 have RSID tones but they’re not used during normal operation and could throw off the timing of the exchange. JT65 is also operates in designated windows of the digital sub-bands. It’s probably meant more for identifying EME transmissions using JT65.

RSID notification

The ‘strange’ transmissions are not strange at all but rather letting others know which modes are being operated.

WWV update

There was a lot of FUD (that’s fear, uncertainty, and doubt) around the future of WWV back in September of last year. You can check my article in the September edition of the OSJ or on my website. While not yet signed, the fiscal year budget for 2019 does include funding all WWV stations. As it turns out, this year is the 100th year of operation. A member of the Northern Colorado Amateur Radio Club has met with NIST management and is planning a special event station between September 28 – October 2. I’ll be anticipating that event and hope to work WWV.

Thanks for reading and 73… de Jeff – K8JTK

Ohio Section Journal – The Technical Coordinator – November 2018 edition

One of the responsibilities of the Technical Coordinator in the Ohio Section is to submit something for the Section Journal. The Section Journal covers Amateur Radio related things happening in and around the ARRL Ohio Section. It is published by the Section Manager Scott – N8SY and articles are submitted by cabinet members.

Once my article is published in the Journal, I will also make it available on my site with a link to the published edition.

You can receive the Journal and other Ohio Section news by joining the mailing list Scott has setup. You do not need to be a member of the ARRL, Ohio Section, or even a ham to join the mailing list. Please sign up!

If you are an ARRL member and reside in the Ohio Section, update your mailing preferences to receive Ohio Section news in your inbox. Those residing outside the section will need to use the mailing list link above.
Updating your ARRL profile will deliver news from the section where you reside (if the leadership chooses to use this method).
Go to www.arrl.org and logon.
Click Edit your Profile.
You will be taken to the Edit Your Profile page. On the first tab Edit Info, verify your Email address is correct.
Click the Edit Email Subscriptions tab.
Check the News and information from your Division Director and Section Manager box.
Click Save.

Now without further ado…


Read the full edition at: http://arrl-ohio.org/news/2018/OSJ-Nov-18.pdf

THE TECHNICAL COORDINATOR
Jeff Kopcak – TC
k8jtk@arrl.net

DSCF5081 K8JTKHey gang,

A couple years ago, Medina county asked me to create a training session for them on how to use Fldigi specifically for NBEMS. Recently, Lorain county ARES encouraged participants to utilize NBEMS methods. NBEMS stands for Narrow Band Emergency Messaging System. It is a set of standards for the ham radio community to communicate with each other using text and E-mail type traffic. Standards are good to have so there is not a situation where different groups use different digital standards and cannot communicate between themselves.

Two hams are responsible for the NBEMS standards: Dave – W1HKJ, author and maintainer of the Fldigi suite of applications, and Skip – KH6TY, author of one of the first PSK applications, Digipan. Their idea was to have a prolific digital communication standard that followed these important principals:

  • Utilize radios, software, and hardware that are used in every day ham radio (familiarity)
  • Inexpensive. All can participate. Older computers can be used.
  • Simple. No steep learning curve in an emergency situation but flexible.
  • Independent of infrastructure

To make digital interaction possible: a radio, computer, interface between the two, and software to tie it all together is needed. An interface is typically a device like the SignaLink or RigBlaster. One nice thing about NBEMS, it’s possible to operate MT63-2KL by holing your radio up to the computer. This means a separate interface is not required. It’s great in a pinch but doesn’t provide an ideal operating situation.

Fldigi is a modem application. It modulates and demodulates – what sounds like noise – into data. Flmsg, used in conjunction, is a forms manager. It allows you to create and reply to standardized forms and verify reception through a checksum. A checksum is an algorithm used to detect errors in storage or transmission. Standard forms included are ICS, IARU, Radiogram, or the ability to send CSV data. CSV is a plain-text file that stores tabular data with each line being a single record contains one or more fields separated by commas. In NBEMS, CSV is a low-bandwidth way to transfer Excel documents without formatting and extra Meta data. As an example: a Excel document can be 17 kB in size but the same data exported to plain-text CSV is only 5 kB.

Tim – NC8OS, EC for Lorain, asked if I would give an Fldigi training session, which I was more than happy to do. A few years passed since I gave similar training in Medina. A number of changes have happened and it was time to update my presentation. Changes include much more frequent (and not always stable) Fldigi and Flmsg updates, changes in work flows – especially within Flmsg, and I have gained more experience interacting and interfacing with digital nets across the country.

Fldigi had some cosmetic changes, mostly around the menus and configurations. Workflow changes in Flmsg seem like they could be beneficial but were poorly implemented. Luckily, we can go back to familiar behavior. Most important lesson I’ve picked up: all these whiz-bang things are tools. This or any other technology needs to be played with to figure out how it can be best utilized (offering a real advantage), how it can be utilized efficiently, and have people who know how to use these tools. Groups are finding digital operators are ones who have the least amount of problems and greater success during drills than someone who hasn’t opened the application in 6 months. This, too, means someone who wants to become successful needs to practice, practice, and practice by operating, participating in practice nets or starting one if one is not available.

For my presentations and training, I feel people get much more out of a hands-on session. I encouraged participants to bring their stations or go-boxes which helped facilitate a great question and answer session to address a good number of problems. Eric – N8AUC, DEC for District 10, was on hand to answer questions as well. We accomplished a lot, answered a lot of questions, and got them on the right track.

I learned that I need to be figuring out interactions with this combination of hardware, software, and Windows 10. As more people are upgrading, replacing computers, or purchasing new devices this means more questions and issues will center on the most widely used operating system platform. Though I have stopped using Win 10 in favor of Linux, I do need to spend time with it to better answer those types of questions.

Thank you to Lorain ARES for allowing me the opportunity to pass on knowledge about digital and NBEMS. My presentation is available online on my website. Contact me about setting up a training session with myself or a Technical Specialist if you would like to host a session on NBEMS.

Speaking of Technical Specialists, another meeting night idea for your club is to hold a “Test and Tune Night.” Dave – KD8TWG hosted one of these events for LEARA. It usually ends up being a “Test and Test Night” because the operating manual does not have the information on how to make adjustments. Those are found in a Service Manual. Professional test equipment was on hand including Service Monitors, wattmeters, and analyzers to test radios, scanners, and coax. Dave could tell you if that $30 Baofeng is compliant with spectral requirements. VERY good chance it won’t be.

Dave reminded all of us that Part 97 certifies us as operators to be compliant with the rules. This allows us to build our own radios and not have to do something crazy like file a testing and compliance report with the FCC for a home brew project. Just because the radio ‘sounds good,’ ‘does everything I need,’ or ‘was cheap’ doesn’t mean it works correctly especially when transmitting. It is up to each of us as hams to make sure our equipment is compliant. Contact Dave or myself to help get a Test and Tune night for your club.

It’s that time of year again! For the 13th consecutive year, The 3916 Nets will be presenting The Santa Net on 3.916 MHz. Good girls and boys can talk to Santa Claus, via amateur radio, nightly at 8:30 PM (Eastern) starting Friday, November 23, 2018. The Santa Net will run nightly at 8:30 PM Eastern through Christmas Eve, December 24, 2018. This fun opportunity is great for connecting kids or grandchildren with the Head Elf himself. Details and updates will be made via their Facebook group: https://www.facebook.com/3916santanet/.

Thanks for reading and 73… de Jeff – K8JTK

NBEMS – An Introduction Using Fldigi and Flmsg presentations

I was asked to give a presentation on using Fldigi and Flmsg in NBEMS — Narrow Band Emergency Messaging System (or Software).

Framework

The framework I chose to use for the presentation slides is called reveal.js. It is an HTML framework meaning it will run in any HTML 5 capable browser. Looks a little better than a PowerPoint presentation.

Navigation

Useful navigation keys in the presentation. In addition to navigating with the keys below, you can swipe (tables/smartphones) or use the navigation arrows on screen in the lower right.

Toggle full screen: press [F11].

Advance to the next slide: press [n] or [SPACEBAR].

Go back to the previous slide: press [p] or press and hold the [SHIFT] key while pressing the [SPACEBAR].

Display presentation overview: [ESC] then use the arrow keys or mouse to select a slide. [ESC] again will exit overview mode.

Links

Clickable links are colored in blue text.

Presentations

Three variations are available: presentation version is viewable in a browser. Printable version for printing or saving in a different format (Chrome, Chromium, and variants compatible only). Finally a PDF version.

They may take some time to load because I left original images untouched and some were a couple MB in file size.

Slides

Introduction to NBEMS

The presentation is about 60 minutes in length.

Presentation version
Printable version
PDF version

This presentation was given at the following meetings:
Lorain County ARES on 10/21/2018.

VHF/UHF NBEMS

This is an older version without the HF information.

The presentation is about 60 minutes in length.

Presentation version
Printable version
PDF version

This presentation was given at the following meetings:
Medina County ARES on 11/10/2015.
Mansfield Hamfest on 2/21/2016.

Digital Communications in Amateur Radio: Narrow Band Emergency Messaging System (NBEMS)

This article appeared in the The Wood County Amateur Radio Club newsletter CQ Chatter August 2017 edition.

Read the rest of the series in the Digital Communications in Amateur Radio articles category.


Have you ever been involved with an EmComm/ARES drill and heard digital tones as forms were being passed over a repeater? You may have wondered what application are they using, what mode, or how do they know what form is being sent? Chances are they utilized an established standard called NBEMS. The Narrow-Band Emergency Messaging System was created to pass text based messages and forms used by hams and other served agencies over Amateur Radio. Technicians, listen up! NBEMS includes standard modes for HF SSB and is very popular on VHF/UHF FM.

NBEMS was established in collaboration between David Freese, Jr. – W1HKJ who created and maintains the Fldigi suite of applications and Skip Teller – KH6TY who created DigiPan, a popular PSK application. The philosophy specifies utilizing radios, software, and hardware readily available and widely used in ham radio. Older equipment and older computers can be used meaning it would be relatively inexpensive. There would be no steep learning curve but flexible in an emergency situation. Finally, must be independent of infrastructure. No need for Internet, nodes, or existing communications systems. Power the computer, radio, interface, and you’re off-and-running.

Interfaces between the computer and radio used for other digital modes work best. In accordance with the flexible and inexpensive philosophy, another option is available: no interface at all. That’s right, you don’t need any interface between a computer and radio in order to communicate. To receive data, the radio speaker is held to the computer microphone. To transmit, the radio microphone is held to the computer speaker. This method is called an “acoustic interface.” It’s a game saver in a pinch, doesn’t require any additional hardware, and allows anyone with a radio and PC to participate. The digital protocols used are robust enough to deal with ambient noise, casual conversations, too much audio, too little audio, and still be able to decode 100%.

Though operating without an interface sounds like the best of all possible options, there are serious drawbacks. Transmitting (PTT) is done manually. Longer messages mean the operator has to hold PTT in longer. If their finger accidentally slips off the button, the message needs to be retransmitted. The operator needs to be more attentive to the station where it’s possible they may become distracted and miss messages. In a conference or war room, transmitting and receiving messages acoustically adds a layer of disruption to the setting. A connected interface would handle the keying, always provide audio to the computer for decoding messages – even while away from the station, and would not generate any additional noise effectively allowing the station to be completely quiet. As a whole, digital modes are not designed to work through an acoustic interface because most are sensitive to noise. Noise introduces errors making all or part of the transmission unrecoverable. An acoustic interface is a good way to practice or start, though the efficiency of a connected interface will soon be realized.

NBEMS utilizes two different modes: VHF/UHF uses MT63-2000L, HF uses Olivia 8/500. Both were developed by Pawel – SP9VRC.

It is surmised that 25% of the characters in an MT63 transmission can be lost and the receiving station will still have a perfect copy. This is achieved by encoding characters over the time and frequency domains for robustness. In addition, the “L” versions have additional (long) interleaves providing even more error correction. MT63 is very forgiving of audio levels and tuning errors making it a great choice for EmComm. The suffix indicates bandwidth used, 2000/2K means 2 KHz. Transfer rate is about 1 KB/minute.

Olivia 8/500 is used on HF because signals can be decoded below the noise. Low power and QRP stations can communicate nearly as effectively as a higher power station. A channelized approach is used because signals below the noise can be decoded but not heard or seen on the waterfall. The 8/500 indicates 8 tones utilizing 500 Hz of bandwidth. Fldigi suite reverses these in places, 500-8. Transfer rate is about 170 bytes/minute.

A common question brings up the issue of popularity. PSK31 and JT65 are two popular modes on HF. Both are not used in NBEMS because there is no error correction for weak or fading signals in PSK. A faster, multicarrier PSK-R (for Robust) mode is occasionally used in NBEMS but I have not seen many groups use it as an established standard. JT65 is limited to 48 second timed transmissions of 13 characters which is not efficient for data transfer.

Two applications are synonymous with NBEMS: Fldigi and Flmsg. In the last article, I talked about Fldigi being one of the more popular multimode applications. Flmsg is another application in the Fldigi suite that manages forms. It can be used to send standardized agency forms like ICS, Red Cross, or MARS. Forms developed by local agencies can be coded as a “custom form.” Plain text (.txt) and comma-separated (.csv) files can be transferred. Sticking to the inexpensive and flexible philosophy, the entire Fldigi suite of applications are free, open source, and cross platform available on Windows, Mac, and Linux including Raspberry Pi. Custom forms are a popular use of Flmsg however, these forms need to be disseminated or available online ahead of time.

Other applications like DM780 and MultiPSK can send and receive both MT63 and Olivia. These don’t have provisions for managing forms or validating transmissions. Fldigi and Flmsg are integrated seamlessly to pass data between the form manager and modem application.

A very important behind the scenes, but not often discussed feature in NBEMS is the checksum. In computing, a checksum is used to detect errors in transmission or in storage. Flmsg automatically generates and includes a checksum as part of the message with each transmission. Receiving stations calculate a checksum value based on the data received and compare it against the value included in the message. This is an ease-of-use feature letting receiving stations know if they received a prefect copy of the message. If the checksum matches, Flmsg will open displaying the form or message. If the checksum fails, this means an error was introduced in transmission. As a result, the message will not open or a “Checksum failed” prompt will be seen.

Example message:

... start
[WRAP:beg][WRAP:lf][WRAP:fn K8JTK_Digital_Communications_in_Amateur_Radio-_NBEMS.p2s]<flmsg>4.0.2
:hdr_fm:21
K8JTK 20171807024326
:hdr_ed:21
K8JTK 20171807024320
<plaintext>
:tt:46 Digital Communications in Amateur Radio: NBEMS
:to:6 Reader
:fm:5 K8JTK
:dt:10 2017-07-17
:tm:5 2233L
:sb:12 Demo message
:mg:44 This is an example message in an NBEMS form.
[WRAP:chksum 2CBF][WRAP:end]
... end

A checksum value is included in the “WRAP” tags and is 2CBF for this message. Upon receipt of this message, Fldigi automatically calculates a checksum for verification. If it arrives at the value of 2CBF, the message was received perfectly.

There are limitations of NBEMS that users and served agencies need to be aware. To meet FCC requirements, all data must be transmitted within 3 minutes on a repeater with a standard time-out-timer or 10 minutes on simplex. This means a maximum file size for MT63-2KL on a repeater is 3,000 bytes and 1,700 bytes for Olivia 8/500 on simplex. These properties severely limit the content that can be transferred to text. Word documents need to be converted to TXT and Excel spreadsheets to CSV files in order to save bandwidth. There are not many useful images, Word documents, Excel spreadsheets, and executable programs under 3K. This makes high-resolution images and large data transfers impractical using NBEMS. Remember, it is a Narrow-Band Emergency Messaging System.

Reminder: review the first two articles in the series for information that will be omitted here including some modes operate your transceiver at 100% duty cycle, use upper sideband (USB), and don’t drive the transmitter with too much audio as the signal will be wider than intended. Operating data over FM is the same as operating voice and does not change the duty cycle of the radio. However, operating FM at high power for prolonged periods of time is considered extreme for most radios and will likely shorten the life of the transceiver. In addition, review the fourth article on “Conversational Modes” as Fldigi was covered.

With Fldigi setup and working, download and install Flmsg from http://www.w1hkj.com/. To prepare Fldigi for VHF/UHF NBEMS, click Op Mode, select MT63, and click MT63-2000L. MT63-2000L is also abbreviated as MT63-2KL in other places within the Fldigi suite. These are the same, 2K = 2000. With MT63-2KL selected as the active mode, now center the receive window on the waterfall at 1500. 1500 Hz is the standardized center frequency. For HF NBEMS, replace MT63-2000L references with Olivia 8-500.

Fldigi passes data to Flmsg for decoding and displaying. Fldigi needs to know where to find the Flmsg installation. In Fldigi, click Configure, select Miscellaneous, then click Misc to enter the Miscellaneous program options. Finally, click the NBEMS tab. In newer versions of Fldigi (later than 3.23.0), uncheck the Transfer direct to executing flmsg. Open with flmsg and Open in browser should be checked if they are not already. Now click Locate flmsg. Depending on the version of Windows, the default installation location for Flmsg will be C:\Program Files (x86)\flmsg-x.x.x or C:\Program Files\flmsg-x.x.x. In that directory, select the flmsg application, click Open. Click Save, then Close.

“x86” is a Windows designation to differentiate 32 bit from 64 bit applications on a Windows 64 bit installation. “x.x.x” is the version of Flmsg. Each time a new version of Fldigi, Flmsg, or any other Fldigi application is installed, it is kept in a separate directory with the version appended. Alot of versions can accumulate on a system if frequently updated. Anytime uninstalling or using a new version of Flmsg, the steps above for “locating flmsg” need to be repeated.

Start Flmsg. A dialog prompting for the selection of a “Default User Interface” will be seen on a new installation, click Communicator/Expert. Station information will be requested. These are used as inputs for some forms. Call sign should be filled in as a minimum. Click the red “X” when done filling in station information. At the bottom of the main Flmsg window is the mode selector. Click the down arrow and select MT63-2KL.

Configuration is done!

To use Flmsg, a blank Radiogram will open initially. To select a different form, click Form. Different types of available forms are categorized: ICS, MARS, Radiogram, Red Cross, weather, and custom forms loaded will be available from this menu. Choose any form for practice. Standard practice is to note somewhere in the form that this is a “test,” “practice,” or “drill.” As with voice, someone may mistake the transmission for a real message.

Once the form is filled out, set your radio to the appropriate frequency and open Fldigi if it is not already. Set it to MT63-2KL centered at 1500. Verify the mode selected in Flmsg is MT63-2KL. Click AutoSend. The file must be saved before it will transmit. Once the file is saved, transmission will begin automatically. Get into this habit of checking transmit frequency, Fldigi configuration and Flmsg configuration before clicking AutoSend. Otherwise you will inadvertently transmit on a different frequency or in a different mode. It happens to everyone eventually.

Receiving stations only need to open Fldigi. They will first see the message appear in the Fldigi receive pane. The form type is transmitted as part of the message. In the example message, <plaintext>. The lines begin with the form field name and check of the number of characters in that field. “:fm:5 K8JTK” is the “from” field with a check of 5 characters, “K8JTK“. When completed, an Flmsg window will open. The form will also be rendered in the default web browser. Receiving stations don’t have to do a thing except wait for the transmission to complete. If the next message received is a Radiogram, Flmsg will automatically open a window and browser page displaying the Radiogram format.

That’s it for using NBEMS! I have a more detailed setup and walk through of installing and configuring Fldigi and Flmsg. My instructions include another Fldigi suite application called Flwrap. Flwrap allows files of any type to be transferred. It sounded, at one point, like it was going to be part of the standard set of NBEMS applications but never made it due to the file size constraints. Additionally, Flmsg performs similar functionality to Flwrap in its ability to send TXT & CSV files. The Flwrap parts can be skipped unless they are found useful.

Typically, you’ll need to setup a sked or hold a net to pass messages around. Operators don’t sit around watering holes sending Flmsg messages, though I have seen it! Use news on QRZ.com or ARRL Ohio Section updates as text to fill out the forms as practice. Participating in a couple different nets, there seems to be less problems when everyone is using the same versions of the applications.

An Android smart phone app is available at the same site as Fldigi called AndFlmsg. There is a INSTALL.txt file with install instructions. The app is not available through any of the Android app stores and must be installed by temporarily enabling the option to allow applications from “Unknown sources.” A user guide is available in the same directory as the download. This will be helpful as the interface is not entirely intuitive.

The Ohio Digital Emergency Net (OHDEN) is a weekly HF practice net that uses the Olivia standard. Checkins and coordination is accomplished using the text input box in Fldigi. There is no voice coordination. Formal messages don’t happen every week but are passed using Flmsg. OHDEN meets Tuesdays at 7:45 PM eastern on 3.585 USB using Olivia 8-500 centered on 1000 Hz.

Find out more information:
NBEMS mission statement, considerations, and features: http://uspacket.org/network/index.php?topic=44.0

ARRL NBEMS: http://www.arrl.org/nbems

K8JTK Getting started with Fldigi – including Flmsg and Flwrap: http://www.k8jtk.org/2015/04/16/getting-started-with-fldigi-including-flmsg-and-flwrap/

K8JTK VHF/UHF NBEMS – An Introduction using Fldigi and Flwrap: http://www.k8jtk.org/2015/11/10/vhfuhf-nbems-an-introduction-using-fldigi-and-flmsg-presentations/

Ohio Digital Emergency Net: http://www.ohden.org/

Ohio Section Journal – The Technical Coordinator – April 2017 edition

One of the responsibilities of the Technical Coordinator in the Ohio Section is to submit something for the Section Journal. The Section Journal covers Amateur Radio related things happening in and around the ARRL Ohio Section. It is published by the Section Manager Scott – N8SY and articles are submitted by cabinet members.

Once my article is published in the Journal, I will also make it available on my site with a link to the published edition.

You can receive the Journal and other Ohio Section news by joining the mailing list Scott has setup. You do not need to be a member of the ARRL, Ohio Section, or even a ham to join the mailing list. Please sign up!

If you are an ARRL member and reside in the Ohio Section, update your mailing preferences to receive Ohio Section news in your inbox. Those residing outside the section will need to use the mailing list link above.
Updating your ARRL profile will deliver news from the section where you reside (if the leadership chooses to use this method).
Go to www.arrl.org and logon.
Click Edit your Profile.
You will be taken to the Edit Your Profile page. On the first tab Edit Info, verify your Email address is correct.
Click the Edit Email Subscriptions tab.
Check the News and information from your Division Director and Section Manager box.
Click Save.

Now without further ado…


Read the full edition at: http://n8sy2.blogspot.com/2017/04/april-edition-of-ohio-section-journal.html

THE TECHNICAL COORDINATOR
Jeff Kopcak – TC
k8jtk@arrl.net

DSCF5081 K8JTKHey gang,

Since the last couple months have been feature articles, this month will be odds-n-ends.

Maker Spaces & Faires

I got positive comments on last month’s article about Makerspaces and Maker Faires. I hope it gave clubs and groups ideas to get younger makers into our hobby. Not only did the January edition of QST have the article on Maker Faires but it was the focus of ARRL CEO Tom Gallagher – NY2RF’s note in April. I’m happy to say these types of things are on the radar of the League and they’re focusing efforts on this new generation of Ham Radio operators. According to Tom, the ARRL plans to be at the three national maker events this year.

AllStar

I learned the creator of AllStar Link, Jim Dixon – WB6NIL, passed away at the end of last year. Jim is the creator of “app_rpt” which allowed the open source PBX system, Asterisk, to function as a repeater controller. In doing so, created one of the most impressive and versatile solutions for VoIP (Voice over Internet Protocol) in ham radio. Having played around with AllStar on my own node, nodes can be linked together directly through the public Internet, private network, point-to-point network, or really any combination of methods. Hubs are systems with greater bandwidth allowing for multiple simultaneous connections – like “reflectors” on IRLP or “conferences” on Echolink. One of my buddies who spoke with Jim commented that he was the smartest, nicest guy you’d meet and [he] would be doing well if he retained even half of what they talked about. Jim will be missed but the AllStar project will live on. AllStar Link: https://allstarlink.org/, Raspberry Pi & BeagleBone image: https://hamvoip.org/

Fldigi & Flmsg

W1HKJ and the contributors to the Fldigi project have been busy (http://www.w1hkj.com/). A new major release of Fldigi was made available at the end of March. This brings both Fldigi & Flmsg up to version 4.0.1. Technical Specialist Bob – K8MD messaged me about the update. My response: ‘crap, I just updated the screen shots from the previous changes the weekend before’ (3.22.x). I was hoping there were no new changes. Of course there were! Now my newly updated instructions are dated again! Those instructions were getting stale because of significant program option changes since I made them available about two years ago. They are on my site (up to Fldigi v3.23.21 and Flmsg 4.0.1) at http://www.k8jtk.org/2015/04/16/getting-started-with-fldigi-including-flmsg-and-flwrap/. Written for the LEARA Digital Net, they do focus on NBEMS operation.

Check them out and do some practice nets. From experience, it’s best if ALL participating stations are using the same program versions. There are fewer issues with forms because newer forms are included in later Flmsg versions that were not in earlier ones and everyone can be on the same page when going through settings.

Over that same weekend, I wrote up tutorials and hacks you can do with Flmsg. We’ve all been there. You missed receiving part of an Flmsg message because of being off frequency (radio or waterfall), in the wrong mode, or not paying attention. The issue is quickly corrected and most of the message is still received. However, Fldigi doesn’t know what to do with the form because some of the headers are missing. When headers are missed, Fldigi can’t open the form because the message won’t checksum. The checksum is used to verify the entire message was received. I wrote up a tutorial how to recover a partially missed message: http://www.k8jtk.org/2017/03/25/recovering-a-partially-received-flmsg-message/.

The last is more of an Flmsg hack. When an Flmsg form is received, NBEMS standard is to have the ‘open in browser’ option enabled. As expected, this will open the received form in the default browser. Many don’t realize that any web programming code (HTML, CSS, JavaScript) sent as part of the form will be interpreted by the browser. This means you can send clickable links, link to an image, redirect to websites, and change background colors. Just about anything that can be done on a webpage can be sent as part of an Flmsg form and rendered when opened in the browser. Find out how at http://www.k8jtk.org/2017/03/25/flmsg-forms-rendered-as-web-pages/. Standard squid disclaimer for both: this is for fun and not NBEMS compliant.

OpenSpot

If you have an OpenSpot hotspot, there was a major firmware update for the device in February and subsequent update in March to bring the current version to 108. The changelong has – in the neighborhood of – 80 (yes, eighty) fixes and enhancements. Previously, I wasn’t using this device to run the Ham Nation D-STAR After Show net. However, since they added a nice web interface with call log and export feature, it’s now my device for running the net. If you’re looking for a ham radio digital mode hotspot, check out the SharkRF OpenSpot: https://www.sharkrf.com/products/openspot/

One of the SharkRF connector options is their own IP Connector Protocol Server (https://github.com/sharkrf/srf-ip-conn-srv). The Connector Server is used to create a network of OpenSpot devices and it can be implemented in other hardware/software as it is open source. Like AllStar, it can accept public internet connections, run on a private network, or mesh network. I haven’t tried but it may even compile and run on a Raspberry Pi.

The Connector Server repeats any digital transmission sent to it. All modes can even be simultaneously connected. D-STAR connected clients will only hear D-STAR transmissions because there is no transcoding of D-STAR data streams. DMR and Fusion streams can be transcoded. DMR streams are transmitted to modems set to DMR and converted by the OpenSpot to Fusion for Fusion modems. Similarly, a Fusion stream is transmitted to modems sent to Fusion and converted to DMR for DMR modems.

I’ve setup a Connector Server that is open and there to mess around with. In the OpenSpot configuration:

  • In Connectors: under Edit Connector, select “SharkRF IP Connector Client.”
  • Click “Switch to selected.”
  • Once changed, enter your TX/RX frequencies.
  • Server address: srf-ip-conn-srv.k8jtk.org
  • Port number is in ‘Advanced mode’ but is the default, 65100.
  • ID, use your CCS7 DMR ID.
  • No password.
  • Enter your Callsign.
  • Click “Save.”
  • In the Modem options, select the desired mode.

The dashboard is: http://srf-ip-conn-srv.k8jtk.org/. The server will remain online if it continues to see use. Otherwise, it could disappear at any time without use 🙂

Ham Nation 300 (#HamNation300)

Last but certainly not least, yours truly has been on the planning committee for the Ham Nation 300th special event. Ham Nation is an audio and video podcast recorded live and available at https://twit.tv/shows/ham-nation. The program records at 9:00 p.m. eastern time every Wednesday evening. Following each episode are the “after show nets” which are round tables discussing the show or ham radio. These nets include: 20m, 40m, D-STAR, DMR, and Echolink.

After each 100 episodes, a special event is planned to commemorate another 100 episodes. In the past, these have been geared around HF. The show is not only for the General/Extra class licensees and not everyone has the ability or desire to operate HF. This year’s festivities have something for everyone including the chance to make digital contacts for the special event and a summer long challenge.

Ham Nation 300th special event runs the week following Dayton, May 24-31, 2017. Full details can be found on any of the 1×1 special event callsigns on QRZ or at https://www.hamnationdstar.net/2017/04/05/ham-nation-300-special-event/. Please join in and help make this event successful. Follow it on social media: https://twitter.com/hashtag/hamnation300 and https://www.facebook.com/HNonTwit.

That’s about it for this month. Thanks for reading and 73… de Jeff – K8JTK

Recovering a Partially Received Flmsg Message

We’ve all been there.  Part of a Flmsg message was missed because the receiving station was off frequency, in the wrong mode, or not paying attention.  The issue is corrected and most of the message is received.  However, Fldigi doesn’t know what to do with the form because most of the headers are missing – meaning it won’t open in the browser or Flmsg.

I will demonstrate how I recover Flmsg messages that I’ve partially missed.  How much of the message can be decoded depends on how long it took to rectify the situation while the other station was transmitting.  The sooner, the better.

The key is to start decoding the message before the form/message type is transmitted.  This is transmitted fairly early on.

NOTE: re-transmitting incomplete forms in a real event is NOT acceptable!  That is, this (or similar) procedure is used to recover a message, then that message is transmitted in a real event.  Ask for a re-transmit, if possible.

Check out my other Fldigi and Flmsg posts.

Example message

Example plaintext form message used for this tutorial:

The entirety of the message as transmitted through Fldigi:

... start
[WRAP:beg][WRAP:lf][WRAP:fn K8JTK_Recovering_a_partially_missed_Flmsg.p2s]<flmsg>4.0.1
:hdr_fm:21
K8JTK 20172603194239
:hdr_ed:21
K8JTK 20172603172413
<plaintext>
:tt:19 Flmsg recovery demo
:to:24 Digital Net Participants
:fm:5 K8JTK
:dt:10 2017-03-25
:tm:5 1612L
:sb:35 Recovering a partially missed Flmsg
:mg:491 Lorem ipsum dolor sit amet, consectetur adipiscing elit. Sed tempor mi lectus, at ultrices leo suscipit et. In
aliquet semper pulvinar. Phasellus consequat nisi at orci feugiat euismod ac vitae magna. Proin a nisl est. Sed dignissim
faucibus sagittis. Proin a ornare mauris. Maecenas efficitur ante eu mauris tempus congue. Pellentesque at nulla purus.
Morbi nec pharetra nulla, at bibendum lorem. Donec et libero non ex ultricies porta. Aliquam quis mauris aliquet mi
efficitur ullamcorper.
[WRAP:chksum 780E][WRAP:end]
... end

In this message the form type is <plaintext>.  Everything before that tag could be missed and the message will still open in Flmsg using this process.

Recovering the form

In the Fldigi receive pane, part of the message was lost.  Note that <plaintext> form type is still received.

When the transmission is complete, Fldigi won’t open Flmsg or open the message in the web browser because not all headers were received.

Right-click in the receive pane.

Click Select All.  This will highlight the entire contents of the receive pane.

Right-click again and click Copy.  This will copy the entire contents of the receive pane to the clipboard.

Open a plaintext text editor like Notepad, Notepad++, Vim, or Nano.  Do not use Microsoft Word or LibreOffice Writer.

Right-click in the text document and select Paste.

Remove any other unnecessary text or other messages that are not part of the intended message.  In this case, the lines about ‘reading macros’ are removed.

Save the message someplace easy to remember like the Documents folder or Desktop.  I’ll put them in the same directory as messages extracted from Fldigi: C:\Users\USERNAME\NBEMS.files\WRAP\recv.

Enter a File name.

Leave the extension as “.txt

Click Save.

Open Flmsg.

Click File.

Click Open.

Navigate to the location where the file was saved from the text editor.

Next to the file name box, select All Files.

Click the file name.

Click Open.

The recovered message is open in Flmsg!

If the form type was missed, a message will indicate an error in the data file (see Failed to Receive Form Type below).

To open the Flmsg form in the browser, in Flmsg click File.

Select View.

Click Html delivery.

Failed to Receive Form Type

If the message type was not received, there are still ways to recover the message but the form type must be obtained.  This usually means asking the transmitting station for the form type they sent.

Using our previous message example, paste and clean up the text in the editor as described above.

Notice that <plaintext> tag is not seen.

Above the first line, insert the form type tag for the message.  In this case <plaintext>.  Other common form types:
<blankform>
<csvform>
<ics213>
<plaintext>
<radiogram>


Save the message and open in Flmsg as described above.

Notes:

  • Missing data shows up as blank fields in the Flmsg form – including those parts of the form where the field prefixes are missing (“fm,” “tm,” “sb,” or “mg,” etc.).  In the Plaintext form, if the message prefix is missing, since it’s one of the last prefixes transmitted the entire form will appear blank.
  • If the wrong form type is inserted (<plaintext> when it should have been <radiogram>), the file will open in Flmsg but the fields will not be populated.  The field prefixes are generally not the same from form-to-form.

Digital Communications in Amateur Radio: Conversational Digital Modes (PSK, RTTY, MFSK, Olivia)

This article appeared in the The Wood County Amateur Radio Club newsletter CQ Chatter February 2017 edition.

Read the rest of the series in the Digital Communications in Amateur Radio articles category.


Got a new rig for Christmas? How about working digital? The most popular digital modes in ham radio are conversational modes (keyboard-to-keyboard). Best way to describe these is the instant messaging or text messaging of ham radio digital modes. One station sends a message to another station. The other station does the same in return. Conversations can be about anything – the weather, where that person lives, traveling, or life stores – for as long as you want. These modes include (in order of popularity): PSK, RTTY, MFSK, and Olivia. All, except Olivia, are available on the W1AW digital operating schedule. Others will pop up on the bands from time-to-time too or you may choose to play around with a buddy using other modes.

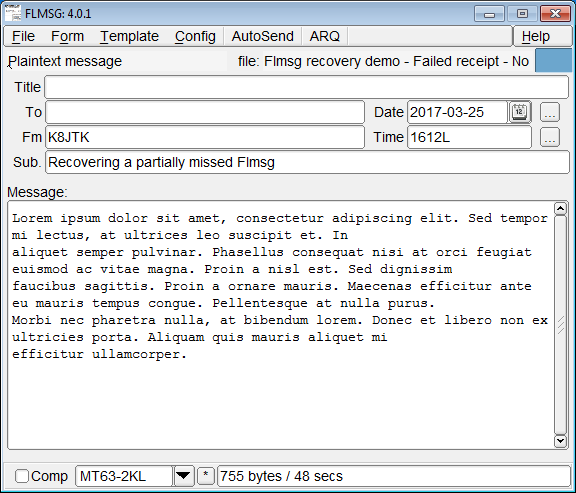
For the popular flavors of these digital modes, I performed a transmit time test. The text was one paragraph of “Lorem Ipsum” with 83 words consisting of 569 characters. I recorded how long it took to transmit the message in minutes and seconds to compare the speed of each flavor. The results were close between equivalent modes. PSK-31 and RTTY-45, for example, took about 2 minutes. This indicates that the advantage is not necessarily in speed but which mode works better in a situation. Popular HF frequencies are also listed. There is a lack of consensus on some of the exact frequencies. It won’t be uncommon to hear these modes in other portions of the data sub-bands. Different flavors tend to operate on the same frequency to stir up activity.

Commonalities among conversational modes include the RSID (Reed-Solomon Identification) tones which universally identify a digital signal at the beginning and, occasionally, the end of a transmission. RSIDs are more popular on rarer and wider modes like PSK-63, MFSK, Olivia, and other rare modes. An RSID tone is about 170 Hz so announcing your PSK-31 signal at 31 Hz will interfere with other conversations.

It is common to give a signal report using the IARU RSQ reporting system. Like the RST system of “59,” RSQ adds an additional number “599.” These numbers stand for:

Readability (percentage of good text received):

  • 5: 95+%, perfectly readable.
  • 4: 80%, little to no difficulty.
  • 3: 40%, considerable difficulty and many missed characters.
  • 2: 20%, occasional words distinguishable.
  • 1: 0%, unreadable.

Strength (measure how strong the signal trace is on the waterfall, there are only 5):

  • 9: Very strong trace.
  • 7: Strong trace.
  • 5: Moderate trace.
  • 3: Weak trace.
  • 1: Barely visible trace.

Quality (measure of unwanted artifacts in the signal: pops, clicks, splattering, harmonics, and unwanted modulation):

  • 9: Clean signal.
  • 7: One barely visible sidebar pair.
  • 5: One clearly visible sidebar pair.
  • 3: Multiple visible sidebar pairs.
  • 1: Splattering over much of the spectrum.

Also brush up on CW shorthand as these are used in exchanges. Commonly used abbreviations: btu (back to you), k (any station may transmit), kn (specific station only may transmit), sk (done transmitting, clear), pse (please), de (this is).

Reminder: review the first two articles in the series for information that will be omitted here including some modes operate your transceiver at 100% duty cycle, use upper sideband (USB), and don’t drive the transmitter with too much audio as the signal will be wider than intended.

PSK

PSK-31 is the most widely used HF digital mode. It’s popular because of its narrow signal. PSK was at the forefront of the digital sound card revolution in 2000. It was discovered that ordinary sound cards and computers had enough power to become digital-to-analog converters. Peter – G3PLX created PSK-31 to perform well with weak signals and operate at a narrow bandwidth. In a perfect world, within 3 kHz you could potentially have nearly 100 individual QSOs happening at once.

PSK stands for Phase Shift Keying, the modulation method used to generate the signal. It’s a common mistake to believe that 31 stands for the amount of bandwidth the signal occupies. It does occupy 31 Hz, however 31 stands for the bit rate of 31.25. There are other flavors of PSK: PSK-63, PSK-125, and PSK-250 each less likely to be seen on the bands than the previous.

It might be observed that software applications may have BPSK and QPSK in their list of operating modes. BPSK stands for Binary Phase Shift Keying and QPSK Quaternary Phase Shift Keying. The differences between these two are significant. When people refer to PSK, 99% of the time they are referring to BPSK. QPSK is a better choice under adverse conditions because it adds a significant amount of error correction ensuring nearly 100% copy of the transmission during signal fade or interference. However, both stations need to be on frequency, within 4 Hz, for error correction to work correctly. It takes a lot more work for two stations to be in sync with each other using QPSK.

Some stations may request an IMD (Inter-Modulation Distortion) report. This metric can only be observed while the other station is in transmit mode but no text is being sent; idle in other words. The station might type a message saying they’re looking for an IMD report and leave it idle for 10, 15 seconds, or more. There will be a measurement on screen in negative dB; lower the negative number the better. Readings in the -25dB to -30dB rage are considered very good, -20dB or greater is considered bad. A bad reading is usually caused by driving the transmitter with too much audio.

Transmit test: PSK-31: 1:58, PSK-63: 1:00
Frequencies: 3580 kHz, 7070 kHz, 10140 kHz, 14070 kHz, 21070 kHz, 28120 kHz.

RTTY

After six decades of use by hams RTTY, known as Radioteletype, is still a very popular mode for contesting and DXing on the low bands. RTTY has a long history and HF digital operators are very comfortable with it. Many transceivers also have RTTY built in. This mode works better in decoding large pileups than other modes. RTTY is efficient in that it works at a speed of about 60 words per minute – which is about the fastest one person can type. Other modes are typically much slower.

RTTY is based off the Baudot digital code which represents each character as a series of bits for telephone or radio communication. W1AW will refer to RTTY as Baudot on their operating schedule. Looking at a RTTY signal on a waterfall, the 1’s and 0’s are represented by twin tones for the mark (1) and space (0) tones. The two data streams are separated by the shift or space between them. When people refer to RTTY, they will most commonly refer to RTTY-45 (baud) but 75 can be seen as well. Inverted RTTY flips the mark and space data streams.

Transmit test: RTTY-45: 1:53, RTTY-75: 1:09.
Frequencies: 3580-3600 kHz, 7040-7100 kHz, 14080-14099 kHz, 21080-21100 kHz, 28080-28100 kHz.

MFSK

Multi-Frequency Shift Keying, known as MFSK, is “super-RTTY” which uses multiple tones instead of the two used in RTTY. The most popular is MFSK-16 using 16 tones. MFSK was developed as a flexible point-to-point solution to combat multipath propagation problems. It is very good at detecting noise and reducing transmit errors with error correction all while utilizing low bandwidth. MFSK is slow to decode so be patient!

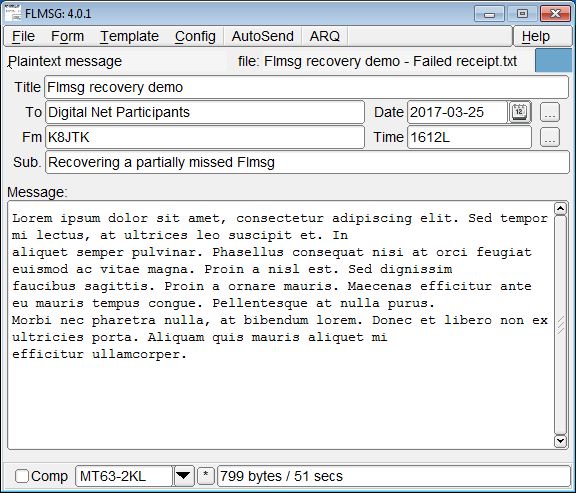
An exciting addition to some MFSK flavors is the ability to send small images. MFSK-16 can send images but not MFSK-8. A 320×256 sized color image took 4:26 using MFSK-16. It’s unlike Slow Scan TV where the software will size the image and overlay a template. The image needs to be fully prepared before it can be transmitted.

Transmit test: MFSK-16: 1:45, MFSK-8: 2:48.
Frequencies: 7072 kHz, 14072-14076 kHz.

Olivia

MFSK is good in poor band conditions but Olivia offers even better performance. Developed by Pawel – SP9VRC it is named after his daughter Olivia. It is called the JT65 of conversational modes because it’s incredibly slow but unlike JT65, it’s not a structured exchange.

There are different combinations of bandwidth and number of tones used, such as 500/16 is 500 Hz with 16 tones. Fldigi reverses these numbers for some odd reason and will read “Olivia 16 – 500.” Locking on to an Olivia signal may take 15 seconds. If the software is not decoding after that time, the bandwidth might be correct but the number of tones maybe wrong. For this reason, a call for “CQ” may take a minute or longer so stations can lock on and return a call. Be patient!

Olivia is great for poor band conditions because a trace may not be seen on the waterfall but a signal might be decoded! One example I share is a buddy of mine and I tried operating Olivia. We established contact and had strong traces on the waterfall using only 1.5 watts. We decided to compare it to sideband voice. We couldn’t contact each other on sideband until we were nearly up to 100 watts!

Transmit test: Olivia 500/16: 4:56, Olivia 500/8: 3:20.
Frequencies: 1835-1838 kHz, 3583.25 kHz, 3577 kHz, 7035-7038 kHz, 10141-10144 kHz, 14072-14075.65 kHz, 14106.5 kHz, 18102.65 kHz, 21072 kHz, 24922 kHz, 28122 kHz.

Software

I love and recommend software applications that are capable of operating multiple modes (multimode) using one application. This keeps the clutter down of installing multiple applications for each mode. The two I use are Digital Master 780 (DM780) as part of the Ham Radio Deluxe suite (http://ham-radio-deluxe.com/). This package is not free and only available on Windows. If that is out of your budget, then I recommend Fldigi (http://www.w1hkj.com/). It’s free, open source, and cross platform available on Windows, Mac, and Linux including Raspberry Pi. Both of these support many different modes and are constantly being updated and with newer modes.

MixW (http://mixw.net) and MultiPSK (http://f6cte.free.fr/index_anglais.htm) are alternatives and support most modes. There are specific mode applications like DigiPan (http://www.digipan.net/) for PSK and MMTTY (http://hamsoft.ca/pages/mmtty.php) for RTTY. Both are no longer maintained but are reported to work well with later versions of Windows. Other programs have known issues with versions of Windows later than Vista. Keep that in mind when trying older programs.

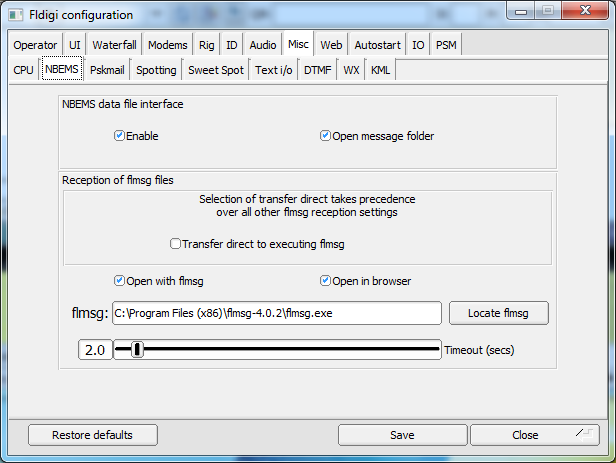
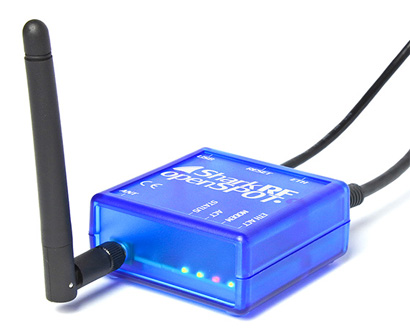
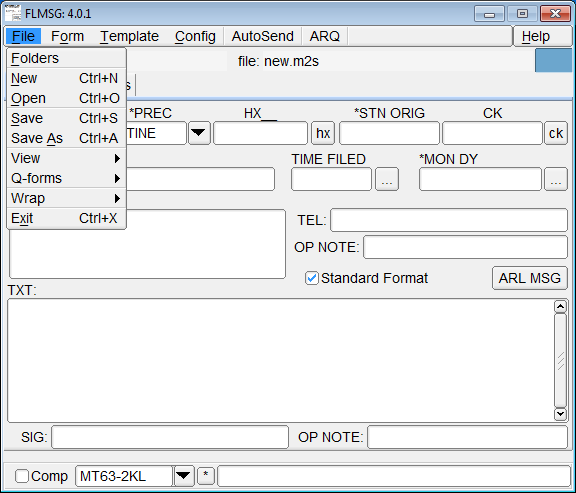
The software applications are similar in setup and operation. Exact labeling might be different from application to application. I am going to reference Fldigi, though not going in-depth with settings, it should get you started. Install Fldigi with the default options. A configuration wizard will appear the first time the application is started. Fill out all your station information. Select the sound card interface (USB Audio Codec for SignaLink). If the transceiver is using something other than the SignaLink for keying, select the appropriate radio and COM port for TX control.

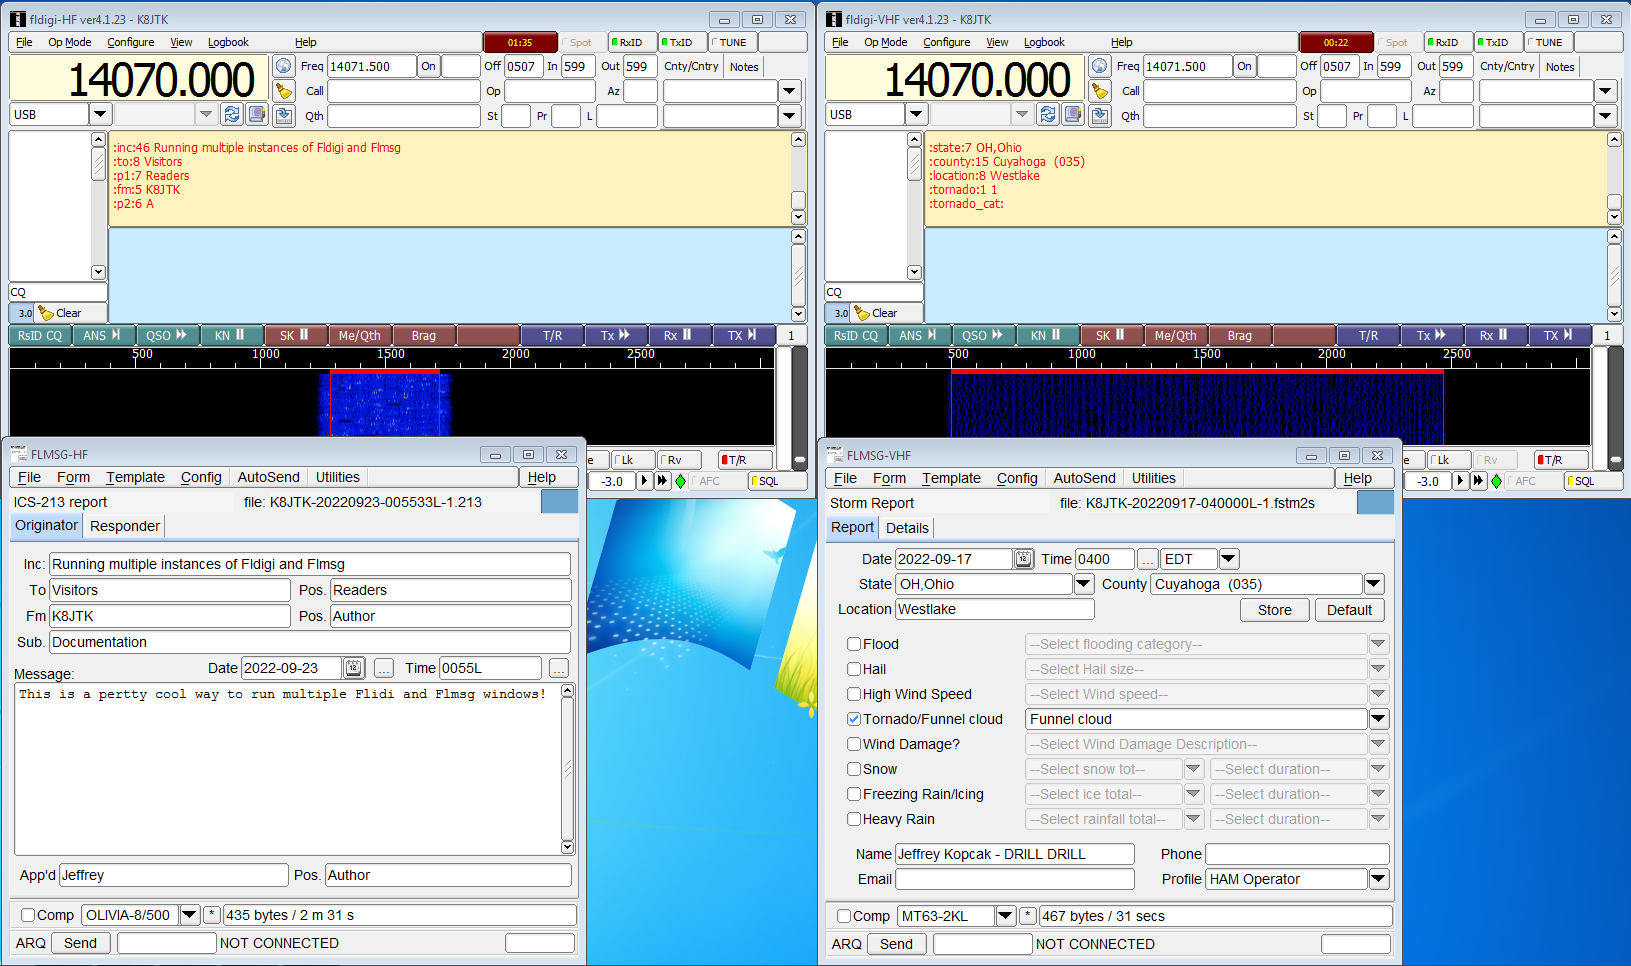
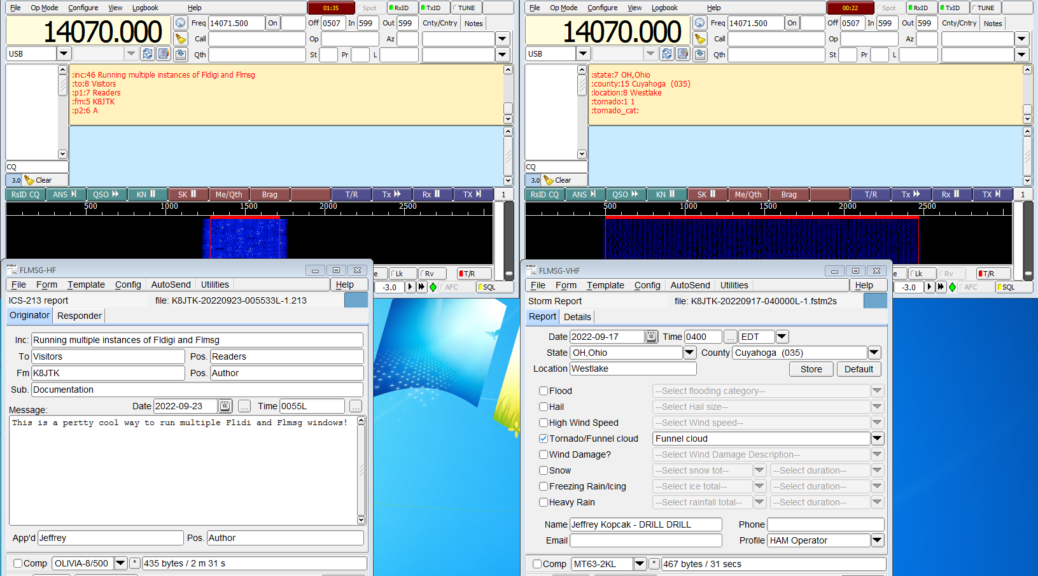
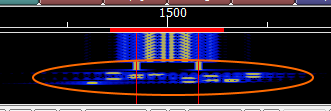
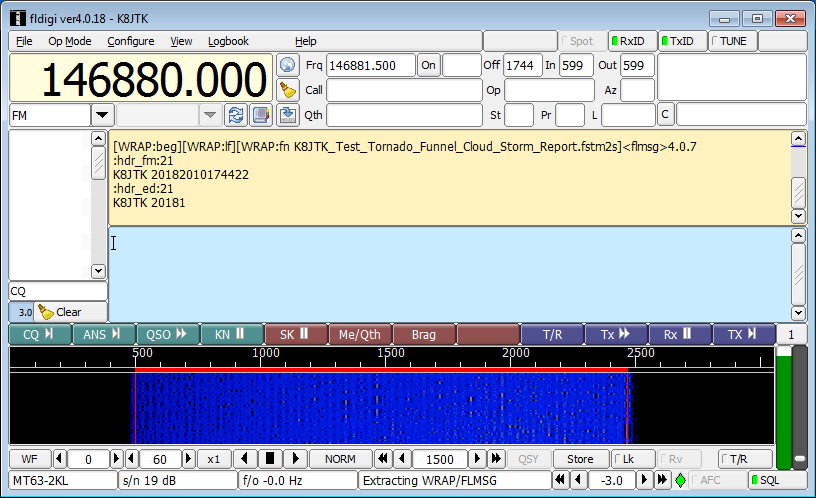
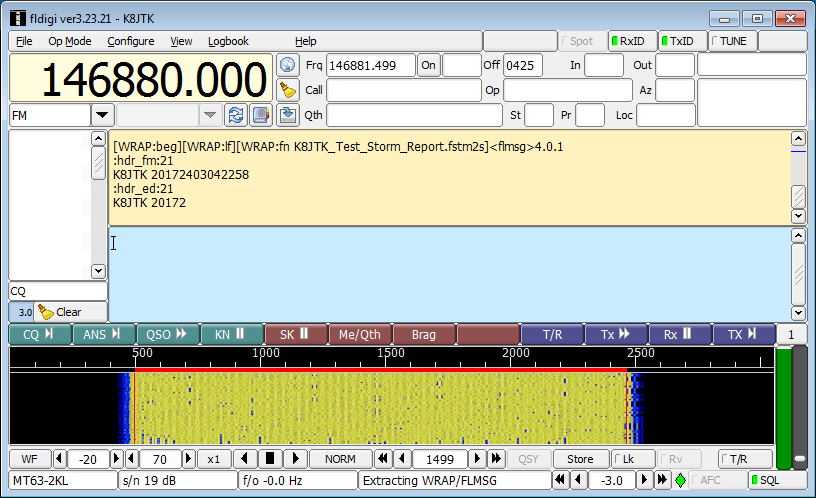
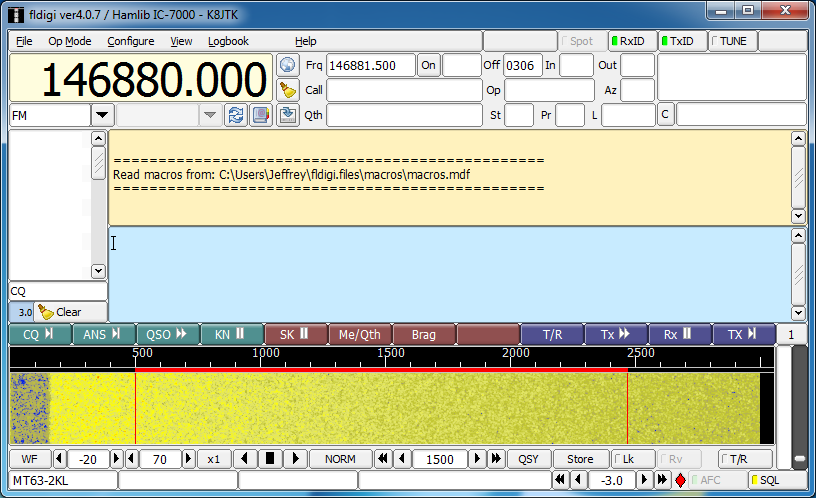
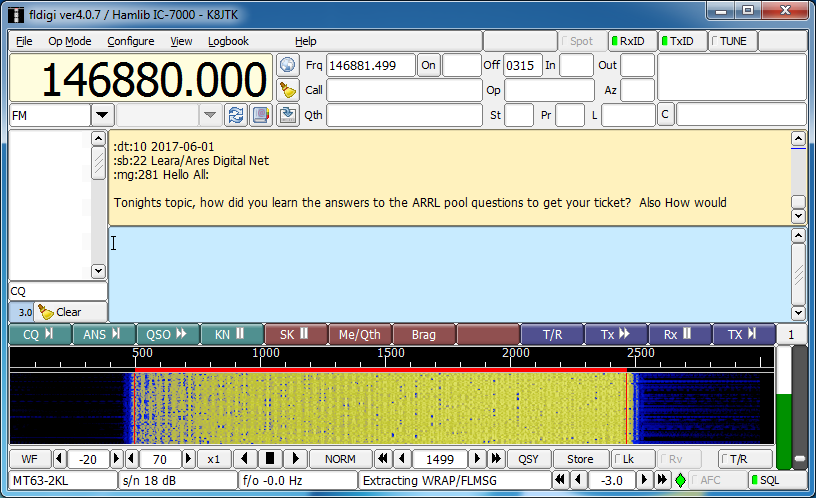
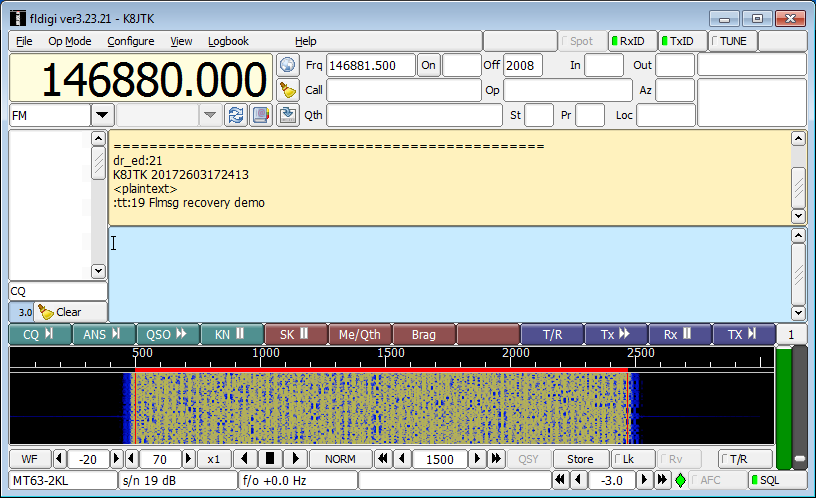
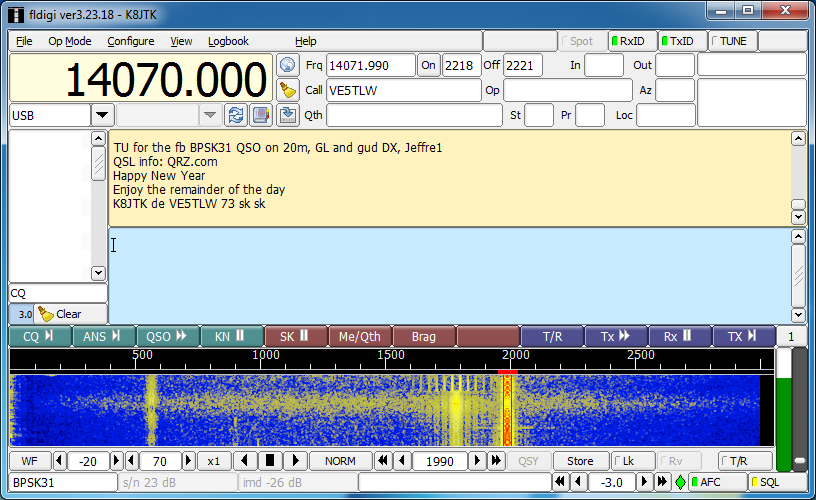
There are many parts to the Fldigi window. Standard menu options are seen like “File,” “Op Mode,” “Configure,” etc where operating modes or Fldigi configuration can be changed. Below that is Radio Control and Logging. When using internal logging, you’ll want the frequency to be correct. Rig control will help greately to automatically log the correct frequency as you change the VFO. Below that is the tan box where received messages will be displayed as well as transmitted messages will be copied here. The blue box is the transmit window where messages are composed for transmitting. If you have a white box to the left of the transmit and receive panes, this is the signal browser. This will display all conversations taking place, using the same mode, on the same frequency at once! Below the transmit text box is a line of colored buttons which are macros. Macros are pre-populated and commonly exchanged texts so you don’t have to keep typing them (right-click the button to edit). Below that is the frequency scale in Hz and waterfall. Below the waterfall are the waterfall controls. The line below that are the status messages and readings. To the right of the waterfall are two vertical white and a gray bars which indicate the strength of the decoded digital signal and squelch setting.

Tune your radio to one of the PSK frequencies to get setup. 20 meters is better during the day and 40 at night. The waterfall should start turning blue and yellow. If it is black, check the audio paths between the radio and computer, verify the audio input is set correctly in the Fldigi setup. Radios with a main and sub-band often cause confusion as to which band sends audio to the computer. If there is blue and yellow but a lot of black on the waterfall, check and disable radio filtering. Pro tip: the waterfall is a great educational place to visualize the filtering changes of the radio.

Now from the menu select “Op Mode,” “PSK”, then “BPSK-31.” To select a digital signal on the waterfall, simply click on the waterfall and the cursor will move to that location. Signals under the cursor will be displayed in the receive pane. It’s important to move the cursor on screen and do not adjust the radios VFO. Once a strong PSK signal is selected, you’ll notice the white squelch bar fills with green. The green needs to be above the light gray squelch slider to break squelch and decode. This is the first place to look if the cursor is over a signal but it is not decoding. Having the squelch set too high will miss decoding weaker signals and having the squelch too low will produce a lot of garbage text in the receive window. If a specific signal is strong but not decoding, the signal could also be multipathing, thus confusing the program. Watch conversations a good while to make sure you understand how the program works and for conversation syntax. Many programs have a “Signal Browser” or “Signal Sweeper” (DM780) which will decode multiple conversations at one time! In Fldigi, this can be broken out in a separate window under the “View” menu option.

Someone calling CQ will send CQ two-three times. I am K8JTK and Steve – W8HF will be the other station in these examples.

CQ CQ CQ de K8JTK K8JTK K8JTK

Repetition is good for weaker stations that might miss a letter or two. A responding station may respond with: K8JTK K8JTK de W8HF W8HF pse kn.

The two stations might begin the exchange using macros. These are good conversation starters. Macro messages typically include age of the operator, when they were licensed, radio and antenna, digital software program (Fldigi), computer operating system, physical location, etc, etc. This macro is called the “Brag” macro because you brag about your station. Beware though, for slower modes like Olivia, it can take a LONG time to send the same macro that takes seconds using PSK. The two stations could conclude the exchange or go back and forth typing out messages using the keyboard.

When receiving a message from another station, the responding station can begin typing a response in the blue transmit window even before the other station has finished transmitting. Always begin with something like “W8HF de K8JTK” so the other station knows you are responding to them, then continue with your message. If you’re conversing with a station and they don’t respond back after your message, they may have lost your signal, their program crashed, or became distracted. I typically wait 30 seconds – 1 minute and try a quick call back to the other station: W8HF W8HF W8HF de K8JTK K8JTK K8JTK, did I lose you? W8HF de K8JTK pse kn. I’ll try this 2-3 times and if they don’t return, I’ll log the QSO and move on.

End of transmissions should conclude with something like “btu Steve W8HF de K8JTK pse kn” noting the station is turning it back over to the other station. Concluding the conversation will end with something like: thx for QSO Steve, 73, W8HF de K8JTK sk. Other stations will end with a similar macro that includes their QSL information or when they upload their logs.

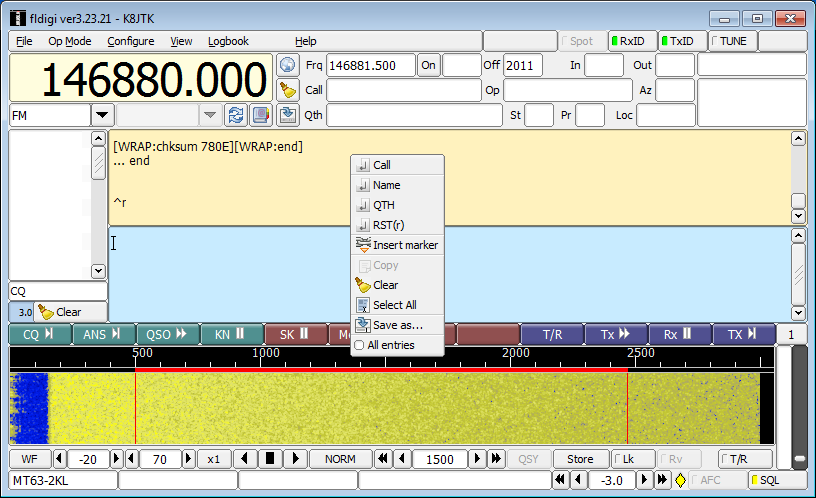
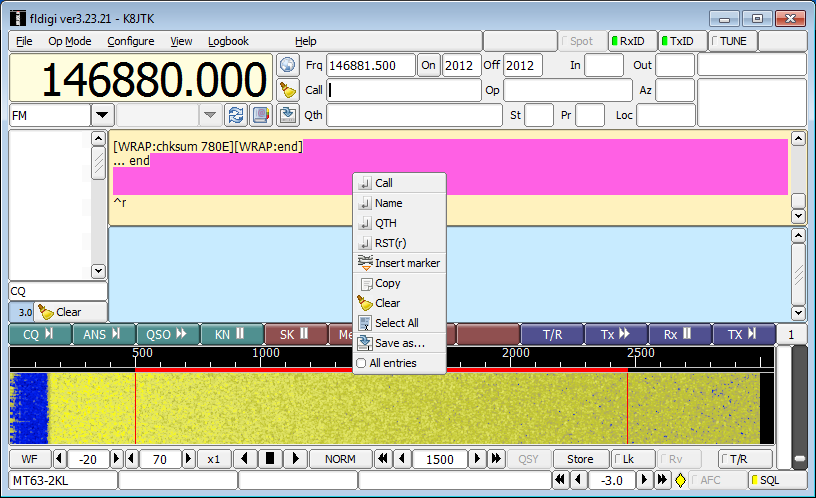
To transmit CQ, find an open space on the waterfall and click to bring the cursor to that spot. Tones will be generated in the same place as the cursor on the waterfall during transmission. Tune up on frequency and call CQ using the “CQ” macro. Some macros start and/or stop transmitting on their own. The “T/R” button under the waterfall is your best friend to start or stop transmitting. Some of the macros have the sequence “^r” at the end. This is an Fldigi command to change from transmit mode to receive mode aka transmission complete. This can be typed in manually at the end of messages too. PSK Reporter (http://pskreporter.info/) can be used just like JT65 to see how far you’re reaching.

Logging is fairly straight forward. RTTY and Olivia are logged as their respective mode only. BPSK is logged as PSK31, PSK63, etc. QPSK31, MFSK8, and MFSK16 are all logged as listed. If an RSQ was exchanged, log it accordingly. IMDs for either station can be recorded in the comments for future reference.

One idiosyncrasy with Fldigi: the position of the cursor in the transmit pane is critical. Fldigi will remain idle during transmission until the cursor is moved further down or moved to the end of the message. Many people are confused by this behavior and other programs don’t seem to follow this convention. For example if you had a sentence with “this that” and positioned the cursor after “this,” characters before the cursor will be transmitted until the point of the cursor was reached. The word “this” would be transmitted then Fldigi will remain idle in transmit mode until the cursor is moved. When moved, “that” will be transmitted until the program reaches the cursor again. Position the cursor at the end of the message during transmit and all will be well.

That’s it. These conversational modes are very open and very free form. Contesting will have a structure but casual operating is very informal. This outline can lead to operating other modes like Contestia, Thor, Throb, MT63, or Hell. Yes “Hell,” short for Hellschreiber, is a facsimile based mode where there is a reason everything is printed twice.

Find out more information:
“PSK31: A New Radio-Teletype Mode” by G3PLX: http://www.arrl.org/files/file/Technology/tis/info/pdf/x9907003.pdf
“Get on the Air with HF Digital” book: https://www.arrl.org/shop/Get-on-the-Air-with-HF-Digital
“RTTY/PSK31 for Radio Amateurs” book: https://www.arrl.org/shop/RTTY-PSK31-for-Radio-Amateurs-2nd-Edition/
“Nifty E-Z Guide to PSK31 Operation” book: https://www.arrl.org/shop/Nifty-E-Z-Guide-to-PSK31-Operation/
“How to get started with PSK-31 Ham Radio” by K7AGE on YouTube: https://www.youtube.com/playlist?list=PL8D7C6EBD6E2081E2

Ohio Section Journal – The Technical Coordinator – March 2016 edition

One of the responsibilities of the Technical Coordinator in the Ohio Section is to submit something for the Section Journal. The Section Journal covers Amateur Radio related things happening in and around the ARRL Ohio Section. It is published by the Section Manager Scott – N8SY and articles are submitted by cabinet members.

Once my article is published in the Journal, I will also make it available on my site with a link to the published edition.

You can receive the Journal and other Ohio Section news by joining the mailing list Scott has setup. You do not need to be a member of the ARRL, Ohio Section, or even a ham to join the mailing list. Please sign up!

If you are an ARRL member and reside in the Ohio Section, update your mailing preferences to receive Ohio Section news in your inbox. Those residing outside the section will need to use the mailing list link above.
Updating your ARRL profile will deliver news from the section where you reside (if the leadership chooses to use this method).
Go to www.arrl.org and logon.
Click Edit your Profile.
You will be taken to the Edit Your Profile page. On the first tab Edit Info, verify your Email address is correct.
Click the Edit Email Subscriptions tab.
Check the News and information from your Division Director and Section Manager box.
Click Save.

Now without further ado…


Read the full edition at: http://n8sy2.blogspot.com/2016/03/march-edition-of-ohio-section-journal.html

THE TECHNICAL COORDINATOR
Jeff Kopcak – TC
k8jtk@arrl.net

DSCF5081 K8JTKHey Gang,

It’s been a busy month for yours truly. Things got started off with a drive down to Columbus with my dad N8ETP. We visited the Columbus Radio Enthusiasts Society (CRES) on February 16th. It was touch-and-go for a while due to the weather. Snow hit both areas the night before and hoped it would hold off for the meeting. It did. We made it there and back, no problem. It was our first meeting in Columbus and we couldn’t have had a better time. I was contacted by Steve – N8WL to troubleshoot an RFI issue he was experiencing. CRES_N8ETPWe got to talking and he invited me to come down and speak about, well, myself –what the Technical Coordinator does and projects I’ve worked on. The presentation consisted of: my history in Ham Radio and how I got to where I am, laid out the ARRL and Field Services structures, section level positions and the Ohio Section, my responsibilities as Technical Coordinator, and projects I’ve worked on. In addition gave some pointers for troubleshooting RFI problems. Our Section Manager was on hand and helped answer specific questions about the section. It was an informative meeting. CRES: http://www.w8zpf.net/, presentation: http://www.k8jtk.org/2016/02/16/about-the-arrl-ohio-section-technical-coordinator/

The following weekend I presented at the Mansfield Hamfest during the Digital Forum. Danny – W8DLB, who is in charge of the Hamfest, was at my NBEMS training session in Medina County and asked me to present it during the Digital Forum. The Digital Forum covered voice and text based digital modes. Duane -K8MDA demonstrated FreeDV. FreeDV is a mode used on HF for voice communication. It’s impressive because the bandwidth is about one-third of sideband! I gave a portion of my training session on Narrow Band Emergency Messaging using Fldigi.

K1NAt the LEARA meeting in Cleveland, I showed the video for the Navassa Island K1N DXpedition which happened in February of last year. A DXpedition is an expedition to a remote location, usually uninhabited, for the purposes of activating the location and making as many contacts as possible. Navassa was my first time trying to chase a “most wanted” entity for my log. I was able to log them twice. Bob Allphin – K4UEE has participated in many DXpeditions and has released the story of many on DVD. I had no idea what it took to put on a DXpedition of that magnitude. After seeing his DVD on Navassa, I now have a better idea. It is a phenomenal video that got rave reviews and comments at the meeting. The main video runs about 45 minutes. The wrap-up from the Dayton forum is included which has some great background details. These are great for club meetings, introducing newcomers to Ham Radio, and gifts. Purchasing the video helps supports future DXpeditions and supports other hams: http://t-rexsoftware.com/k4uee/dvds.htm

Last, and certainly not least, Ken – KG8DN instructor at Gilmour Academy in Gates Mills, Ohio has been in charge of the Gilmour Academy Radio Club – ND8GA for as long as I’ve known him. During the school year, organizations are in charge of running Convocation for a week. This is a gathering of the entire school for announcements, happenings, events, and entertainment. Ken asked me to speak at Convocation one morning. This was a different type of presentation than I was expecting. I figured I would be there to talk-up Ham Radio and get kids interested. Nope. It was more about life experiences with a little Ham Radio sprinkled in. Things students could relate to. I have to be honest this was more challenging than I anticipated. A lot of time was spent searching for topics that students would care about, relate to, and how those experiences got me to where I am now. There was a visual portion which included many pictures from my high school years. When looking back on friends and people I shared those experiences with, it make me wish I was back in that time. I’m sure I’ll feel the same way when I look back on today. The presentation turned out great and I have to thank Ken for all of his help. ND8GA: https://sites.google.com/a/gilmour.org/gilmour-amateur-radio-club/

Thank you to everyone for coming to my various appearances and the organizers for asking me to speak with your organizations.

ham_radio_for_makers_2_KB1WNRham_radio_for_makers_1_KB1WNRI received an email from a fellow Trustee of LEARA, Marv – W8AZO, asking if I had seen my name mentioned in a post on a website. I had not. What website did he find my name on? The IEEE website. Now, I know the fine folks over at IEEE (Institute of Electrical and Electronics Engineers) are wicked smart. Much smarter than I am. They come up with solutions to technical problems which usually turn into established standards. Additionally, they publish one-third of the world’s technical literature. Why the heck would they be talking about me? Stephen Cass – KB1WNR, Senior Editor for the IEEE Spectrum magazine wrote an article titled “Hands on: A Ham Radio for Makers.” He built an FM transceiver using an RS-UV3 transceiver board and Raspberry Pi to take advantage of digital modes. I was mentioned because Stephen used the instructions I posted to compile and run Fldigi on the Raspberry Pi. Super cool! ham_radio_for_makers_3_KB1WNRI emailed Stephen and thanked him for the plug. He was very appreciative of the well written instructions. His article may have glossed over some important points relevant to hams but the goal of the article was to draw others in from the wider community. The article will be in the March printed edition of IEEE Spectrum and should be available by the time you read this. It hasn’t hit the shelves in my local bookstore yet. Online version: http://spectrum.ieee.org/geek-life/hands-on/hands-on-a-ham-radio-for-makers

That is what ham radio and makers are all about. I wanted to figure out how to run Fldigi on the Raspberry Pi, came up with a way to do it, documented it thoroughly, and shared it online. Stephen came across my instructions and used them as part of his project to create something greater; perpetuating the cycle.

Thanks for reading and 73… de Jeff