Category Archives: Computing

Computing, networking, and the like. Non-Ham Radio related.

Bridge a Remote Site Network with OpenVPN Access Server

Having access to your devices over the Internet is a requirement for any admin deploying a project. Instead of running to a remote site to administer devices (making changes, applying updates and patches), it’s easier to connect remotely and make changes. Remote access poses many issues and concerns.

Security

First and foremost is security. You always, always, ALWAYS want devices connected to the Internet behind a router with a built-in firewall (NAT router). A firewall filters traffic between two networks (your ISP and home for example) and will block attempts to connect to your internal (private) network.

Device manufacturers take security for granted. Little testing and auditing takes place because the analysis is expensive for throw-away devices. This is noted in many stories including Bug Exposes IP Cameras, Baby Monitors where simply clicking “OK” on the login dialog allowed access to the Internet connected video camera. It is trivial to find these devices on the Internet because of Shodan. Shodan is dubbed the “Internet of Things Search Engine.” If you’re not familiar, think of it as the Google for devices connected directly to the internet. These could be: web servers, printers, cameras, industrial machines, bitcoin mining… Putting devices behind a firewall minimizes the risk because anything trying to peer into the network would be blocked by the firewall.

This holds true for networks you don’t control (granted access on someone else’s network). Put your stuff behind a router/firewall so they can’t see your devices and you can’t be exploited by devices on the other network.

Port Forwarding is a popular technique to only allow traffic on a specific port to a device you specify in your firewall (router). This provides little security as it still allows a potentially vulnerable service to accept incoming connections from the Internet.

Choose a good router

Couple of tips for a good router:

  • You get what you pay for. Don’t opt for cheap.
  • Opt for ones that support third-party firmware like DD-WRT and Tomato or setup a dedicated computer running pfsense or Untangle. These have proven to be more secure than stock firmware in addition to offering a more complete feature set.
  • Stick with popular models as found on Amazon, Newegg, or other tech store. They’re more likely to be reliable, well updated models.
  • Look for ones that accept USB cellular modem dongles for installations that have no accessible network connection like a remote site.

Virtual Private Network

The preferred way to connect to a remote network is to use a VPN. A VPN connects to a private network securely over the Internet. It allows the user to exchange data, use services, and connect to devices as if they were directly connected to that network. An open-source project that implements VPN technologies security is OpenVPN. OpenVPN is an application that allows for secure point-to-point communication. There are many implementations of OpenVPN including using it in many third-party router firmware (mentioned above). OpenVPN Access Server is one of the many implementations and the one used for this project.

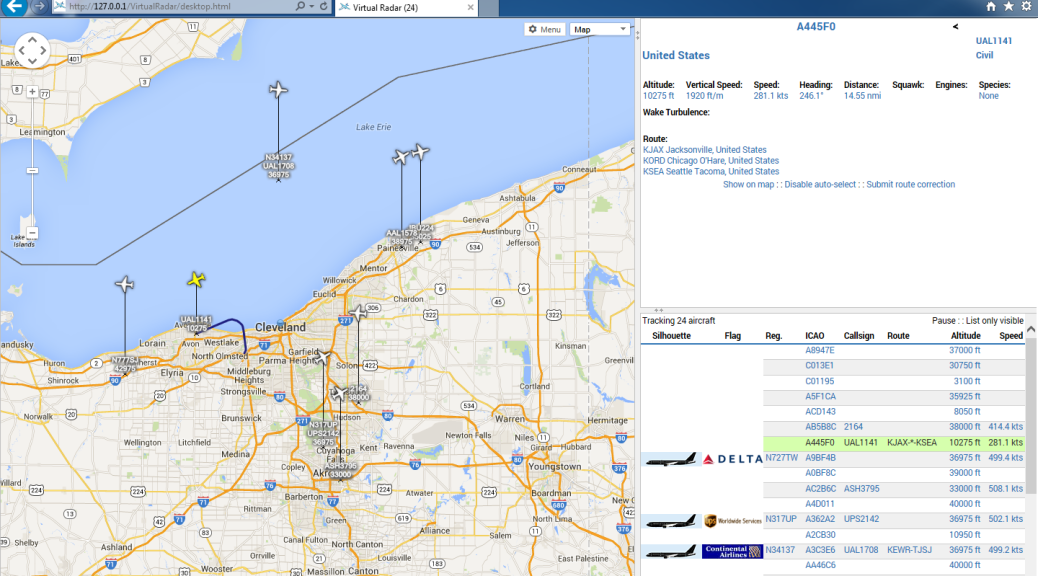
This project was inspired by Hak5 1921 – Access Internal Networks with Reverse VPN Connections. As an Amateur Radio operator into the newer computer and digital technologies, more devices are located at remote sites.

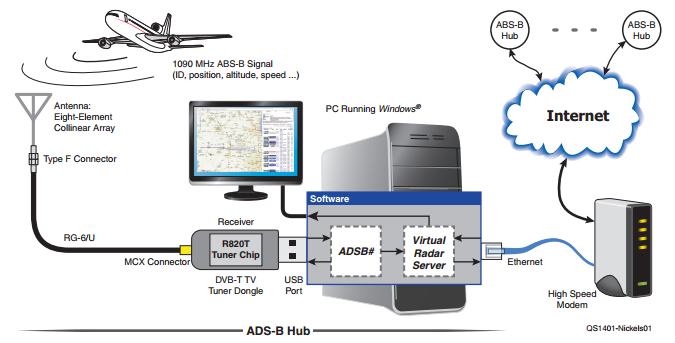
This setup consists of:

  1. A remote network behind a firewall where devices exist you want to access. This will be a Linux server on the remote network that will act as the gateway and persistently connected to the bridge. This could be a full desktop computer purposed for something else or Raspberry Pi. Also on the same network will be a Windows machine.
  2. An unsecure/unknown network, AKA the Internet.
  3. A private server that will act as the bridge between the remote network and a device you choose.
  4. A device in a separate location that will connect to the cloud server and will be able to access the remote network. I will use a Windows machine to act as a ‘home’ computer.

This setup works in nearly all cases because the only device receiving incoming connections is the bridge server in the cloud. Firewalls block incoming connections by default. Very few block connections originating inside the network out to the Internet (egress). If a device along the way filters by content, connection attempts will be blocked. Many corporate networks are doing this kind of filtering. Otherwise the traffic looks the same as secure web traffic on port 443. No port forwarding is used.

Hosting

I recommend using an infrastructure hosting provider for the bridge server. This can cost anywhere from $5-$15 per month. The device can be anywhere on the public Internet. It must accept multiple connections on different ports but only by a couple users at a time are needed. Minimal configuration is more than sufficient. Bandwidth, latency, and up-time of all points in this setup effect reliability. My personal recommendations for infrastructure hosting providers are: Rackspace and DigitalOcean.

IP addressing

All remote networks and the home user networks cannot overlap in address space. That is they need to be differently numbered. For example, typically home networks have addressing as 192.168.1.x. The remote site(s) can’t have the same numbering (192.168.1.x). It must be different. I suggest making the remote site different enough to not cause conflict with any home users’ networks. Remote sites as 192.168.25.x, 192.168.26.x, and 192.168.27.x would work fine when the home users’ networks is addressed 192.168.0.x, 192.168.1.x, 192.168.2.x, and so on (except 25-27). Similarly addressed networks create routing conflicts and the packets will not reach the correct network.

Downsides

Cost.

In addition to hosting, a downside to using OpenVPN Access Server is licensing. While OpenVPN is Open-Source Software and OpenVPN Access Server is free, the license allows for only two concurrent tunnel connections at any one time. This means the remote site counts as one connection and the home device the second. If a second person (third device) needed access to the remote network, they would get a message saying ‘Access Server has reached its concurrent connections limit.’ The first person would need to disconnect first before the second could connect otherwise current connections will begin to be booted. Additionally, connecting two or more remote sites and a home user is not possible without purchasing licenses or running an additional bridge server. Additional licenses can be purchased for “$9.60 License Fee Per Client Connection Per Year. Support & Updates included. 10 Client minimum purchase.” $96 per year.

An alternative to OpenVPN Access Server is to setup your own (roll your own) OpenVPN server which is free. I hope to do an OVPN server setup at some point in the future.

Assumptions

This guide is step-by-step in nature, meant for beginners, with brief explanations of the steps. It will help to have an understanding of Linux commands and scripting. Capitalization is important in Linux! Understanding of basic networking concepts including determining network prefixes and CIDR notation is also required.

Program versions

I used a Windows 7 64 bit PC for configuration (and Home PC). Applications and versions used in this writeup:

  • OpenVPN Access Server 2.0.24
  • Putty 0.67
  • Ubuntu 14.04 x64 (bridge and remote servers)
  • Filezilla 3.16.0

P25 Trunked Tracking and Decoding with RTL-SDR, Unitrunker, and DSDPlus

The project that got me really into experimenting with the RTL-SDR dongles is using them to decode P25 digital trunked public service radio systems.  I have been a casual scanner listener for years and like to listen to emergency calls nearby.  In college it was great to listen in on a party weekend hearing fights, disturbances, or why my street suddenly filled with cars at 3 AM.

Narrowbanding

That was when most agencies were analog.  To get more use out of the radio spectrum, the FCC decreed a narrowbanding mandate requiring a “maximum of 12.5 kHz bandwidth across the private land mobile bands between 150-174 and 421-512 MHz.”  This means going digital for much of that radio spectrum because traditional FM transmissions are 15 KHz.  Ironically they will “go digital” but move to 700/800 MHz.

As a casual listener, I wasn’t exactly thrilled with spending at least $500 for a scanner capable of digital (P25 mostly) and trunked system tracking (also Radio Reference wiki).

$40 RTL-SDR trunked scanner

Lurking around the Radio Reference forums, I saw references to being able to use the RTL-SDR dongles for trunked digital decoding.  I had to try it.  I had played around with these dongles and read about the many projects people were doing with them.  In actuality this project cost me $65.

About the project

You will need at least two RTL-SDR dongles ($20/each) and a copy of Virtual Audio Cable ($26).  I already had a premium Radio Reference account.  You can do the project with one dongle but you loose many features in Unitrunker like talkgroup priority.  Theoretically, the single dongle listens to the system control channel and then tunes to voice calls, then back to the control channel.  You will miss calls because that notification comes across the control channel while the dongle was tuned to a voice transmission.  I will cover a two dongle setup and do not plan to cover a single dongle setup.

This project is still very complicated but it is MUCH easier than it used to be.  This manly thanks to Rick, the developer of Unitrunker who implemented support for the RTL-SDR chipset in his program.  Previously, there needed to be a plug-in for both Unitrunker and SDRSharp, there were all kinds of “moving parts.”  In one respect, being able to see the signal waveform on a spectrum analyzer made it much easier to fine tune the PPM correction on-the-fly as opposed to guessing on a modulation scope.  This setup is much cleaner and the Unitrunker developer has implemented advanced features like drift correction.  It will take some time and patience to understand, research, and know the types of systems and system specifics.

There are some advantages like cost and being software based.  Changing modulation types is often as easy as changing programs.  As an example, DSDPlus will decode MotoTrbo as opposed to no standalone scanner being able to do so currently.  However, portability of this setup is limited as you have to have many pieces of equipment with you.  You’ll need an Internet connection to find sites to program and a PC to tweak settings.

Two very specific and key things to note about trunked radio systems in general:

  • You cannot tell the tower your’re listening to which talkgroup you want to monitor.  Doing so would require the ability to transmit and IS ILLEGAL because you are not authorized to do so.  If the talkgroup is not transmitted by the tower, you’re out of luck.  You can’t be in Dayton and tell the system you want to listen to a talkgroup originating from Cleveland.
  • Nothing here (and no program I know of) will defeat encryption, even if you own the keys.  Decoding encrypted transmissions is not implemented in any of these programs.  On the flip side, be aware that using this tutorial and feeding the audio to Radio Reference and Broadcastify may not make agencies happy.  You could get a take-down notice or even worse, it is trivial to turn on encryption at the system level and you just blocked reception for all scanner listeners.

Thanks to those whose tutorials I first used getting this setup working: $20 trunking police scanner and RTL-SDR Tutorial: Following Trunked Radio With Unitrunker.

Program versions

I used a Windows 7 64 bit PC. Applications and versions used in this writeup:

  • SDRSharp: 1.0.0.1330
  • Virtual Audio Cable: 4.14
  • DSDPlus: 1.51
  • UniTrunker: 1.0.30.10

Parts list

Listed below are all the parts needed to get this project working.

  • Computer with some processing and memory horse power.  It is recommended to have a computer with a recent Intel Core i5 processor and 8GB of RAM, or better.
  • Receive antenna that covers 700 & 800 MHz where P25 trunked usually resides. For an external antenna, splitters and coax runs maybe needed.  The stock RTL-SDR dongle antennas worked fine for me.
  • Two RTL-SDR Dongles.  To decode more than one voice transmission, increase the number of dongles needed.
  • Virtual Audio Cable.  Not free but trial version available.
  • Radio Reference account.  Premium account.  If you don’t want to fork over the money, become an audio feed provider.
  • Recommend a USB hub.  Couple years ago I picked up a Rosewill RHUB-300 USB 2.0 Hub 7-Port HUB.  I recommend this hub because when the dongle is plugged in, the antenna connector is pointed up.  This makes it easier to connect an adapter and a Pryme RD-98.  If available, connect the hub to an Intel USB chipset on your motherboard.  I’ve had far less issues using Intel based hardware.

ADS-B Decoding with RTL-SDR, ADSBSharp, and Virtual Radar Server

Update: ADSBSharp (ADSB#) is no longer available and has been deprecated.  Copies can be found by doing some searching.  It is not available from the authors site as described in this post for the RTL-SDR. A program like RTL1090 or Dump1090 (or any of its forks) can be substituted.  The author is focusing on AirSpy devices and ADSBSpy is available from the same site as SDR#.


An interesting project I came across using the RTL-SDR dongle is to decode ADS-B data.  ADS-B stands for Automatic dependent surveillance – broadcast allowing aircraft to be tracked by ground stations and provide situational awareness to nearby aircraft.  It is part of the FAA’s NextGen project and mandated by agencies across the globe.  ADS-B uses a frequency of 1090 MHz.

Thanks goes out to Robert Nickels – W9RAN and his article in the January 2014 edition of QST which covers this project and how to make a Collinear Array for 1090.  HAK5 also did a couple episodes showing how to make an antenna and configure Virtual Radar Server.

adsb-hub-diagram
Block diagram of the ADS-B Hub setup. From: QST, January 2014.

Program versions

I used a Windows 7 64 bit PC.  Applications and versions used in this writeup…

SDRSharp: 1.0.0.1330
ADSBSharp: 1.0.11.1
Zadig: 2.1.0.658
Virtual Radar Server: 2.0.2
SBS Resources: 6.7

Parts list

Listed below are all the parts needed to get this project working.

Antenna with receive coverage of 1090 MHz.
RTL-SDR dongle.

I had a ham radio antenna that I used.  It is the MP Antenna 08-ANT-0860 Ultra Mobile Antenna if you’re interested.  To build an antenna, see the QST article above.  The one that comes with the dongle will work but at short range.