Digital Communications in Amateur Radio: Station Setup

This article appeared in the The Wood County Amateur Radio Club newsletter CQ Chatter May 2016 edition.

Read the rest of the series in the Digital Communications in Amateur Radio articles category.


This time in our quest to get on the air with digital, I’ll discuss station setup. For most of this article, it will be related to HF and sideband operation. I’ll talk about FM near the end.

For a Ham Radio digital setup, three things are needed: a radio, computer, and an interface to connect the two.

First the radio. Theoretically, any radio can be put into digital service. Two things are important to consider: frequency stability and switching speed. Frequency stability is critical to digital operations because drift is deadly. Tube and older radios tend to drift in frequency as they warm up. For a mode such as PSK, drifting a few hertz puts you into someone else’s conversation. Switching speed and fast turnaround times are needed. The switching speed of older radios can be hard on relays. Solid-state radios manufactured in the last two decades are recommended. Radios that cover HF/VHF/UHF all mode – open up even more operating possibilities.

icom_ic-7000_(accessory_&_data_ports)
ICOM IC-7000 rear view showing data and accessory ports.

Most radios are designed with digital modes in mind. Radios with an “accessory port” or “data port” built in are ready to go, though not plug-and-play. The data port is the recommended way to connect an interface to the radio. These ports have pins for keying, transmit audio, and received audio. The audio pins have fixed audio levels and do not change based on the volume setting of the radio. If the radio doesn’t have accessory or data ports, microphone and audio out can be used. It’s not an ideal situation but it will work. An important thing to keep in mind, some radios mix various audio inputs. An example is an external mic connected to the accessory port maybe mixed with audio coming into the data port. This means audio generated by the computer will mix with ambient noise picked up from the microphone. You don’t want this because you’ll interfere with other digital exchanges. It’s important to know your radio and how it operates in different configurations. Test with a buddy or Elmer first before jumping in.

CAT (Computer Aided Transceiver) ports on the radio including RS232 (serial port) and CI-V are useful when creating your own interface. Audio cables between your radio and computer would provide transmit and receive audio but these won’t key the radio. CAT ports provide a lot of functionally including the ability to change settings in the radio, update memory channels, change frequency, etc. Keying the radio via CAT is universally supported in applications. A configuration example would be using the soundcard for audio in/out to the audio out/mic-in on the radio. A separate cable between the computer and radio provides CAT commands, usually via a COM port.

Duty cycle is the amount of time the radio is generating RF. When operating SSB voice, the amount of RF the radio generates depends how loud your voice is at that moment. In CW, RF is generated with each dot and dash. In both cases, the radio is operating at less than 100% duty cycle due to pauses in between words and characters. Many digital modes operate the radio near 100% which causes a lot of heat. Heat causes components to fail. Radios are designed for SSB voice though some newer models are including 100% duty cycle. Operate the radio at a power setting of 50% or less (30% recommended) of the total output power. A 100 watt radio would be set between 30 and 50 watts. FM, by nature, is the exception because voice or digital over FM uses the same bandwidth. The typically longer key down times for digital will still generate more heat.

Radios have different operating modes: USB, LSB, FM, AM, RTTY, DATA, DIGITAL and possibly others. HF digital mostly uses Upper Sideband regardless of frequency. In most cases the USB setting is what you want. Some radios will not allow keying from a computer unless they’re in a ‘digital’ mode setting. Check your operating manual and, again, practice and test with a buddy first. Turn off all filters, blankers, attenuation and the like or set it to the least disruptive setting. Set transmit and receive bandwidths to the full SSB bandwidth allowed (2.8 kHz). No filtering and wide bandwidths have less of a chance to distort or modify the signal. Modification of the signal affects the ability to decode a signal. Filtering can be used but after practice and understanding how they affect decoding. Contests usually warrant filtering to keep loud adjacent signals from affecting the exchange.

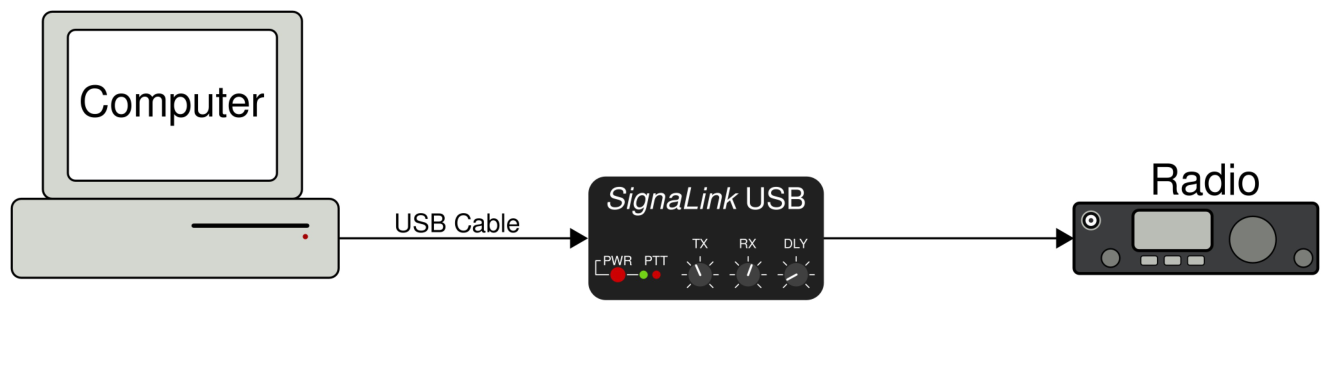
The interface. It serves two main purposes: act as a modem and the device that keys the radio. It acts like a modem by taking modulated audio from the software application and sending to the radio for transmit and taking received audio from the radio and sending it to the application for demodulation. Nearly all computers and laptops in the last decade have on-board audio while older configurations utilize an addon soundcard. Most computers don’t have serial ports these days. If a serial port is needed for CAT, options such as a USB (Universal Serial Bus) to serial adapter, serial port addon cards, or cables manufactured with USB to serial adapters built in are available.

rigbaster_advantage
RIGblaster interface–front view.

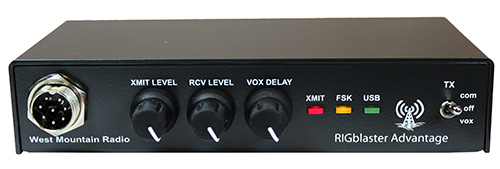
All-in-one interface solutions make the connection between the radio and computer easy. Solutions offer a built in sound card and fewer cables needed to make the connections. Offerings include products from West Mountain Radio, MFJ, MicroHAM, or RigExpert. These options free your on-board soundcard to listen to music or surf online minimizing the possibility of transmitting audio not suited for the airwaves. Adjustments on these interfaces are audio levels and speed (delay) at which the interfaces switches the radio from transmit to receive. Newer models include all functionality integrated into a single USB port requiring only one cable.

signalink_front
SignaLink USB interface–front view.

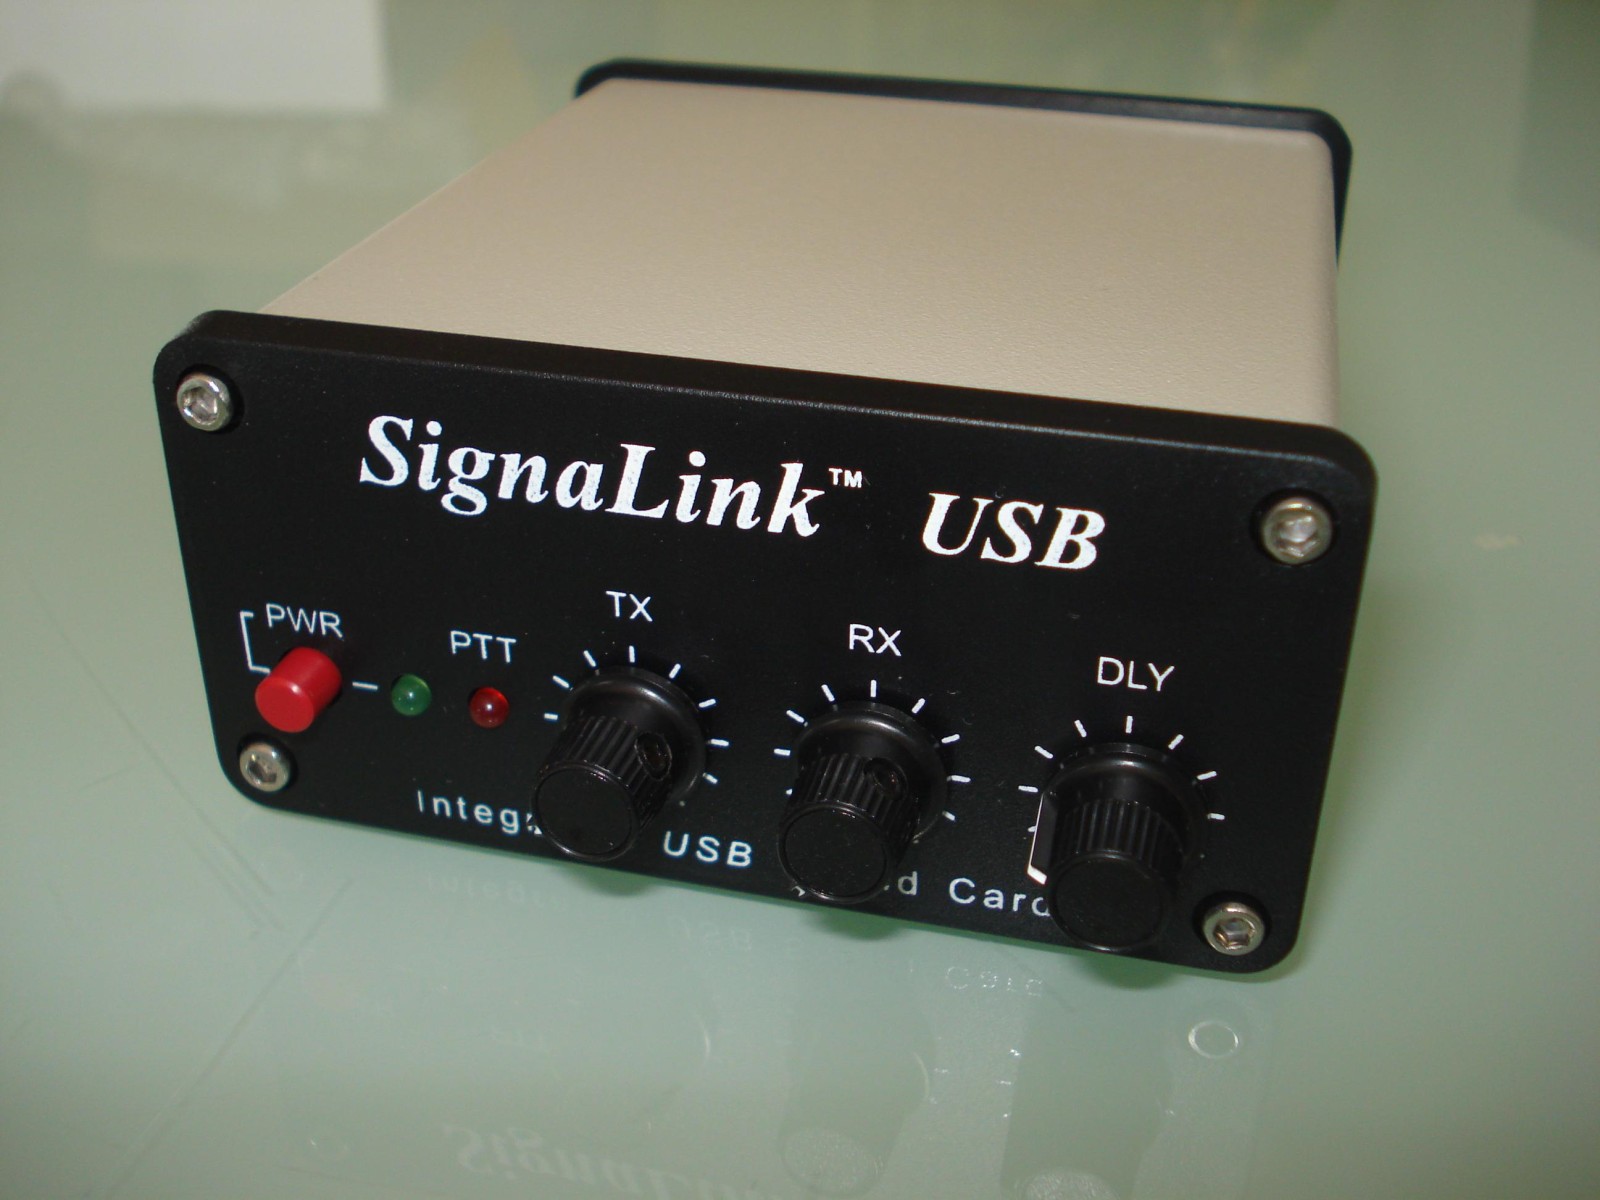
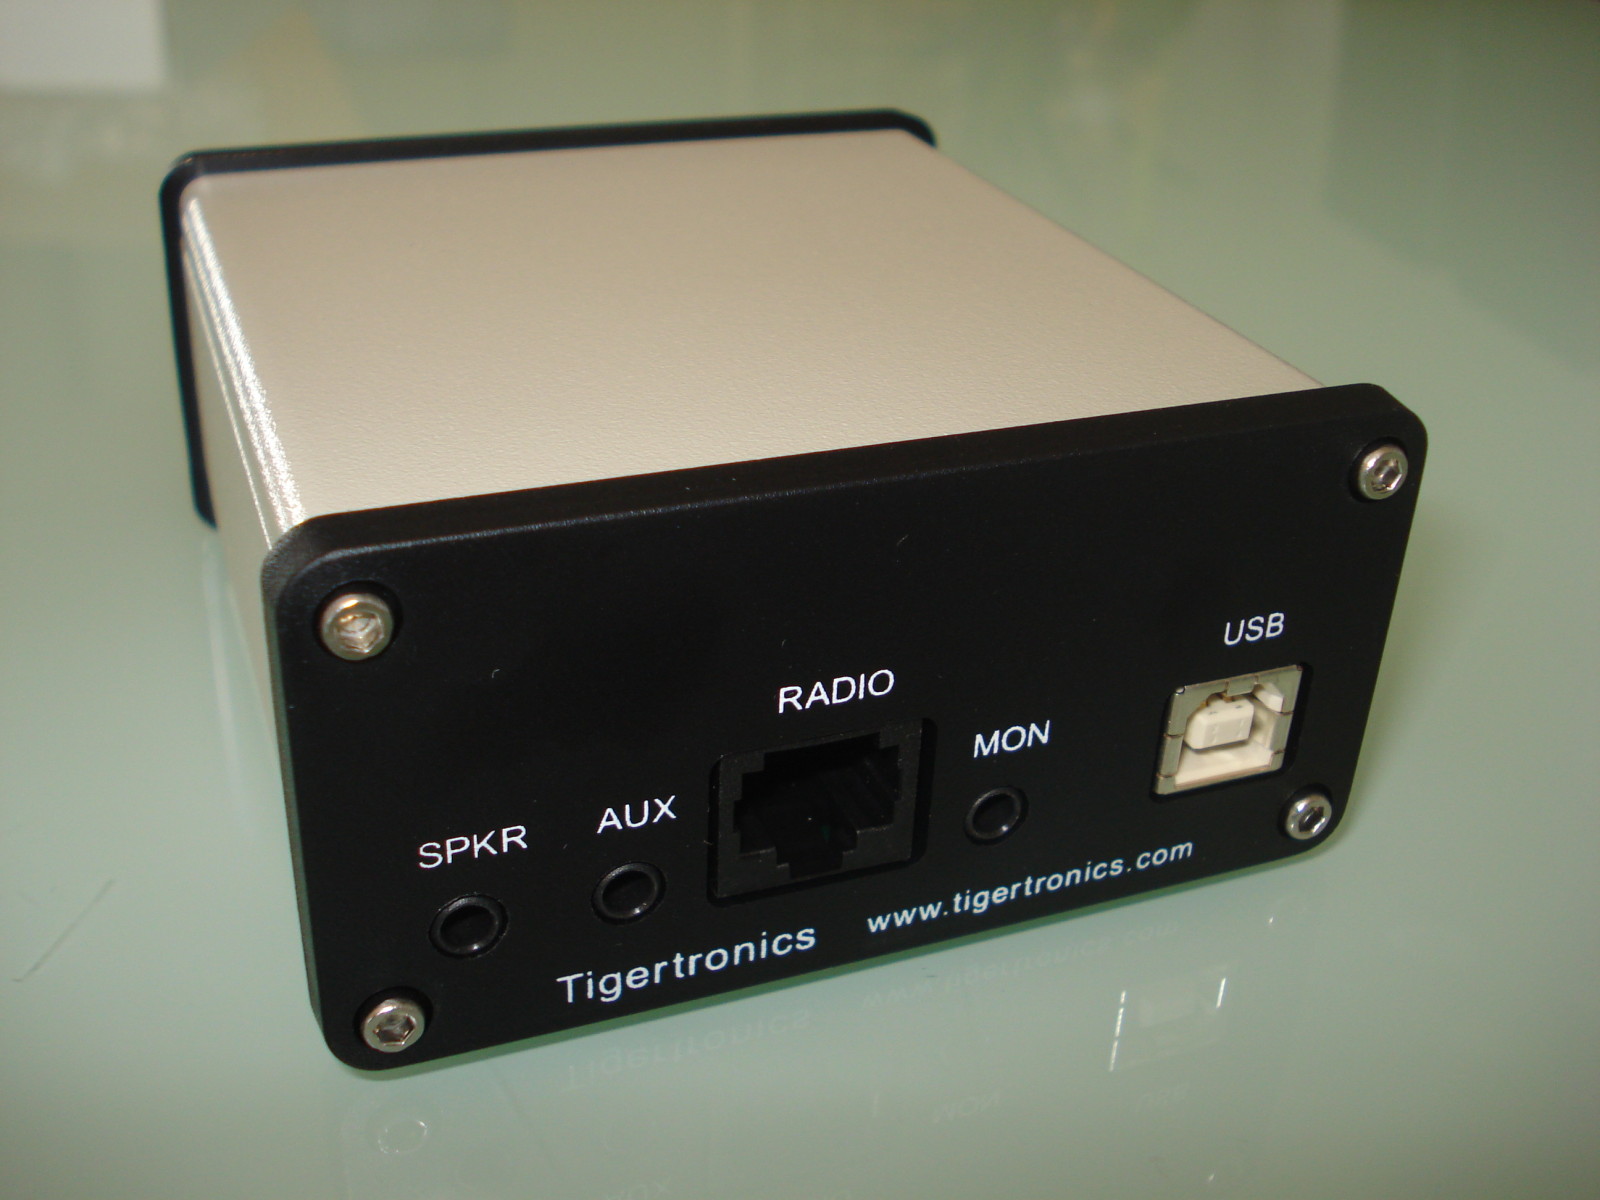
The recommended solution for a radio without integrated USB audio is the Tigertronics SignaLink USB. Two cables are needed to make all connections. A USB cable connects the computer and SignaLink for the audio (soundcard) and a cable to the radio for audio and keying. The cable for the radio is specific to connector type or manufacturer. A list of cables is available and simple internal wiring diagram to match the cable to the radio.

signalink_back
SignaLink USB interface–rear view.

Unterminated cables are available to create custom solutions. The SignaLink and cable are about $120 and available at all ham radio retailers. It is a simple VOX (“voice” operated switch) device. When sufficient audio is generated by the computer it keys the radio. It unkeys the radio when that audio has fallen below a threshold.

signalink_diagram
SignaLink USB connection set up.

If you have an interface or are setting one up for the first time, I wrote a tutorial on configuring the interface in Windows. It shows setting default devices and audio levels. These settings help avoid splattering on the bands (taking up more bandwidth than intended) due to too much audio fed into the transmitter. Again, practice with a buddy or Elmer to verify optimal audio settings. Included is a section showing how to record digital transmissions and play them back for decoding at a later time (time shift) such as a net: http://www.k8jtk.org/2015/04/16/radio-interface-setup-for-getting-started-with-ham-radio-sound-card-digital-modes/

The computer. Aside from the requirements to make connections, most computers work fine for digital operation. Ones made within the last decade seem to work without issue. Some older ones tend to have issues. A computer with a 1.5 GHz CPU and 4GB of RAM is sufficient. As always, more is better. Windows is the operating system of choice for digital programs. Mac and Linux are well represented with a program or two less viable than their Windows counterparts. Let’s not forget portable devices like tablets and smartphones. Digital applications are available for those devices too. My operating has been on a Windows 7 64 bit desktop computer.

Up to this point I’ve talked about operating digital on HF and Sideband. What about Technicians who don’t have access to digital portions of the HF bands? All of these digital modes can be operated over FM so you Technicians can get in on the fun too. Won’t be able to transmit as far as an HF station but digital can be transmitted over simplex or even a net on a repeater using an HT! On HF, audio tones are generated by Audio Frequency Shift Keying (AFSK). Audio generated by the computer is converted into RF frequencies when transmitted. Only those frequencies in use at that time are transmitted by the radio. This allows hundreds of exchanges to take place on the same frequency. FM on the other hand occupies the full 10 to 15 kHz, even though the bandwidth of the audio generated by the computer is less. So it still stands only one transmitting station can have the frequency at a time. Yes, this defeats the purpose of narrow bandwidth modes. Someone wanting to learn and experiment with these modes may get bitten by the bug and lead to a license upgrade. I say let them have at it. That’s how I did it.

To this point, Stephen Cass – KB1WNR, Senior Editor for the IEEE magazine built a low power FM digital transmitter for just that reason, get more people interested in digital. It’s a great maker project or demonstration tool for digital. I also mention it because he used my instructions to get Fldigi running on the Raspberry Pi! http://spectrum.ieee.org/geek-life/hands-on/hands-on-a-ham-radio-for-makers

Next time, I’ll start covering specific digital modes, software, and operation.

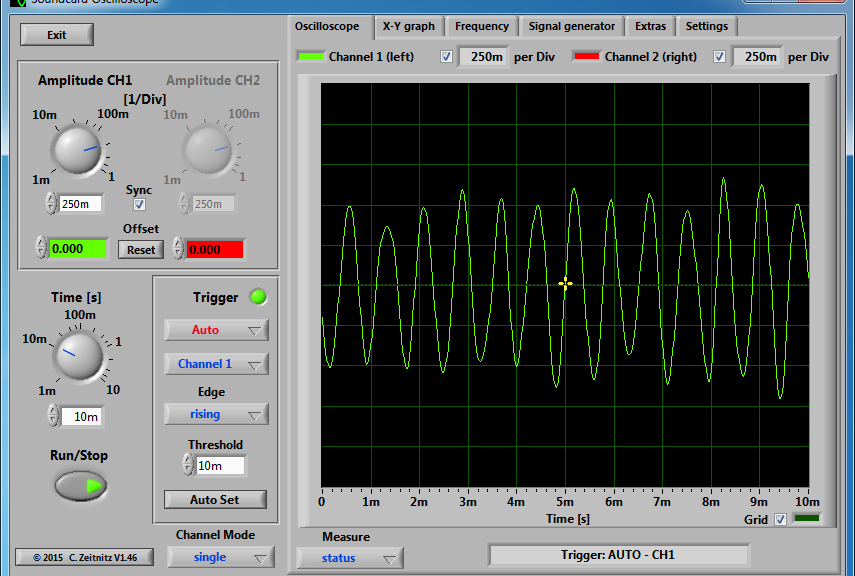
Images: F8DZY, W3YJ, West Mountain Radio.

Calibrate Receive Audio for Ham Radio Soundcard Digital Modes

This tutorial will show to determine an optimal Receive Volume (RX) level on your audio interface for operating (or only receiving) digital modes.  My tutorial showing how to setup your audio interface in Windows is the starting point for this tutorial.  Please review it, specifically the “Recording” settings as this tutorial builds upon it including having an existing audio interface setup.

The audio level from the radio into the audio interface is typically a fixed level.  Once the audio enters the audio interface, the level sent to the computer is adjustable by the RX or Receive Level controls.  This tutorial will help determine the optimal setting for the RX level.

Soundcard Oscilloscope is a program that emulates an oscilloscope from signal data received from a sound card.  The radio will need to monitor active digital transmissions.  Tuning to HF frequencies where PSK31 (7.070/14.070), JT65 (7.076/14.076), or RTTY (7.080-7.125/14.080-14.100) transmissions can be observed are great places.  The 40 and 20 meter frequencies for those are listed as those bands are more active.

This tutorial can help set the transmit level of another station by observing or monitoring their transmissions.  Do this only after you’ve calibrated your receive audio and spent a good amount of time operating with no audio issues of your own.  Use a quiet simplex frequency both can hear the other station.  This way adjustments will not be effected by other stations on the same sideband frequency.  FM won’t matter because only one station can occupy the frequency at a time.

A similar tutorial appeared in QST recently.  They beat me to it, lol!

Program versions

  • Windows 7 – 64 bit
  • Soundcard Oscilloscope 1.46

Download and Installation

This will install Soundcard Oscilloscope on your PC.

receive_level_calibration-01_install-01_soundcard_oscilloscope_website

Go to https://www.zeitnitz.eu/scope_en.

Click the link to “Download the latest version.”  Save it in your Downloads folder.

receive_level_calibration-01_install-02_installer-01

Launch the installer.

Click Yes.

receive_level_calibration-01_install-03_installer-02

Click Next.

receive_level_calibration-01_install-04_installer-03

Click Next.

receive_level_calibration-01_install-05_installer-04

Click Next.

receive_level_calibration-01_install-06_installer-05

Installation will begin.

receive_level_calibration-01_install-07_installer-06

Click OK.

receive_level_calibration-01_install-08_installer-07

Click Finish.

Soundcard Oscilloscope is now installed.

Configuration

This will setup Soundcard Oscilloscope to capture audio coming from your audio interface device.

receive_level_calibration-02_configuration-01_language

Start Soundcard Oscilloscope by clicking the Start orb.

Click All Programs.

Click Scope.

Click Scope.

The first time the program is run, you’ll be prompted to select a language.  Select your language and click Continue.

receive_level_calibration-02_configuration-02_license

The program is not free and will ask for a License key.  Not entering a license will display this screen each time the program is started.  The program is less than $12.50 US.  Please support the developers by purchasing a license.  This is made at the download site by clicking the “private donation license” link.

Click Continue if you don’t have a license.

receive_level_calibration-02_configuration-03_audio_interface_selection

Click the Settings tab.

Under Windows Sound Parameters, Audio Devices, Input is where you select the audio interface device.  For SignaLink USB, this would be Microphone USB Audio Codec.  Other interfaces: Line In, or Mic In would be selected appropriately and known from my audio interface setup tutorial.

Soundcard Oscilloscope is now configured.

Setting receive level audio

These screenshots will help determine optimal audio RX setting for receive audio.  It is important to leave the audio level settings alone in Windows.  These settings were shown in my audio interface setup tutorial.  Adjust the settings in Windows ONLY when where is not enough audio when RX level is at the maximum setting or there is too much audio with RX set to the lowest setting.

receive_level_calibration-03_calibration-01_settings

Click the Oscilloscope tab if you are not there already.

These settings will need to be reset after restarting the program.  At this point, my radio is off but it doesn’t matter.

Set the Amplitude to 250mv.

Set Time to 10ms or less.

Turn on the radio if it is not already.

Examples

Adjust the RX level until there are no peaks with flat-tops on the oscilloscope.  Flat-tops indicate the audio level is too high and digital programs will have a hard time decoding the signal.  These examples were taking monitoring PSK31 on 20 meters.

receive_level_calibration-03_calibration-02_best_example

This is the best example.  No flat-top peaks.  Peaks appear about two divisions from the center line.  There is plenty of headroom for louder signals.  My RX setting was about the 10 o’clock tick-mark on my SignaLink.

Anything lower than two divisions will still work.  There maybe issues pulling out weaker stations.

receive_level_calibration-03_calibration-03_ok_example

Here is a good example but I would not be comfortable with this audio level.  The peaks do not have flat-tops which is good.  However, the peaks are reaching well into the third division.  My RX setting was about the 11 o’clock tick-mark on my SignaLink.

receive_level_calibration-03_calibration-04_bad_example

This is an example of what the scope should not look like.  Peaks have flat-tops at the fourth division.  The audio level is too high into the computer and RX volume needs to be dialed back.  My RX setting was about the 1 o’clock tick-mark on my SignaLink.

When optimal level is reached, the audio interface receive audio level is calibrated!

Ohio Section Journal – The Technical Coordinator – April 2016 edition

One of the responsibilities of the Technical Coordinator in the Ohio Section is to submit something for the Section Journal. The Section Journal covers Amateur Radio related things happening in and around the ARRL Ohio Section. It is published by the Section Manager Scott – N8SY and articles are submitted by cabinet members.

Once my article is published in the Journal, I will also make it available on my site with a link to the published edition.

You can receive the Journal and other Ohio Section news by joining the mailing list Scott has setup. You do not need to be a member of the ARRL, Ohio Section, or even a ham to join the mailing list. Please sign up!

If you are an ARRL member and reside in the Ohio Section, update your mailing preferences to receive Ohio Section news in your inbox. Those residing outside the section will need to use the mailing list link above.
Updating your ARRL profile will deliver news from the section where you reside (if the leadership chooses to use this method).
Go to www.arrl.org and logon.
Click Edit your Profile.
You will be taken to the Edit Your Profile page. On the first tab Edit Info, verify your Email address is correct.
Click the Edit Email Subscriptions tab.
Check the News and information from your Division Director and Section Manager box.
Click Save.

Now without further ado…


Read the full edition at: http://n8sy2.blogspot.com/2016/04/april-edition-of-ohio-section-journal.html

THE TECHNICAL COORDINATOR
Jeff Kopcak – TC
k8jtk@arrl.net

DSCF5081 K8JTKHey Gang,

So — Windows 10. This topic was brought up during the after meeting at my local club. Many of you are undoubtedly seeing the upgrade nag-screens. You too might be wondering: what’s changed in Windows 10, might have heard some of the issues surrounding the new operating system, and why the big push to upgrade. This month I’ll cover the new operating system from the perspective of what has happened so far and not from a ham radio perspective. Also to preface this whole thing, Microsoft has never been very clear about their statements and often retracts or goes back on things they’ve said. In other words, any of this may change as we go along.

windows-update-impending-upgradeWhat is Windows 10?… why not Windows 9? There are many theories surrounding the choice in numbering. The named version of Windows hasn’t matched the real version number since Windows NT 4.0. Windows 10 is the successor to Windows 8.1, but not Windows as you know it. It represents a shift in the direction of Microsoft as a company. Microsoft indicated this is the “the last version of Windows.” While they’re not killing it off, Microsoft is moving to a model they call “Windows as a service.” This means Microsoft will deliver innovations and updates in an ongoing manner instead of separate releases (versions) of Windows. The ultimate goal is to have one version of Windows that will run on all platforms. Everything, including Raspberry Pi, phones, tables, HoloLens (wearable, so called “smart-glasses”), laptops, desktop PCs, Surface Hubs (interactive whiteboards), and Xbox entertainment systems. Having one version of an operating system means all of these systems will become integrated and share information easily.

windows-product-family

A large part of this shift includes the use of “the cloud.” The cloud is a fancy term for someone else’s equipment on the Internet. The most common example is ‘cloud storage.’ Services like DropBox, Google Drive, or OneDrive allow you to save your documents and pictures elsewhere. You upload files to these services and you can access those files or share them with others on the Internet. The cloud is heavily integrated into Windows 10. After installing Windows 10, it will prompt you to sign in using a Microsoft Account. This syncs your user profile with the Microsoft cloud. When you sign into another device using your Microsoft Account, your settings will be the same across those devices. You can use Windows 10 without a Microsoft account. The computer will operate in standalone mode similar to previous versions of Windows. Microsoft’s online storage service called OneDrive is integrated into the operating system as well. Other new features include your new personal assistant, Cortana. She will help find things on your computer and the web, set reminders, similar to Apple’s Siri or Google Now.

Universal apps: These first appeared in Windows 8 as “Metro Apps.” This concept is to have developers write one application and have it work the same way on any Windows platform. These apps are found and delivered via the Microsoft Store (similar to the Android Play Store or Apple’s App Store), and again – available on all platforms. Some games and applications that came preloaded in previous versions of Windows have been replaced with Universal Apps in 10.

Edge browser: Microsoft Internet Explorer has been replaced with Microsoft Edge. It’s been touted as a more secure browser. However, this has yet to play out because browser extensions are very limited.

upgrade-is-readyFree upgrade: Legal copies of Windows 7/8/8.1 are eligible for a free lifetime upgrade to Windows 10 until July 29, 2016. There are some stipulations to this free upgrade. “Lifetime” means the lifetime of the device eligible for the free upgrade. When that device fails, you cannot transfer the free upgrade to another device. What happens after July 29th? Microsoft hasn’t said. The free upgrade is expected to become a premium upgrade that you’ll have to purchase, even for a device that was previously eligible for the free upgrade. Versions prior to Windows 7 are not eligible for the free upgrade. To be honest, if you’re running a version of Windows prior to 7, you probably want to upgrade your hardware for 10.

Now reality.

Big upgrade push: Windows users have seen the icon in the system tray nagging them to upgrade. Why the big push? Microsoft is trying to avoid another Windows XP. At the time Windows XP was declared “end-of-life,” it accounted for about 10% of all computers on the Internet. Two years later, about 7% are still using XP. That’s a lot of users running a dead operating system. On top of that, Windows 7 will be 7 years old in July and only supported for 4 more years (until January 2020).

While Windows XP maybe working great, there are reasons to get off of it. Google has been leading a push for a more secure Internet. Windows XP cannot handle many modern security methods in use today. All browsers in XP (except Firefox) will display ‘your connection is not private’ when connecting to a website that has more modern security then XP can understand. Since Windows XP is not a supported operating system, it won’t be updated to handle modern security methods. While the website will still work, your connection will be less secure. A work around for this security issue is to use Firefox. Though no known vulnerabilities exist in XP, best practice dictates users should remove unsupported operating systems from the Internet if it doesn’t need to be on the Internet. Another reason to upgrade is new hardware and software will not have support for old operating systems.

upgrade-is-waitingThe upgrade push for Windows 10 has been nothing short of a disaster. Last year, users eligible for the upgrade began seeing a Windows icon in the system tray saying ‘you’re PC is ready for your free upgrade.’ This deplorable tactic is commonly used by malware and spyware authors to trick you into installing software you don’t want or need. As an Information Technology professional with an interest in cyber security, this is the type of message I tell users NOT to acknowledge. Kind of ironic. Initially this tray icon came in the form of a Windows “Recommended” update. Then Microsoft upgraded it to a “Critical” Windows Update -yet another deplorable tactic. Despite this maneuver, Windows 10 is NOT a critical update. The upgrade popups are very confusing as the clickable options are: “upgrade now,” “upgrade later,” “OK,” or “Get Started.” Oh, it gets worse. Users are reporting they vigilantly closed the prompts to upgrade (clicked the red “X”) but their system was still upgraded automatically against their wishes. They went to bed with Windows 7 and got up the next morning to Windows 10. Surprise.

Once the upgrade happens, you do have 30 days to revert back to your previous version of Windows. The problem here is users have found the roll back frequently fails. Imagine that. ‘Don’t worry, you can go back… if you want. Opps, the roll back just failed! Guess you’re stuck.’ Thanks.

Start Menu: Microsoft tried to remove the Start menu in Windows 8 and replaced it with a full screen tile menu. This was an attempt start a unified experience between PCs and mobile devices. The change worked fine on small screen devices but was a terrible experience on PCs. It was met with much outcry. The Start menu has returned in Windows 10 with something that kind of resembles the Start menu from Windows 7. It’s more of a combined Start menu — “Live Tile” experience. Live Tiles display updates like weather, news, and photos, while others are just a static application icon.

windows-10

Adding to the confusion, there now two places where system settings reside: “Settings” and “Control Panel.” Settings typically run between devices like time zone, personalization, notifications, and user accounts. The Control Panel is mostly desktop specific settings.

Tracking: Microsoft Windows 10 tracks much of what you do and where you go. Their claim is they provided a free upgrade so you can give some information back to Microsoft on your usage. Two problems with this: even if you pay for the Windows 10 upgrade, this information is still shared with Microsoft. The other, this tracking is now rolled into Windows 7 and 8. Privacy advocates feel this is a violation of user’s privacy. The argument on the other side is most use Google or Apple’s services and they know just as much about you. This Ars Technica article explains tracking is a growing trend in technology: http://arstechnica.com/information-technology/2015/08/windows-10s-privacy-policy-is-the-new-normal/

Upgrade tips: create a full system backup using a backup service or create an image of your current installation on an external hard drive before attempting to upgrade. This is a backup incase the rollback fails. Check the vendor’s website of your hardware and critical software applications. Look for driver support or knowledge base articles about Windows 10 before upgrading. Knowing whether your devices and software are supported will help minimize regret because your favorite app or device no longer works.

Certainly some of these concerns have caused me to look at alternative operating systems. I have found in my deployments (I have yet to upgrade all of my desktops) with a little work, I can get 10 to act a lot like (my favorite) Windows 7. Turning off or uninstalling cruft helps a lot: turning off notifications, disabling camera & microphone usage, disable Cortana, remove many Universal Applications, and turn off background apps. I use Classic Shell to return a normal looking Start menu and Anti-Beacon to disable tracking. Links to those applications and ones to disable the upgrade nag-screens are below. Seriously, if you find any of these apps useful, consider donating to the author because we need to support those doing the right thing and allowing choice.

Thanks for reading and 73… de Jeff – K8JTK

Image sources: thurrott.com, zdnet.com, and blogs.windows.com.

As always, use these at your own risk.
Disable Windows 10 upgrade and notifications in Windows 7 & 8/8.1:
Never 10: https://www.grc.com/never10.htm
GWX Control Panel (advanced users): http://ultimateoutsider.com/downloads/

Start menu replacement for Windows 8 & 10:
Classic Shell: http://www.classicshell.net/
Start 10 (trial): http://www.stardock.com/products/start10/

Disable Windows tracking:
https://github.com/10se1ucgo/DisableWinTracking
https://www.safer-networking.org/spybot-anti-beacon/ (from the makers of SpyBot Search and Destroy, works on all versions of Windows).
A more manual approach is presented: http://arstechnica.com/information-technology/2015/08/windows-10-doesnt-offer-much-privacy-by-default-heres-how-to-fix-it/

SSTV Transmissions from the International Space Station – April 2016 edition

An ARISS Commemorative SSTV Event Set for April 11-14 recently concluded. This event was longer than usual and I received alot of pictures. Check the ISS tag for my other ISS SSTV posts.

Station setup: MP Antennas Classic Mobile NMO Antenna – This is a local company in Cleveland and were reviewed in QST. Been using their antennas for a long time with great success. Since the antenna is multi-polarized (the MP in the company name), it is supposed to be a good substitution for receiving satellite transmissions without a directional antenna and not worrying about Doppler Shift (which needs to be accounted for in some cases). The height is about 15 feet.

The antenna was connected to my ICOM IC-7000 with DSP settings turned off on 145.800 MHz FM. Used this radio only because my SignaLink USB is connected to it and the one I use for digital operation on all bands. MMSSTV is the Slow-Scan TV program I use.

I have tutorials available to help get your station setup and getting started with MMSSTV to receive images from the ISS.

I received 14 images total from my location near Cleveland (EN91bl).

SSTV-Transmissions-from-the-International-Space-Station-2016-04-12-1959
2016-04-12 1959 UTC
SSTV-Transmissions-from-the-International-Space-Station-2016-04-12-2004
2016-04-12 2004 UTC
SSTV-Transmissions-from-the-International-Space-Station-2016-04-12-2138
2016-04-12 2138 UTC
SSTV-Transmissions-from-the-International-Space-Station-2016-04-12-2315
2016-04-12 2315 UTC
SSTV-Transmissions-from-the-International-Space-Station-2016-04-13-0051
2016-04-13 0051 UTC
SSTV-Transmissions-from-the-International-Space-Station-2016-04-13-0230
2016-04-13 0230 UTC
SSTV-Transmissions-from-the-International-Space-Station-2016-04-13-0404
2016-04-13 0404 UTC
SSTV-Transmissions-from-the-International-Space-Station-2016-04-13-1907
2016-04-13 1907 UTC
SSTV-Transmissions-from-the-International-Space-Station-2016-04-13-2046
2016-04-13 2046 UTC
SSTV-Transmissions-from-the-International-Space-Station-2016-04-13-2222
2016-04-13-2222 UTC
SSTV-Transmissions-from-the-International-Space-Station-2016-04-14-0000
2016-04-14 0000 UTC
SSTV-Transmissions-from-the-International-Space-Station-2016-04-14-0139
2016-04-14 0139 UTC
SSTV-Transmissions-from-the-International-Space-Station-2016-04-14-0312
2016-04-14 0312 UTC
SSTV-Transmissions-from-the-International-Space-Station-2016-04-15-1859
2016-04-15 1859 UTC