This article appeared in the The Wood County Amateur Radio Club newsletter CQ Chatter May 2016 edition.
Read the rest of the series in the Digital Communications in Amateur Radio articles category.
This time in our quest to get on the air with digital, I’ll discuss station setup. For most of this article, it will be related to HF and sideband operation. I’ll talk about FM near the end.
For a Ham Radio digital setup, three things are needed: a radio, computer, and an interface to connect the two.
First the radio. Theoretically, any radio can be put into digital service. Two things are important to consider: frequency stability and switching speed. Frequency stability is critical to digital operations because drift is deadly. Tube and older radios tend to drift in frequency as they warm up. For a mode such as PSK, drifting a few hertz puts you into someone else’s conversation. Switching speed and fast turnaround times are needed. The switching speed of older radios can be hard on relays. Solid-state radios manufactured in the last two decades are recommended. Radios that cover HF/VHF/UHF all mode – open up even more operating possibilities.

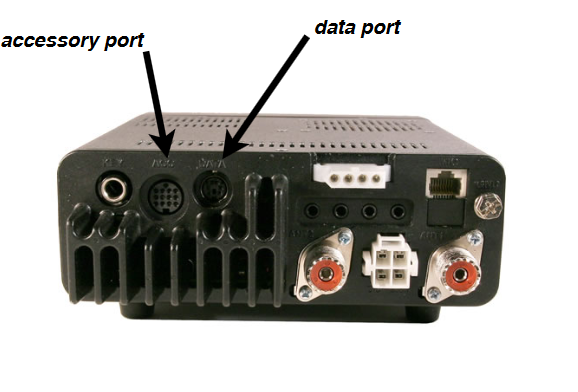
Most radios are designed with digital modes in mind. Radios with an “accessory port” or “data port” built in are ready to go, though not plug-and-play. The data port is the recommended way to connect an interface to the radio. These ports have pins for keying, transmit audio, and received audio. The audio pins have fixed audio levels and do not change based on the volume setting of the radio. If the radio doesn’t have accessory or data ports, microphone and audio out can be used. It’s not an ideal situation but it will work. An important thing to keep in mind, some radios mix various audio inputs. An example is an external mic connected to the accessory port maybe mixed with audio coming into the data port. This means audio generated by the computer will mix with ambient noise picked up from the microphone. You don’t want this because you’ll interfere with other digital exchanges. It’s important to know your radio and how it operates in different configurations. Test with a buddy or Elmer first before jumping in.
CAT (Computer Aided Transceiver) ports on the radio including RS232 (serial port) and CI-V are useful when creating your own interface. Audio cables between your radio and computer would provide transmit and receive audio but these won’t key the radio. CAT ports provide a lot of functionally including the ability to change settings in the radio, update memory channels, change frequency, etc. Keying the radio via CAT is universally supported in applications. A configuration example would be using the soundcard for audio in/out to the audio out/mic-in on the radio. A separate cable between the computer and radio provides CAT commands, usually via a COM port.
Duty cycle is the amount of time the radio is generating RF. When operating SSB voice, the amount of RF the radio generates depends how loud your voice is at that moment. In CW, RF is generated with each dot and dash. In both cases, the radio is operating at less than 100% duty cycle due to pauses in between words and characters. Many digital modes operate the radio near 100% which causes a lot of heat. Heat causes components to fail. Radios are designed for SSB voice though some newer models are including 100% duty cycle. Operate the radio at a power setting of 50% or less (30% recommended) of the total output power. A 100 watt radio would be set between 30 and 50 watts. FM, by nature, is the exception because voice or digital over FM uses the same bandwidth. The typically longer key down times for digital will still generate more heat.
Radios have different operating modes: USB, LSB, FM, AM, RTTY, DATA, DIGITAL and possibly others. HF digital mostly uses Upper Sideband regardless of frequency. In most cases the USB setting is what you want. Some radios will not allow keying from a computer unless they’re in a ‘digital’ mode setting. Check your operating manual and, again, practice and test with a buddy first. Turn off all filters, blankers, attenuation and the like or set it to the least disruptive setting. Set transmit and receive bandwidths to the full SSB bandwidth allowed (2.8 kHz). No filtering and wide bandwidths have less of a chance to distort or modify the signal. Modification of the signal affects the ability to decode a signal. Filtering can be used but after practice and understanding how they affect decoding. Contests usually warrant filtering to keep loud adjacent signals from affecting the exchange.
The interface. It serves two main purposes: act as a modem and the device that keys the radio. It acts like a modem by taking modulated audio from the software application and sending to the radio for transmit and taking received audio from the radio and sending it to the application for demodulation. Nearly all computers and laptops in the last decade have on-board audio while older configurations utilize an addon soundcard. Most computers don’t have serial ports these days. If a serial port is needed for CAT, options such as a USB (Universal Serial Bus) to serial adapter, serial port addon cards, or cables manufactured with USB to serial adapters built in are available.

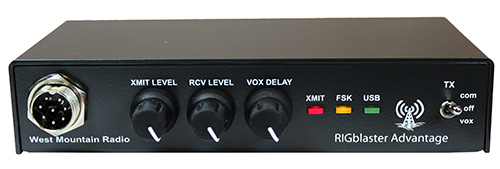
All-in-one interface solutions make the connection between the radio and computer easy. Solutions offer a built in sound card and fewer cables needed to make the connections. Offerings include products from West Mountain Radio, MFJ, MicroHAM, or RigExpert. These options free your on-board soundcard to listen to music or surf online minimizing the possibility of transmitting audio not suited for the airwaves. Adjustments on these interfaces are audio levels and speed (delay) at which the interfaces switches the radio from transmit to receive. Newer models include all functionality integrated into a single USB port requiring only one cable.

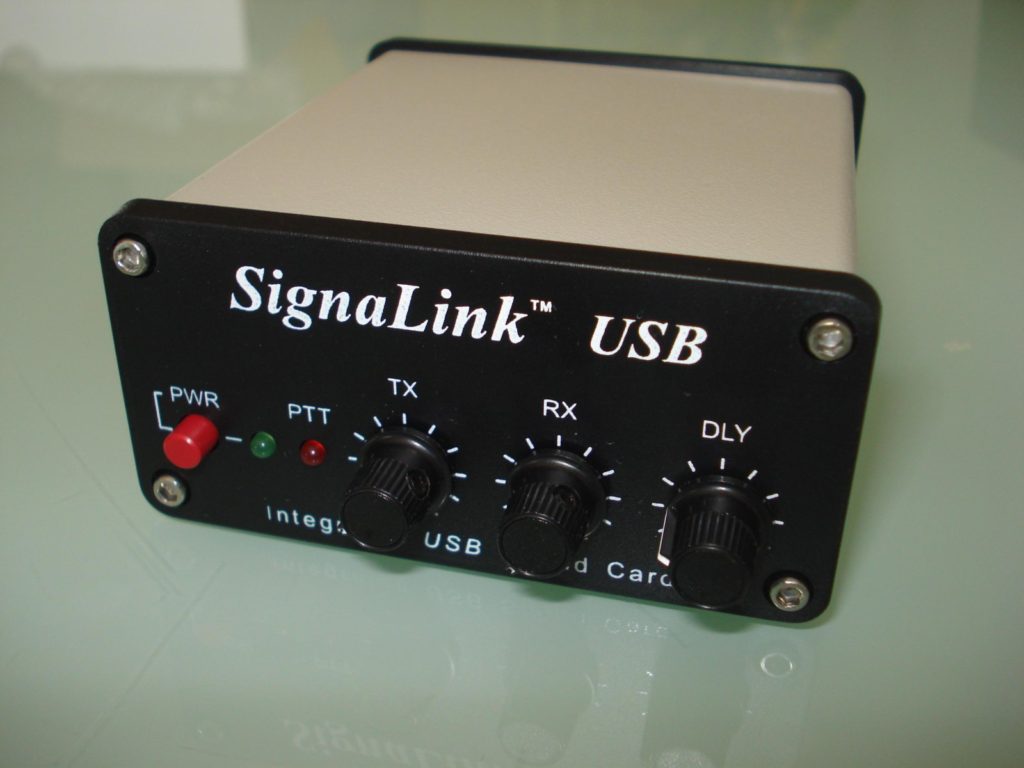
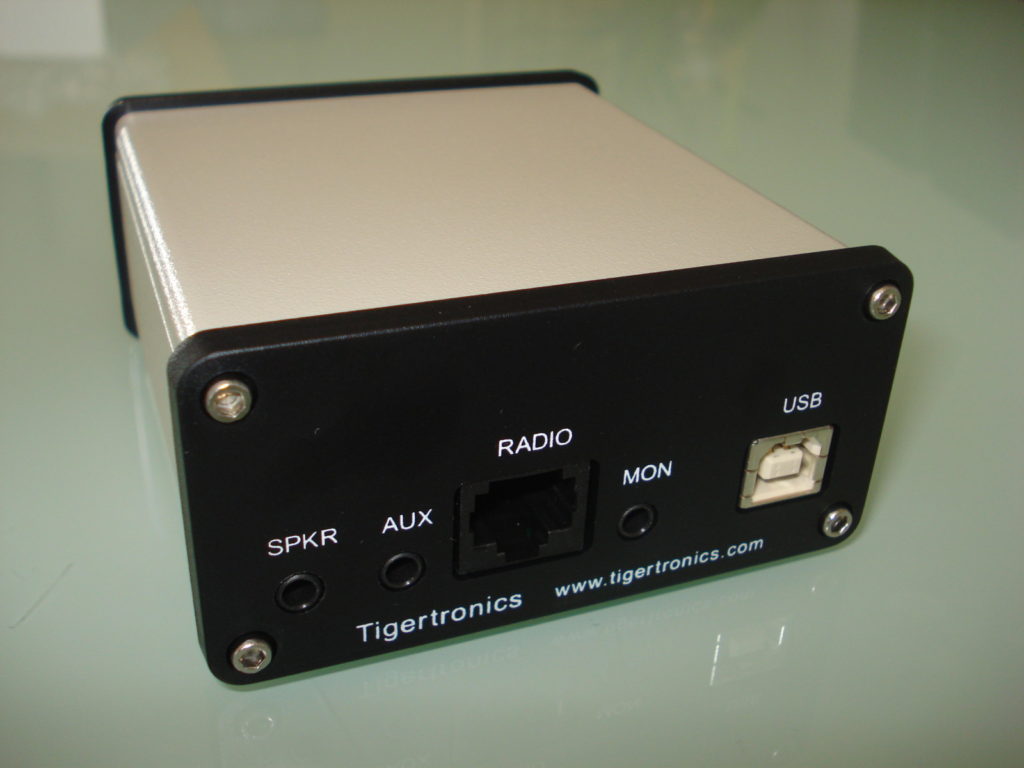
The recommended solution for a radio without integrated USB audio is the Tigertronics SignaLink USB. Two cables are needed to make all connections. A USB cable connects the computer and SignaLink for the audio (soundcard) and a cable to the radio for audio and keying. The cable for the radio is specific to connector type or manufacturer. A list of cables is available and simple internal wiring diagram to match the cable to the radio.

Unterminated cables are available to create custom solutions. The SignaLink and cable are about $120 and available at all ham radio retailers. It is a simple VOX (“voice” operated switch) device. When sufficient audio is generated by the computer it keys the radio. It unkeys the radio when that audio has fallen below a threshold.

If you have an interface or are setting one up for the first time, I wrote a tutorial on configuring the interface in Windows. It shows setting default devices and audio levels. These settings help avoid splattering on the bands (taking up more bandwidth than intended) due to too much audio fed into the transmitter. Again, practice with a buddy or Elmer to verify optimal audio settings. Included is a section showing how to record digital transmissions and play them back for decoding at a later time (time shift) such as a net: http://www.k8jtk.org/2015/04/16/radio-interface-setup-for-getting-started-with-ham-radio-sound-card-digital-modes/
The computer. Aside from the requirements to make connections, most computers work fine for digital operation. Ones made within the last decade seem to work without issue. Some older ones tend to have issues. A computer with a 1.5 GHz CPU and 4GB of RAM is sufficient. As always, more is better. Windows is the operating system of choice for digital programs. Mac and Linux are well represented with a program or two less viable than their Windows counterparts. Let’s not forget portable devices like tablets and smartphones. Digital applications are available for those devices too. My operating has been on a Windows 7 64 bit desktop computer.
Up to this point I’ve talked about operating digital on HF and Sideband. What about Technicians who don’t have access to digital portions of the HF bands? All of these digital modes can be operated over FM so you Technicians can get in on the fun too. Won’t be able to transmit as far as an HF station but digital can be transmitted over simplex or even a net on a repeater using an HT! On HF, audio tones are generated by Audio Frequency Shift Keying (AFSK). Audio generated by the computer is converted into RF frequencies when transmitted. Only those frequencies in use at that time are transmitted by the radio. This allows hundreds of exchanges to take place on the same frequency. FM on the other hand occupies the full 10 to 15 kHz, even though the bandwidth of the audio generated by the computer is less. So it still stands only one transmitting station can have the frequency at a time. Yes, this defeats the purpose of narrow bandwidth modes. Someone wanting to learn and experiment with these modes may get bitten by the bug and lead to a license upgrade. I say let them have at it. That’s how I did it.
To this point, Stephen Cass – KB1WNR, Senior Editor for the IEEE magazine built a low power FM digital transmitter for just that reason, get more people interested in digital. It’s a great maker project or demonstration tool for digital. I also mention it because he used my instructions to get Fldigi running on the Raspberry Pi! http://spectrum.ieee.org/geek-life/hands-on/hands-on-a-ham-radio-for-makers
Next time, I’ll start covering specific digital modes, software, and operation.
Images: F8DZY, W3YJ, West Mountain Radio.