Read the rest of the series in the DMR in Amateur Radio series category.
You picked up a new DMR radio! Congratulations! You maybe thinking, what have I gotten myself into? Good question. DMR is the first commercial mode adopted for ham radio use. Terminology and radio setup are familiar to those who program commercial gear. If you’re coming across this programming example and have not read the first part on terminology, please do so as this will build upon it. Passing around a code plug makes DMR seem plug-and-play and it’s a great way to get started. Doing so tends to leave most of us unable to change the configuration of our own radios. My goal is to demonstrate how to program a DMR ham radio code plug from scratch. This will lead to understanding how code plugs work and how to modify them. I will demonstrate programming a code plug for an example repeater, hotspot, and simplex operation.
In addition to this example, I recommend looking at available code plugs online to get an idea of different ways to improve yours. This is how I learned to program code plugs. There is no central database or repository. Code plugs are scattered around the Internet and shared online. This makes sense because local users would know where to get a code plug. Ask others in the area with similar DMR radios where to find code plugs. The ARRL Ohio site has ones for Ohio’s DMR repeaters: http://arrl-ohio.org/digital/digital.html. Where this works for local hams, a scavenger hunt is required to find working code plugs for an area they’re visiting.
Screen shots and settings referenced in this tutorial are from the TYT MD-380 CPS and radio. Similar settings can be found in other programmers and radios. Functions of not-so-obvious radio settings are described in the appropriate sections.
Software (TYT & Connect Systems)
Updating settings and memories in all DMR radios requires a computer, programming cable, and CPS. Check radio packaging because some include the cable and software, others consider it an additional accessory. Most stock CPSes can’t rearrange entries or import from other sources. If you entered a new contact and wanted to rearrange the order, you can’t. If you want to import thousands of users, you can’t. Third-party code plug editors provide this additional functionality. All are freeware.
Tytera (TYT) MD-380/390/2017 CPS and firmware: http://www.tyt888.com/?mod=download
Connect Systems documentation, CPS, and firmware: http://www.connectsystems.com/software/
MD380 Tools: https://github.com/travisgoodspeed/md380tools
Alternative firmware for the TYT MD-380. Use at your own risk.
TYT MD-380 / 390 Code Plug Editor: http://www.miklor.com/DMR/DMR-380-CPEditor.php
Editor for importing/exporting settings, importing from the DMR-MARC user database, and rearranging entries. The TYT CPS is still needed to write the code plug to the radio. This is my preferred MD-380 editor.
N0GSG’s DMR Contact Manager: http://n0gsg.com/contact-manager/
Works for most models of Connect Systems, Tytera, Retevis, and AnyTone radios. Editor can import/export settings and import contacts from the DMR-MARC user database, comma separated file (CSV), or existing code plug. Sorting is accomplished by clicking the header columns. Radio CPS is still needed to write the code plug to the radio.
The last three are free to use but please consider a donation to the developer if you find their work useful.
Radio ID, general settings, and FPP
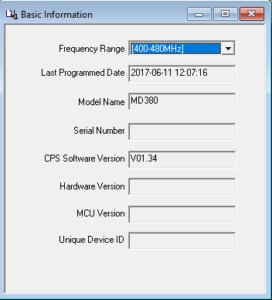
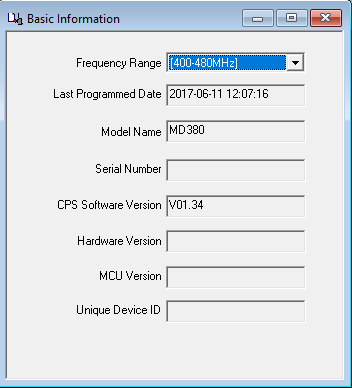
After installing the CPS, in “Basic Information,” first check the “Frequency Range” is correct for the radio.
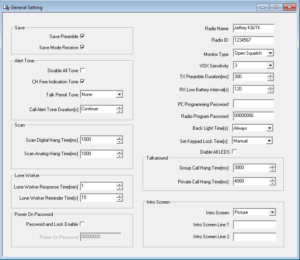
First thing to program is your “Radio ID.” You registered for one, right? It is found in the CPS under “General Settings.” Enter your assigned CCS7 ID. When passing around a code plug or loading someone else’s, update the CCS7 ID otherwise you will appear as someone else.
The “Radio Name” can be whatever name you want to give the radio.
I like to have a notification when the transmission is complete and the channel is free. This is known as the ‘CH Free Indication Tone.’ NOTE: this tone did not work with the DV4Mini for some reason.

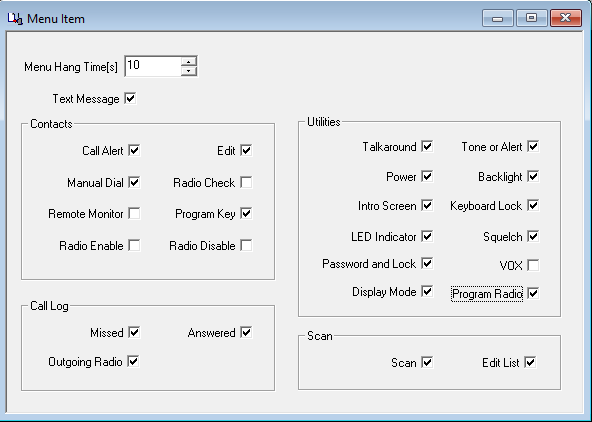
Enable FPP so the programming can be modified from the radio’s keypad. Remember to read the radio or update changes made through FPP into the CPS. Changes will be overwritten when the code plug is downloaded again to the radio. In the CPS, FPP can be enabled in “Menu Item,” under “Utilities,” check “Program Radio.”
To enter FPP mode on the radio, go to the menu, select “Settings,” and “Program Radio.” The “Radio Program Password” in “General Settings” of the CPS is used when entering FPP on the radio. This is a commercial carryover to keep users from screwing with the radio. Enter the program password, if needed, and voila.
Hang-time, delays, and other adjustments can be made and experimented with at your leisure.
Programming example
In order to successfully program a code plug for a repeater, Color Code, talk group, and time slot configuration must be known. This information can be obtained from RepeaterBook, RFinder, owner/club website, asking another user or the repeater owner. Also ask if the repeater has access to reflectors, if desired. Brandmeister and DMR-MARC repeaters have reflector access.
A configuration example of a factitious repeater is outlined below. I’ve picked common U.S. talk groups for each time slot and will use the “Area 8” reflector as examples. When you become more comfortable, substitute the local repeater’s information.
Private calls to individuals are never a mandatory part of repeater configuration. They are possible and will be shown as an example. I include private call channels for frequent contacts as part of my hotspot code plug.
The “type” column in the table below is for informational/clarification purposes only and would not necessarily be provided by the owner (see the previous terminology write-up).
Labeling and organization of the code plug is user preference. RX Group lists and channels will need an abbreviation or prefix noting to which system it applies. When programming even 10 repeaters, some distinction must be made for clarity. Prefixes help programming because similar items are grouped together in the CPS. Rationale behind this will become clearer as you add repeaters to a code plug. Some might like to have the city spelled out (Cleveland, Dayton, Columbus, Cincinnati, Toledo) while having the talk groups abbreviated (WW, NA, Lcl 9, TAC-311, Statewide). Others like to have the city abbreviated (Cle, Day, Col, Cin, Tol) while the talk group is spelled out (World-Wide, North America, Local 9, TAC-311, Ohio). No two items may have the same exact name in any one area: Contacts, RX Groups, Channels, Zones, or Scan Lists. “SC” will be the prefix used for this example to indicate “Some City.”
| Call: K8XXX |
City: Some City, OH |
Output: 444.300
Input: 449.300 |
Color Code: 1 |
| Label |
Type |
ID |
Time Slot |
| World-Wide |
Talk group |
91 |
1 |
| North America |
Talk group |
93 |
1 |
| USA – Nationwide |
Talk group |
3100 |
1 |
| Local 9 (or Reflector) |
Talk group |
9 |
2 |
| TAC-310 |
Talk group |
310 |
2 |
| TAC-311 |
Talk group |
311 |
2 |
| TAC-312 |
Talk group |
312 |
2 |
| Midwest (regional) |
Talk group |
3169 |
2 |
| Ohio (statewide) |
Talk group |
3139 |
2 |
| USA – Area 8 |
Talk group |
4648 |
2 |
Individual contact
| Scott N8SY |
User |
3139437 |
N/A |
Contacts
Digital contacts are required to be setup first. These drives the ability to build RX Lists and channels. Every talk group, reflector, or user gets a contact. Relevant information in the table above: Label, Type, and ID.
It’s best to follow the labeling/naming provided by the c-Bridge. Some radios don’t have a lot of display real estate and names must be shortened to something like “WW” for talk group 91, “NA” for 93.
There are four fields per “Digital Contact” record in the CPS:
- Contact Name
- Call Type
- Call ID
- Call Receive Tone
“Contact Name” is simply the name you give each contact and is the label seen on the radio while receiving a call from that ID. “Call Type” is group/private/all-call setting. “Group” is for talk groups and “Private” is used for radio-to-radio calls or commands. “Call ID” is the numeric talk group, reflector, radio ID, or command number. “Receive Tone” is a per-call setting where a tone is emitted from the radio prior to unmuting the audio. This can be used as notification prior to receiving a call from a contact of interest.
There cannot be two contacts with the same “Call ID” or the same “Contact Name.” When programming different repeaters, potentially on different networks, all talk groups for all c-Bridges are entered as contacts. If two networks label talk group 3333 differently, a generic display name will have to be chosen, such as “3333” or “Group 3333.” On the other hand, “Example talk group” is talk group ID 3333 on one network and ID 3344 on another, then two differently named contacts have to be created for the same talk group (ie: “ExTG 3333” with ID 3333, “ExTG 3344” with ID 3344).
If the repeater owner says they follow K4USD’s talk group layout for example, they have nearly 70 available talk groups on their c-Bridge. Though it seems like a lot of work at the time, I recommend creating contacts for all 70 available talk groups. Having all talk groups programmed will result in less effort changing the code plug later. Brandmeister on the other hand, good luck. You really have to decide which talk groups are of interest because all talk groups are available to all repeaters and hotspots. To keeps things simple, stick with the repeater owner’s suggested Brandmeister groups.
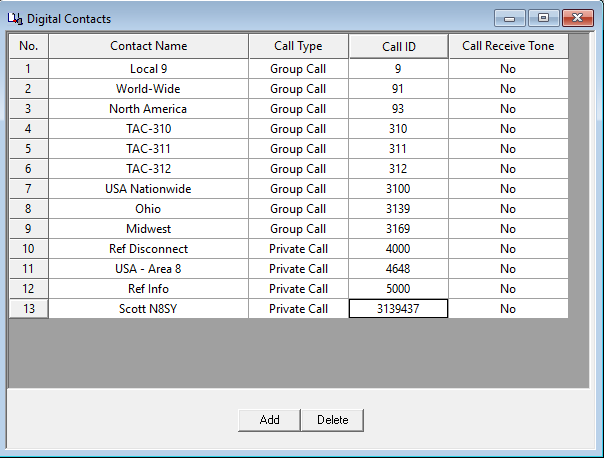
For this programming example, contacts are pre-sorted by ID number. In the CPS software, create Digital Contacts with the listed settings:
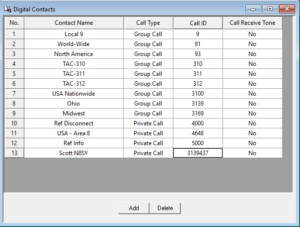
- Contact #1
- Contact name: Local 9
- Call type: Group call
- Call ID: 9
- Receive tone: No
- Contact #2
- Contact name: World-Wide
- Call type: Group call
- Call ID: 91
- Receive tone: No
- Contact #3
- Contact name: North America
- Call type: Group call
- Call ID: 93
- Receive tone: No
- Contact #4
- Contact name: TAC-310
- Call type: Group call
- Call ID: 310
- Receive tone: No
- Contact #5
- Contact name: TAC-311
- Call type: Group call
- Call ID: 311
- Receive tone: No
- Contact #6
- Contact name: TAC-312
- Call type: Group call
- Call ID: 312
- Receive tone: No
- Contact #7
- Contact name: USA Nationwide
- Call type: Group call
- Call ID: 3100
- Receive tone: No
- Contact #8
- Contact name: Ohio
- Call type: Group call
- Call ID: 3139
- Receive tone: No
- Contact #9
- Contact name: Midwest
- Call type: Group call
- Call ID: 3169
- Receive tone: No
- Contact #10
- Contact name: Ref Disconnect
- Call type: Private call
- Call ID: 4000
- Receive tone: No
- Contact #11
- Contact name: USA – Area 8
- Call type: Private call
- Call ID: 4648
- Receive tone: No
- Contact #12
- Contact name: Ref Info
- Call type: Private call
- Call ID: 5000
- Receive tone: No
- Contact #13
- Contact name: Scott N8SY
- Call type: Private call
- Call ID: 3139437
- Receive tone: No
Notice contacts #10 and #12 are not listed in the example table. These are standard reflector commands. A private call to ID 4000 is required to disconnect the repeater, 5000 checks link status. Talk group 9 is also required for reflector use. See the Reflector section for usage.
(Digital) RX Group lists
Once Contacts are entered, RX Group lists can be created. Relevant information from the example table: Label and Time Slot. RX Group lists are limited to a maximum of 32 talk groups per list. The intent was to monitor all talk group activity on a time slot. Only contacts set to “Group Call” can be added.
There are generally two ways of creating RX Groups. The first uses a one-to-one relationship where each talk group has its own RX Group List. The second includes all available talk groups on a repeater’s time slot into a single list. The latter creates lists unique to a repeater that cannot be reused on another repeater, unless the configuration is exactly the same. If the repeater has less than 32 talk groups on a time slot, put them all in one RX Group list. If there are more than 32, then create one RX list per talk group.
To keep repeater specific group lists unique, name the list: repeater location followed by “TS1/2” for the time slot designation. Example: “Some City TS1,” “Some City TS2.”
RX Group lists and the RX list selected for a channel are the first places to look when there is a suspected radio programming issue or nothing is being heard.
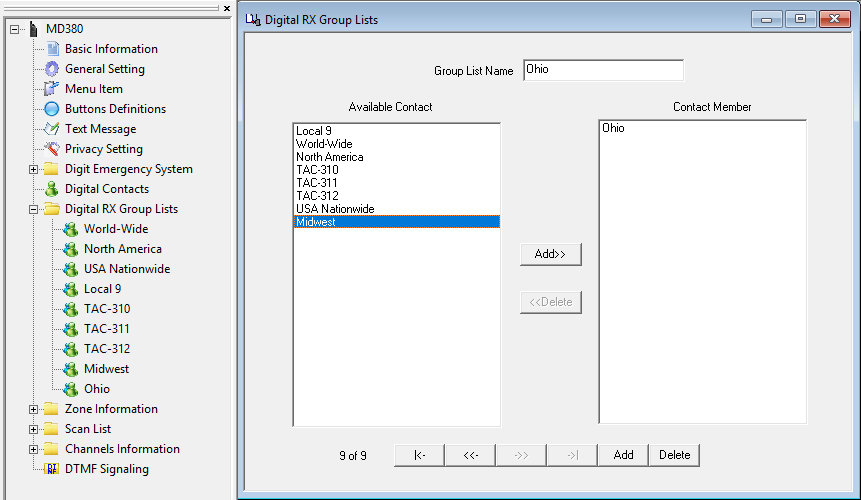
A repeater specific example is provided later. For this programming example, the one-to-one relationship is demonstrated. RX Groups are created in the same order as the repeater listing. In the CPS software, create RX Group lists and include the listed contact(s):
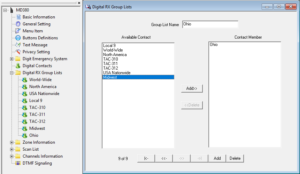
- Digital RX Group List #1
- Group List Name: World-Wide
- Available Contact, select and add: World-Wide
- Digital RX Group List #2
- Group List Name: North America
- Available Contact, select and add: North America
- Digital RX Group List #3
- Group List Name: USA Nationwide
- Available Contact, select and add: USA Nationwide
- Digital RX Group List #4
- Group List Name: Local 9
- Available Contact, select and add: Local 9
- Digital RX Group List #5
- Group List Name: TAC-310
- Available Contact, select and add: TAC-310
- Digital RX Group List #6
- Group List Name: TAC-311
- Available Contact, select and add: TAC-311
- Digital RX Group List #7
- Group List Name: TAC-312
- Available Contact, select and add: TAC-312
- Digital RX Group List #8
- Group List Name: Midwest
- Available Contact, select and add: Midwest
- Digital RX Group List #9
- Group List Name: Ohio
- Available Contact, select and add: Ohio
Notice contacts #10-13 cannot be included because they are set to private call.
Repeater specific, all talk groups per time slot example:
- Digital RX Group List #1
- Group List Name: Some City TS1
- Available Contact, select and add (position 1): World-Wide
- Available Contact, select and add (position 2): North America
- Available Contact, select and add (position 3): USA Nationwide
- Digital RX Group List #2
- Group List Name: Some City TS2
- Available Contact, select and add (position 1): Local 9
- Available Contact, select and add (position 2): TAC-310
- Available Contact, select and add (position 3): TAC-311
- Available Contact, select and add (position 4): TAC-312
- Available Contact, select and add (position 5): Midwest
- Available Contact, select and add (position 6): Ohio
Channels
This is where it all comes together. To create channels, Contacts and RX Group lists need to have been established.
Analog channels are straight forward if you’ve programmed any other analog ham radio. They will not be covered here.
Channels for the same repeater are easier to copy and paste. This depends on the software but usually involves setting up a channel, copying that channel, creating a blank channel, and pasting over the blank channel.
Some settings definitions:
- Admit Criteria: determines when the radio is allowed to transmit.
- Always: allows the radio to transmit any time PTT is pressed. This is the most disruptive option and may interrupt another QSO in progress.
- Channel Free: the radio will only transmit when there is no transmission in progress on the time slot.
- Color Code (Free): the radio will only transmit when the time slot is free on the repeater matching the color code. This mode pings the repeater at the beginning of each transmission to find a matching color code. This pinging is also an indicator if you’re making the repeater or if it is in use.
- “Color Code” is recommended for a repeater, “Channel Free” for hotspot & simplex use.
- In Call Criteria: action taken while receiving a call and the PTT button is pressed. This can be thought of as the ‘interrupt a call’ setting.
- Follow Admit Criteria: follow the setting defined in “Admit Criteria.”
- Always: always transmit, even while receiving a call.
- “Follow Admit Criteria” is recommended for a repeater, “Always” for hotspot & simplex use.
- Auto Scan: when the channel is selected, the radio begins scanning channels defined in the selected “Scan List.” For this option to function: create channels, add the channels to a Scan List, then create another new channel with the newly created Scan List selected and “Auto Scan” checked.
- Lone Worker: the user receives an alert from the radio after a specified amount of time and must acknowledge by pressing any button on the radio. If the user does not respond to the alert, it is assumed the user is injured or incapacitated. The radio switches to an emergency mode so the user can be located and assisted. I have not seen this used in ham radio.
- Allow Talkaround: this allows the radio to operate simplex mode when a repeater is not available or out-of-range. TX and RX frequencies must be different for this option to function. Talkaround is enabled/disabled manually via the radio’s “Utilities” menu, select “Radio Settings,” select “Talkaround,” then select “Turn On/Off.”
- Emergency System: settings for an emergency alarm. I have not seen this used in ham radio.
- Privacy: DMR includes the ability to “scramble” transmissions. This is a form of encryption and not allowed in the US.
A clear definition of “RX/TX Ref Frequency” has not been found and understood the default setting is sufficient.
Provided by Rich – G3ZIY:
These two drop-down selections are provided to change the radio’s basic oscillator frequency in the receive or transmit side. Because the radio covers such a wide frequency range, on some specific receive or transmit frequencies there can be a birdie generated internally which interferes with reception or transmission. If this occurs, by simply trying a different setting from the current setting, it should be possible to get clear reception and a clean transmission.
Leave “TX/RX Ref Frequency” at the default unless you experience problems transmitting or receiving and tack the problem down to the radio itself.
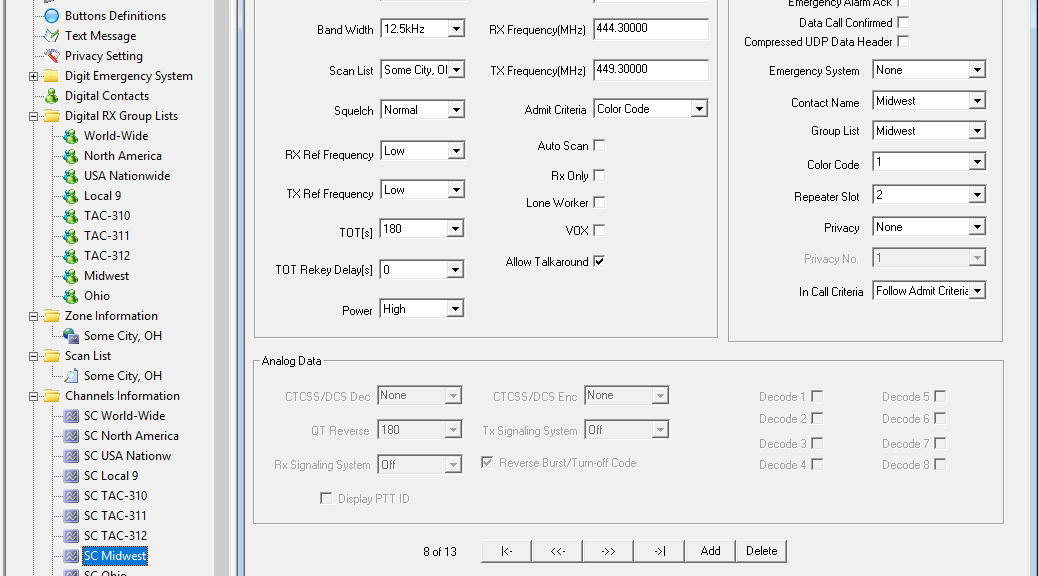
These settings will be applied to every digital channel created for this example and is a good template for actual programming:
- Channel Mode: Digital
- Band Width: 12.5kHz
- TOT[s]: 180s (3 min) max for repeater & hotspot, 600s (10 min) max for simplex channels.
- Power: “High” for repeaters & simplex – unless really close, “Low” for hotspots.
- Admit Criteria: “Color Code” for repeater, “Channel Free” for hotspot & simplex.
- Allow Talkaround: yes
- Emergency System: None
- Privacy: None
- In Call Criteria: “Follow Admit Criteria” for repeater, “Always” for hotspot & simplex.
For this programming example, channels are created in the same order as the repeater listing. In the CPS software, create channels with the listed settings including universal settings above. SC = Some City, Ohio:

- Channel #1
- Channel Name: SC World-Wide
- RX Frequency: 444.300
- TX Frequency: 449.300
- Contact Name: World-Wide
- Group List: World-Wide (or Some City TS1)
- Color Code: 1
- Repeater Slot: 1
- Channel #2
- Channel Name: SC North America
- RX Frequency: 444.300
- TX Frequency: 449.300
- Contact Name: North America
- Group List: North America (or Some City TS1)
- Color Code: 1
- Repeater Slot: 1
- Channel #3
- Channel Name: SC USA Nationw
- RX Frequency: 444.300
- TX Frequency: 449.300
- Contact Name: USA Nationwide
- Group List: USA Nationwide (or Some City TS1)
- Color Code: 1
- Repeater Slot: 1
- Channel #4
- Channel Name: SC Local 9
- RX Frequency: 444.300
- TX Frequency: 449.300
- Contact Name: Local 9
- Group List: Local 9 (or Some City TS2)
- Color Code: 1
- Repeater Slot: 2
- Channel #5
- Channel Name: SC TAC-310
- RX Frequency: 444.300
- TX Frequency: 449.300
- Contact Name: TAC-310
- Group List: TAC-310 (or Some City TS2)
- Color Code: 1
- Repeater Slot: 2
- Channel #6
- Channel Name: SC TAC-311
- RX Frequency: 444.300
- TX Frequency: 449.300
- Contact Name: TAC-311
- Group List: TAC-311 (or Some City TS2)
- Color Code: 1
- Repeater Slot: 2
- Channel #7
- Channel Name: SC TAC-312
- RX Frequency: 444.300
- TX Frequency: 449.300
- Contact Name: TAC-312
- Group List: TAC-312 (or Some City TS2)
- Color Code: 1
- Repeater Slot: 2
- Channel #8
- Channel Name: SC Midwest
- RX Frequency: 444.300
- TX Frequency: 449.300
- Contact Name: Midwest
- Group List: Midwest (or Some City TS2)
- Color Code: 1
- Repeater Slot: 2
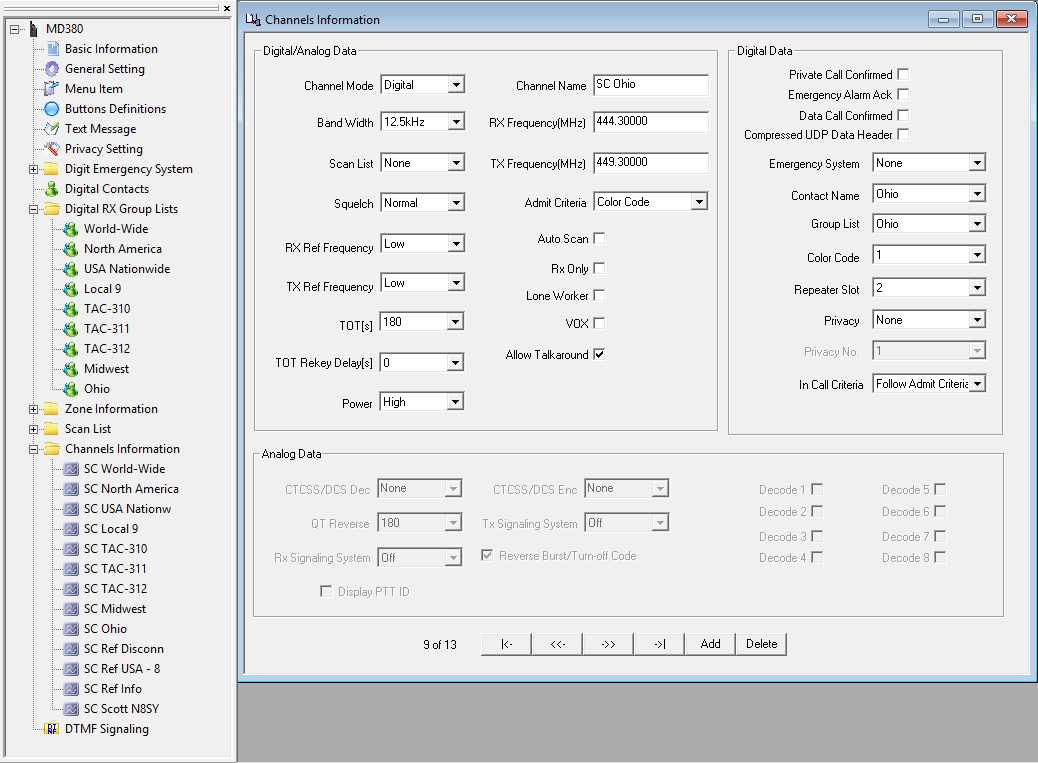
- Channel #9
- Channel Name: SC Ohio
- RX Frequency: 444.300
- TX Frequency: 449.300
- Contact Name: Ohio
- Group List: Ohio (or Some City TS2)
- Color Code: 1
- Repeater Slot: 2
- Channel #10
- Channel Name: SC Ref Disconn
- RX Frequency: 444.300
- TX Frequency: 449.300
- Contact Name: Ref Disconnect
- Group List: None
- Color Code: 1
- Repeater Slot: 2
- Channel #11
- Channel Name: SC Ref USA – 8
- RX Frequency: 444.300
- TX Frequency: 449.300
- Contact Name: USA – Area 8
- Group List: None
- Color Code: 1
- Repeater Slot: 2
- Channel #12
- Channel Name: SC Ref Info
- RX Frequency: 444.300
- TX Frequency: 449.300
- Contact Name: Ref Info
- Group List: None
- Color Code: 1
- Repeater Slot: 2
- Channel #13
- Channel Name: SC Scott N8SY
- RX Frequency: 444.300
- TX Frequency: 449.300
- Contact Name: Scott N8SY
- Group List: None
- Color Code: 1
- Repeater Slot: 2 – though really depends which is available on the repeater.
Zones
To use a Channel on the radio, it needs to be added to a Zone. Zones can contain analog channels too.
Some repeater and c-Bridge owners only made 16 talk groups available on their systems. That’s easy. All 16 go into one zone. Repeaters with more than 16 talk groups must have channels grouped.
Order of channels added to a zone will correspond with the dial position: first added will be position 1, second added will be 2, and so on.
Most use the zone to indicate where the repeater is located. Call signs are not often used because the city provides more detail when selecting an appropriate zone, especially when traveling.
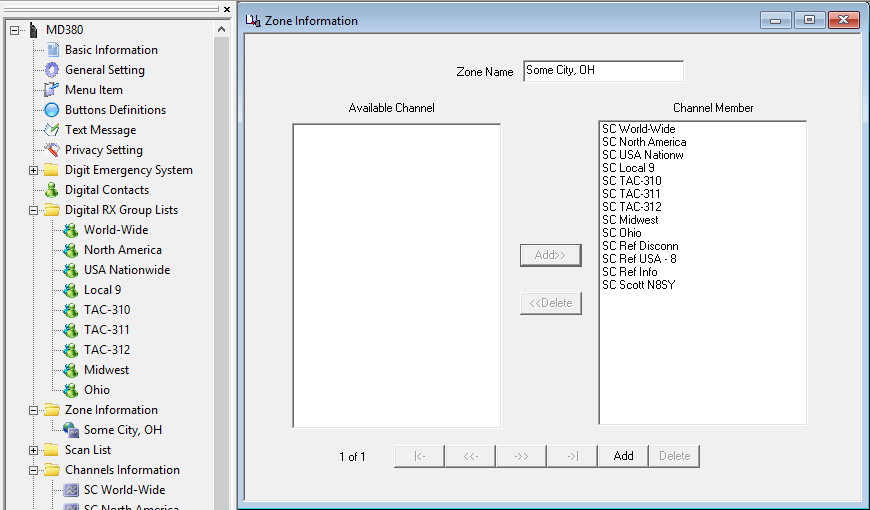
For this programming example, only one zone is utilized. In the CPS software, create a zone with the listed channels:
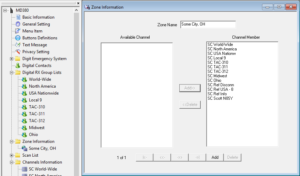
- Zone Information #1
- Zone Name: Some City, OH
- Available Channel, select and add (position 1): SC World-Wide
- Available Channel, select and add (position 2): SC North America
- Available Channel, select and add (position 3): SC USA Nationw
- Available Channel, select and add (position 4): SC Local 9
- Available Channel, select and add (position 5): SC TAC-310
- Available Channel, select and add (position 6): SC TAC-311
- Available Channel, select and add (position 7): SC TAC-312
- Available Channel, select and add (position 8): SC Midwest
- Available Channel, select and add (position 9): SC Ohio
- Available Channel, select and add (position 10): SC Ref Disconn
- Available Channel, select and add (position 11): SC Ref USA – 8
- Available Channel, select and add (position 12): SC Ref Status
- Available Channel, select and add (position 13): SC Scott N8SY
Scan Lists
Scan Lists are not required for radio operation but are nice for scanner like functionality across repeater time slots and frequencies. Channels have to be established first before it can be added. Scan Lists can contain analog channels too.
Order of channels added to a Scan List will correspond with the scan order. Private Call channels are unnecessary in scan lists because they are infrequent, short, and unnecessarily take up available list entries.
Activating the selected Scan List on the active channel requires assigning the “Scan On/Off” functionality to a programmable button universally in the radio. This is done in “Button Definitions” of the CPS. Another way is to create a channel with the “Auto Scan” feature enabled (see Channels section).
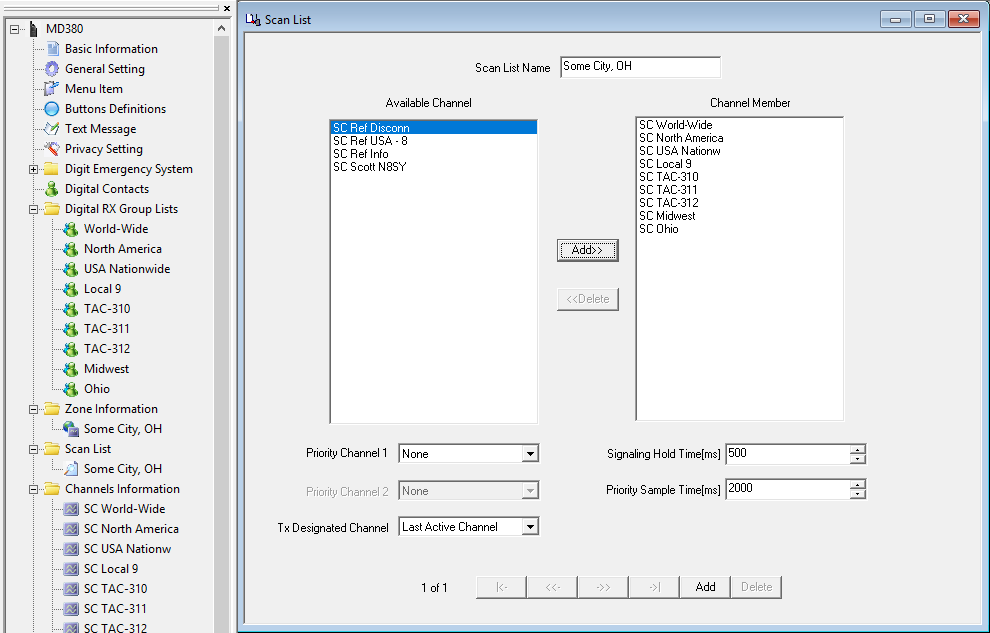
For this programming example, only one Scan List is utilized. In the CPS software, create a Scan List with the listed channels:
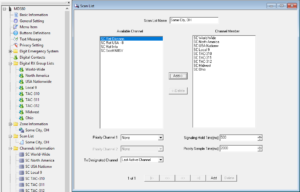
- Scan List #1
- Scan List name: Some City, OH
- Available Channel, select and add (position 1): SC World-Wide
- Available Channel, select and add (position 2): SC North America
- Available Channel, select and add (position 3): SC USA Nationw
- Available Channel, select and add (position 4): SC Local 9
- Available Channel, select and add (position 5): SC TAC-310
- Available Channel, select and add (position 6): SC TAC-311
- Available Channel, select and add (position 7): SC TAC-312
- Available Channel, select and add (position 8): SC Midwest
- Available Channel, select and add (position 9): SC Ohio

Once a Scan List is created, Channels to which a Scan List applies must be updated. All of the “SC” channels.
That’s it! You have successfully programmed a ham radio DMR code plug from scratch! Now, substitute the local repeater’s information and begin having fun!
Suggested talk groups
Here is a suggested list of talk groups to get started on a Brandmeister network U.S. repeater or hotspot. Each bullet can be a separate zone.
- Wide area groups (World-Wide: 91, North America: 93, USA – Nationwide: 3100)
- Regional (Midwest: 3169, Southern Plains: 3175, Northeast: 3172, Mountain: 3177, etc.)
- Ohio & surrounding states (Ohio: 3139, Indiana: 3118, Michigan: 3126, Pennsylvania: 3142, West Virginia: 3154, Kentucky: 3121)
- Local & tactical (TAC) (1, 2, Local 9, TAC-310, TAC-311, TAC-312, TAC 1: 8951, TAC 2: 8952, …, TAC 9: 8959)
- Reflectors & commands (Disconnect: 4000, USA – Nationwide: 4639, USA – Area 0: 4640, USA Area 1: 4641, …, USA – Area 9: 4649, Ref Info: 5000)
- Special use (Parrot: 9990, audio test: 9999)
Reflectors
Update 2/2021: Brandmeister has dropped reflector support at the end of 2020. This information would still be applicable to other networks that use reflectors.
Reflectors are different than talk groups. With a talk group, keying automatically establishes the connection and is dropped after 15 minutes. Reflectors must be manually linked and unlinked. Time slot 2 is always used for reflectors and associated commands.
At user discretion, programming can include reflectors of interest. It’s a good idea to program the control commands into a code plug regardless of the desire to use reflectors. A repeater maybe connected to a reflector and left abandoned. Having those commands programmed are good for knocking down an abandoned link.
To establish reflector connection, a private call is made to the reflector ID. Some radios can make on-the-fly private calls by entering the ID on the keypad. Others need a channel programmed with the reflector ID in the “Call ID” field with “Call Type” set to “Private Call.”
A “Group Call” channel programmed to time slot 2, talk group 9 is required to carry on the QSO. This is known as “Local 9” on many repeaters.
When the QSO is finished, another “Private Call” is made to ID 4000 to disconnect the reflector. Private Call to ID 5000 will check the status at any time.
For two stations to establish communication on the “USA – Area 8” reflector (4648), both stations initiate a “Private Call” to ID 4648 on time slot 2, for 2 seconds. Switch their radios to “Local 9” for the QSO. When done, both initiate a private call to 4000 to disconnect their nodes.
Simplex
Like any good communication system, DMR doesn’t have to be operated using a repeater.
Standard DMR simplex configuration and frequencies in the U.S.:
- Talk group (contact ID and RX Group): 99
- Color Code (channel): 1
- Time slot (channel): 1
- Admit Criteria (channel): Always (though I like to use “Channel Free”).
- In Call Criteria (if applicable, channel): TX or Always.
- UHF
- 441.000
- 446.500
- 446.075
- 433.450
- VHF
Simplex code plug programming template:
- Contact
- Contact name: Simplex
- Call type: Group call
- Call ID: 99
- Receive tone: No
- Digital RX Group List
- Group List Name: Simplex
- Available Contact, select and add: Simplex
- Channel, common:
- Channel Mode: Digital
- Band Width: 12.5kHz
- TOT[s]: 600s (10 min) max.
- Power: High
- Admit Criteria: Always
- Allow Talkaround: yes
- Emergency System: None
- Privacy: None
- In Call Criteria: Always
- Contact Name: Simplex
- Group List: Simplex
- Color Code: 1
- Repeater Slot: 1
- Channel 1
- Channel Name: Simplex 441.000
- RX Frequency: 441.000
- TX Frequency: 441.000
- Channel 2
- Channel Name: Simplex 446.500
- RX Frequency: 446.500
- TX Frequency: 446.500
- Channel 3
- Channel Name: Simplex 446.075
- RX Frequency: 446.075
- TX Frequency: 446.075
- Channel 4
- Channel Name: Simplex 433.450
- RX Frequency: 433.450
- TX Frequency: 433.450
Hotspots
Many hotspots follow very similar programming to that of a repeater. Others offer a ‘simple’ mode utilizing a single talk group in the radio to make programming easier. I prefer my hotspot to function like a repeater.
Hotspot devices like the SharkRF OpenSpot and DVMega act similar to a repeater in terms of the programming. Follow the programming tutorial above with differences being the TX frequency would match the RX frequency (simplex) and time slot is always 2 (though the OpenSpot can use either).
For the OpenSpot, every RX Group will need to include “Local 9” to hear the voice announcements from the OpenSpot. These are the ‘connected’ and ‘profile’ announcements. There are additional control commands that can be used with the OpenSpot, like changing profiles, which are outlined in the manual: https://www.sharkrf.com/products/openspot/manual/
The OpenSpot can alternatively operate in a simple mode where transmissions to and from the Internet are routed to and from talk group 9 for the radio. Example: hotspot is connected to talk group 3139, the radio receives and transmits using talk group 9; connected to talk group 3100, radio still uses 9. Using this method, talk group changes have to be made through the OpenSpot web interface including changing the ‘Reroute ID.’
The DV4Mini will ONLY operate using talk group 9. For this reason, programming talk group 3139 into the radio for the DV4Mini will NOT work. No other talk group configuration will work with the DV4Mini EXCEPT talk group 9!
Brandmeister Extended Routing (XTG) is needed for talk groups not listed in the DV4Mini DV4MF2 application (eg: TAC-310, TAC-311, or TAC-312).
A programming example for OpenSpot in ‘simple’ mode or the DV4Mini. 446.900 is the simplex frequency chosen for the hotspot:
- Contact (does not need to be created if “Local 9” already exits.)
- Contact name: OpenSpot/DV4Mini
- Call type: Group call
- Call ID: 9
- Receive tone: No
- Digital RX Group List (does not need to be created if “Local 9” already exits.)
- Group List Name: OpenSpot/DV4Mini
- Available Contact, select and add: OpenSpot/DV4Mini
- Channel
- Channel Mode: Digital
- Band Width: 12.5kHz
- TOT[s]: 180s (3 min) max.
- Power: Low
- Admit Criteria: Always (though I like to use “Channel Free”).
- Allow Talkaround: yes
- Emergency System: None
- Privacy: None
- In Call Criteria: Always
- Channel Name: OpenSpot/DV4Mini
- RX Frequency: 446.900
- TX Frequency: 446.900
- Contact Name: OpenSpot/DV4Mini (or Local 9)
- Group List: OpenSpot/DV4Mini (or Local 9)
- Color Code: 1
- Repeater Slot: 2
You’re now setup to use OpenSpot in simple mode or DV4Mini!
 Hey gang,
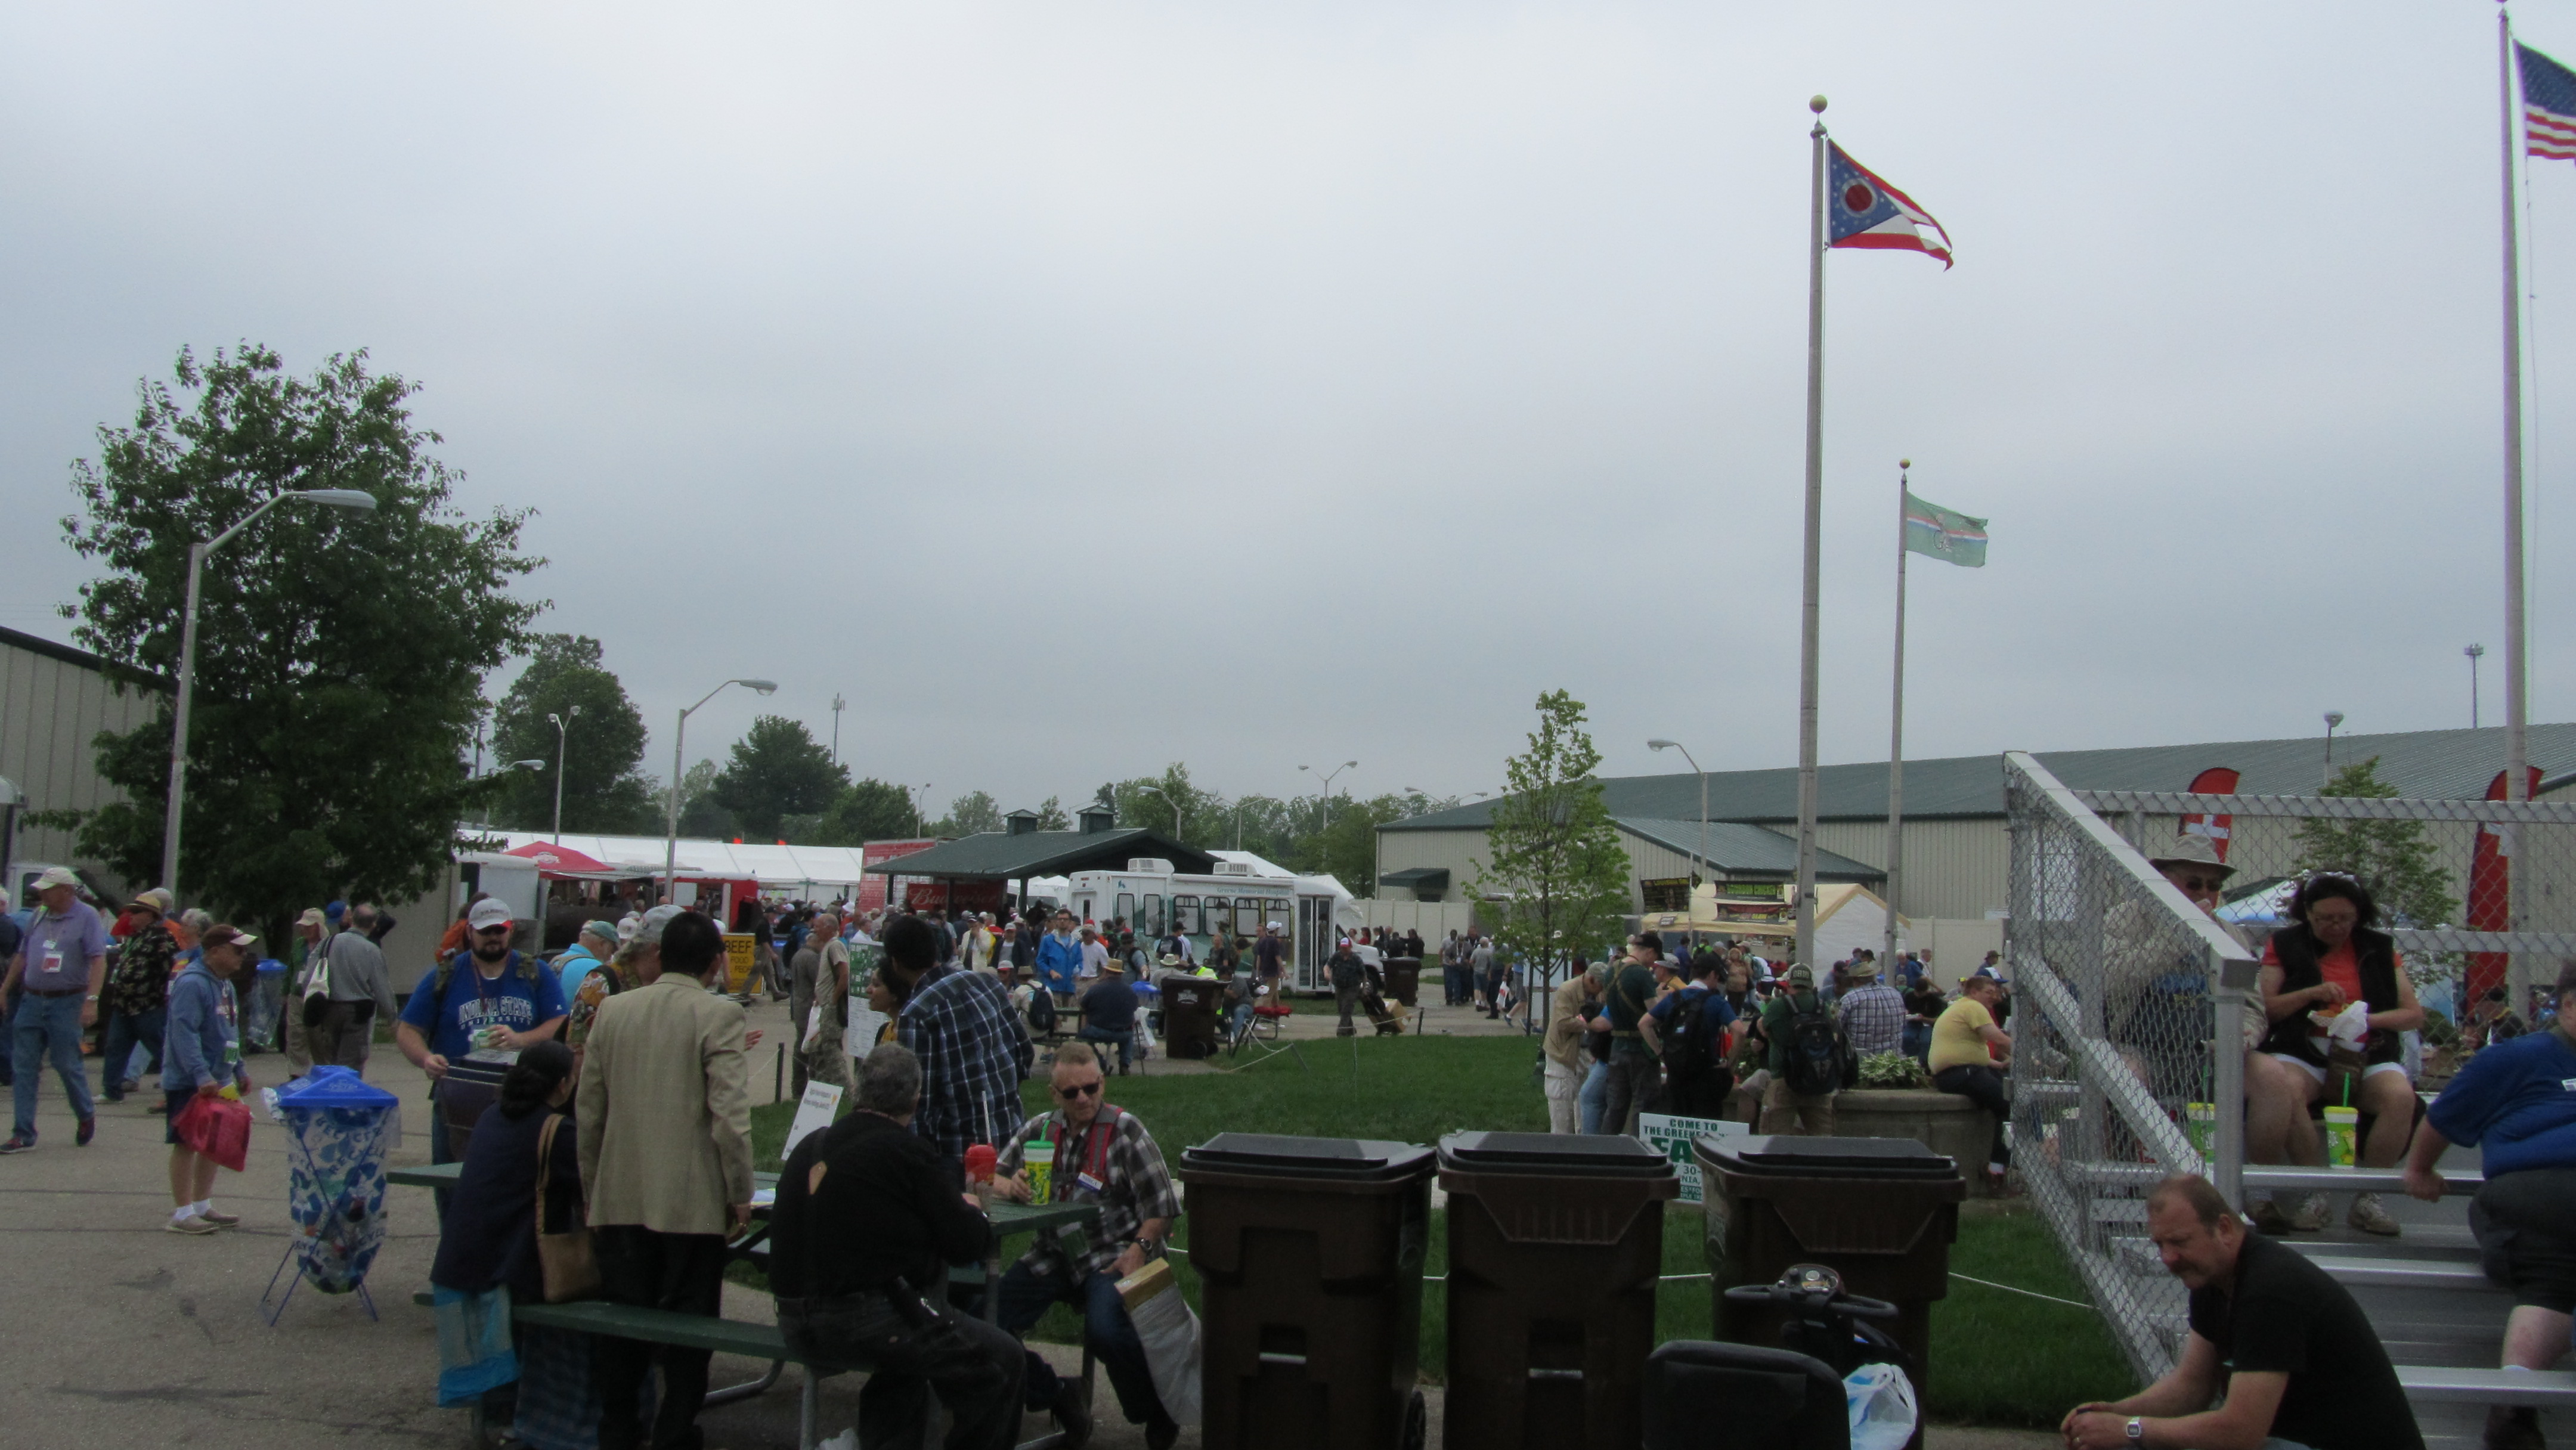 and an abundance of food trucks and carts similar to that of any county fair was seen. More eating area was needed compared to the amount we were used to at Hara. There were long lines and the limited seating, for maybe 50, filled quickly. I had an enjoyable standing lunch with members of the Wood County ARC.
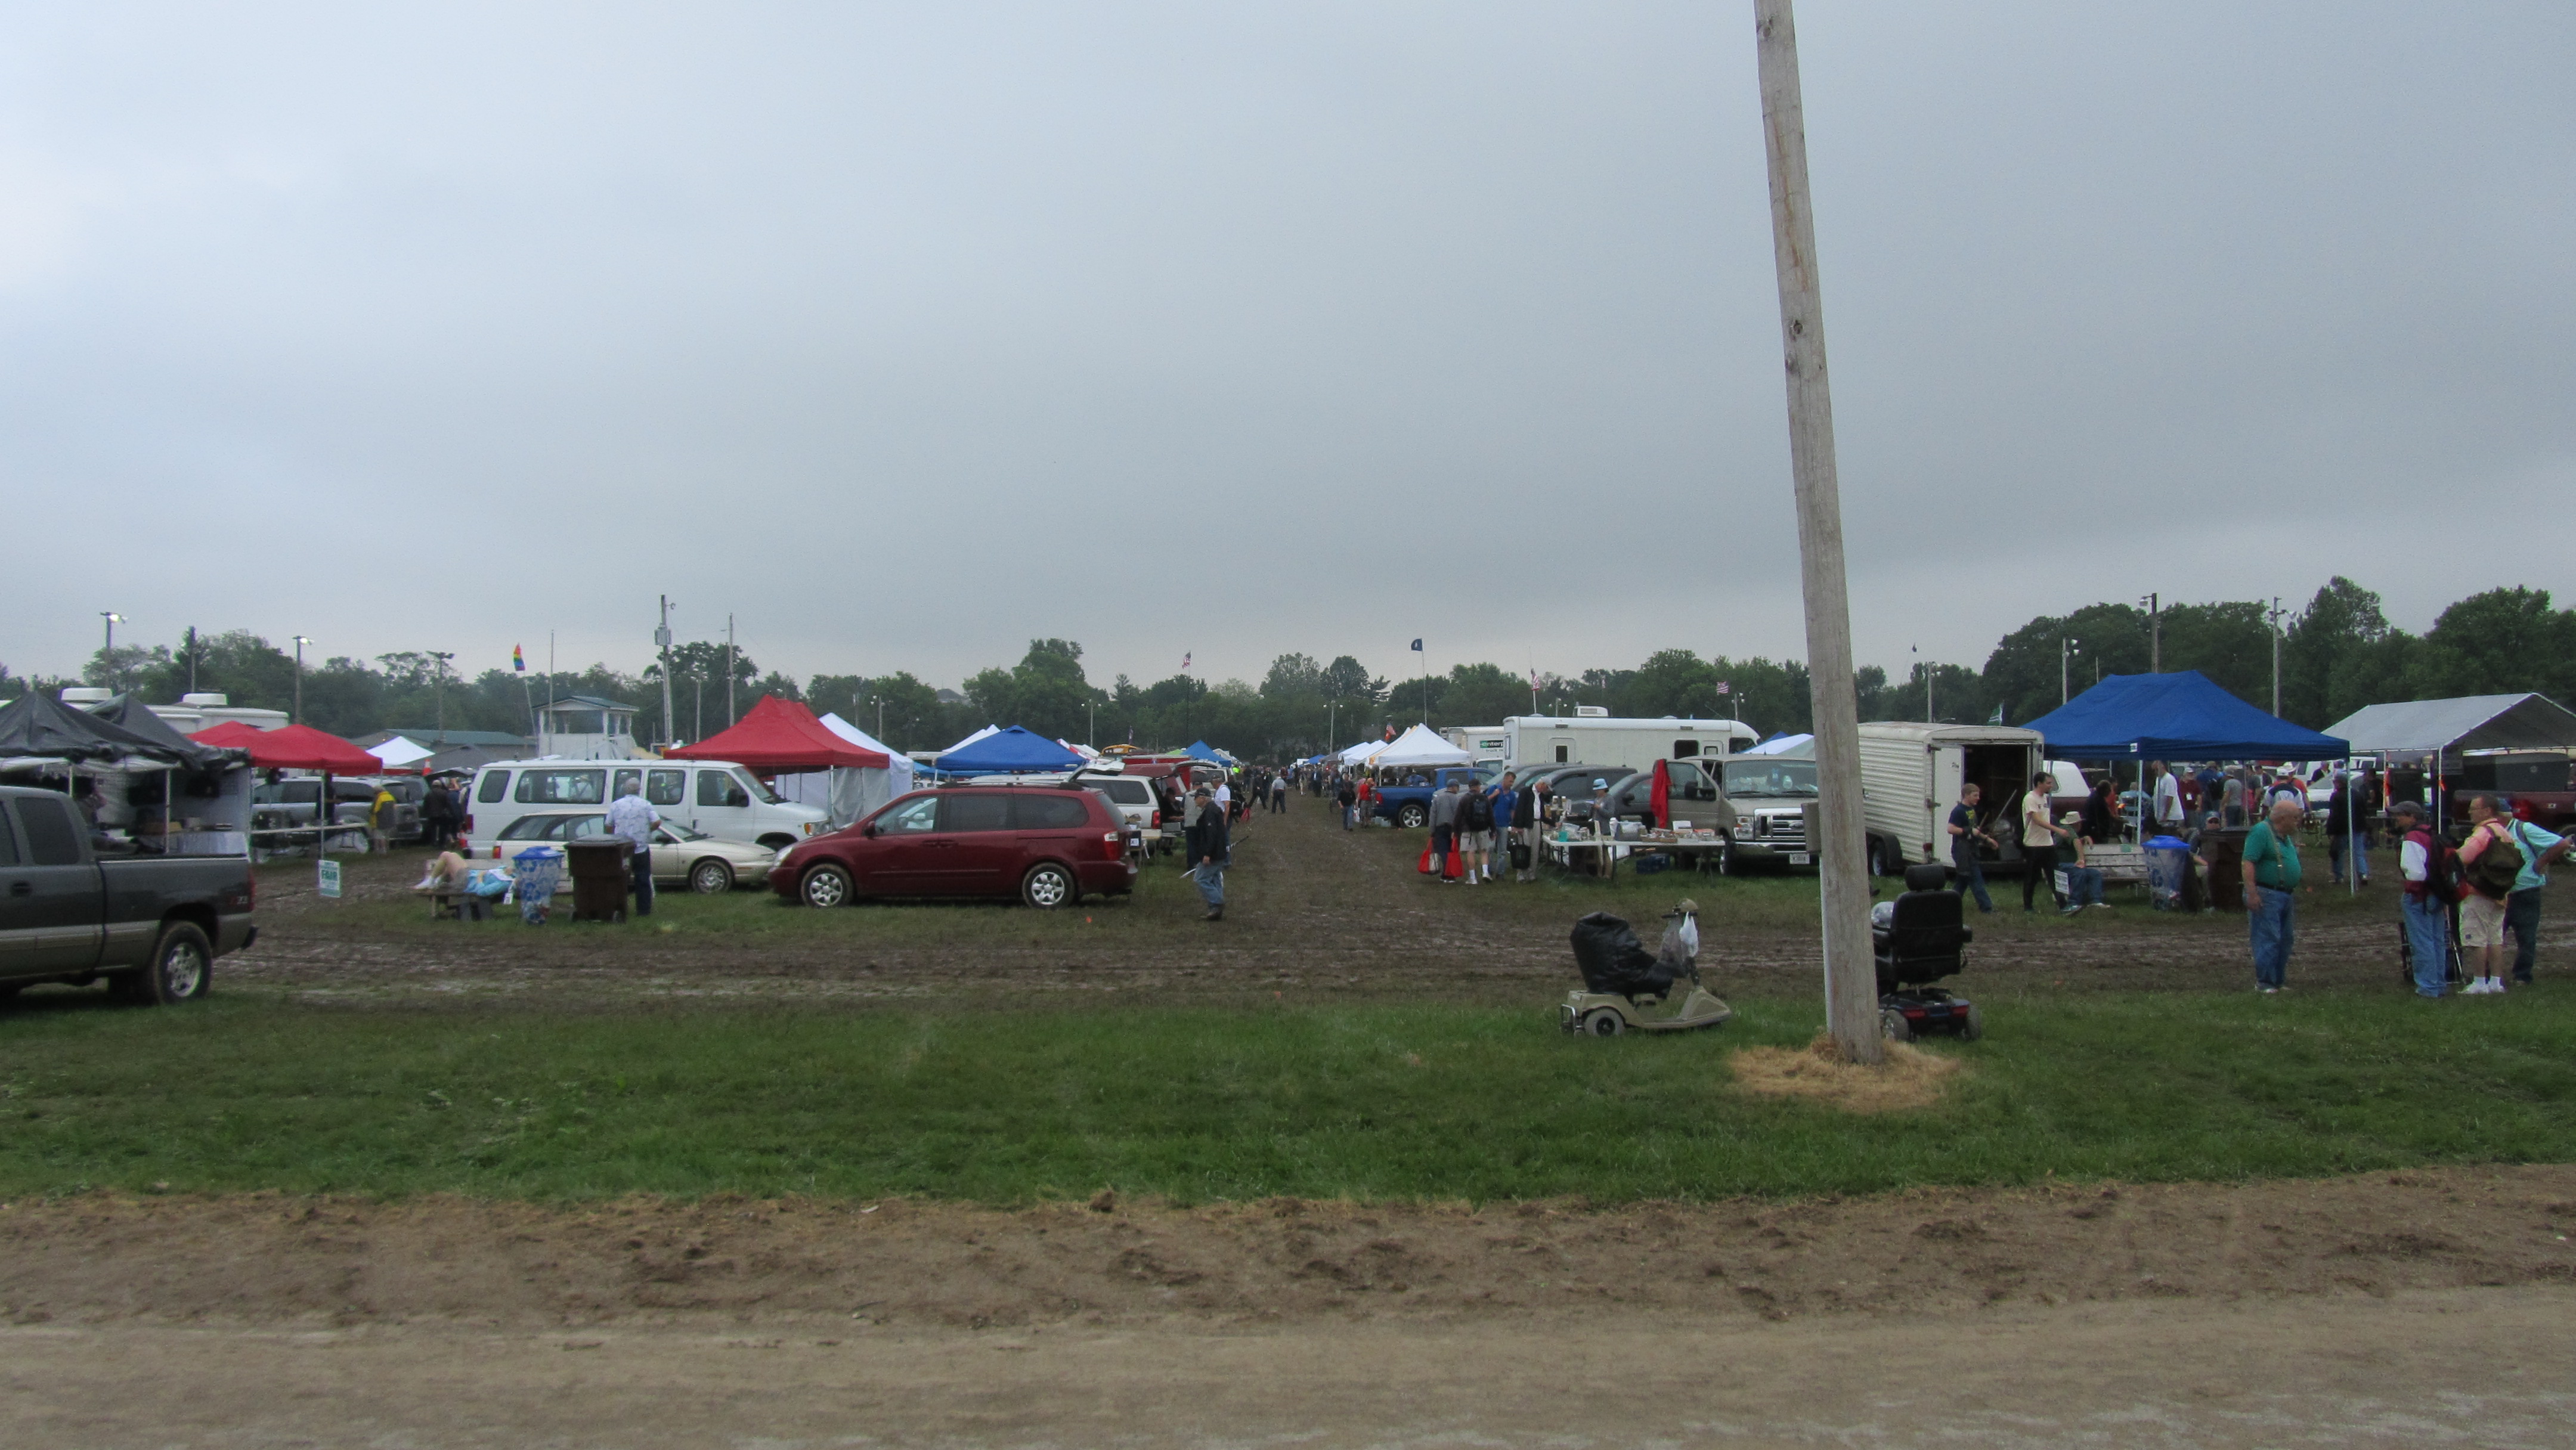 parking lot into a mud pit. After everyone took shelter for even more storms Saturday morning, allll bets were off. The flea market isles were mud tracks. A good pair of rain boots were needed to help manage. It was funny watching rented scooters trying to manage a couple inches of mud. Not wanting to get our clothes dirty, we headed out about 3pm on Saturday and learned the parking lot suffered the same fate as the flea market. The committee, I think, anticipated this because they had rope and skid loaders for cars that needed assistance. We exited without assistance but still need to get our car washed twice to get MOST of the mud off.
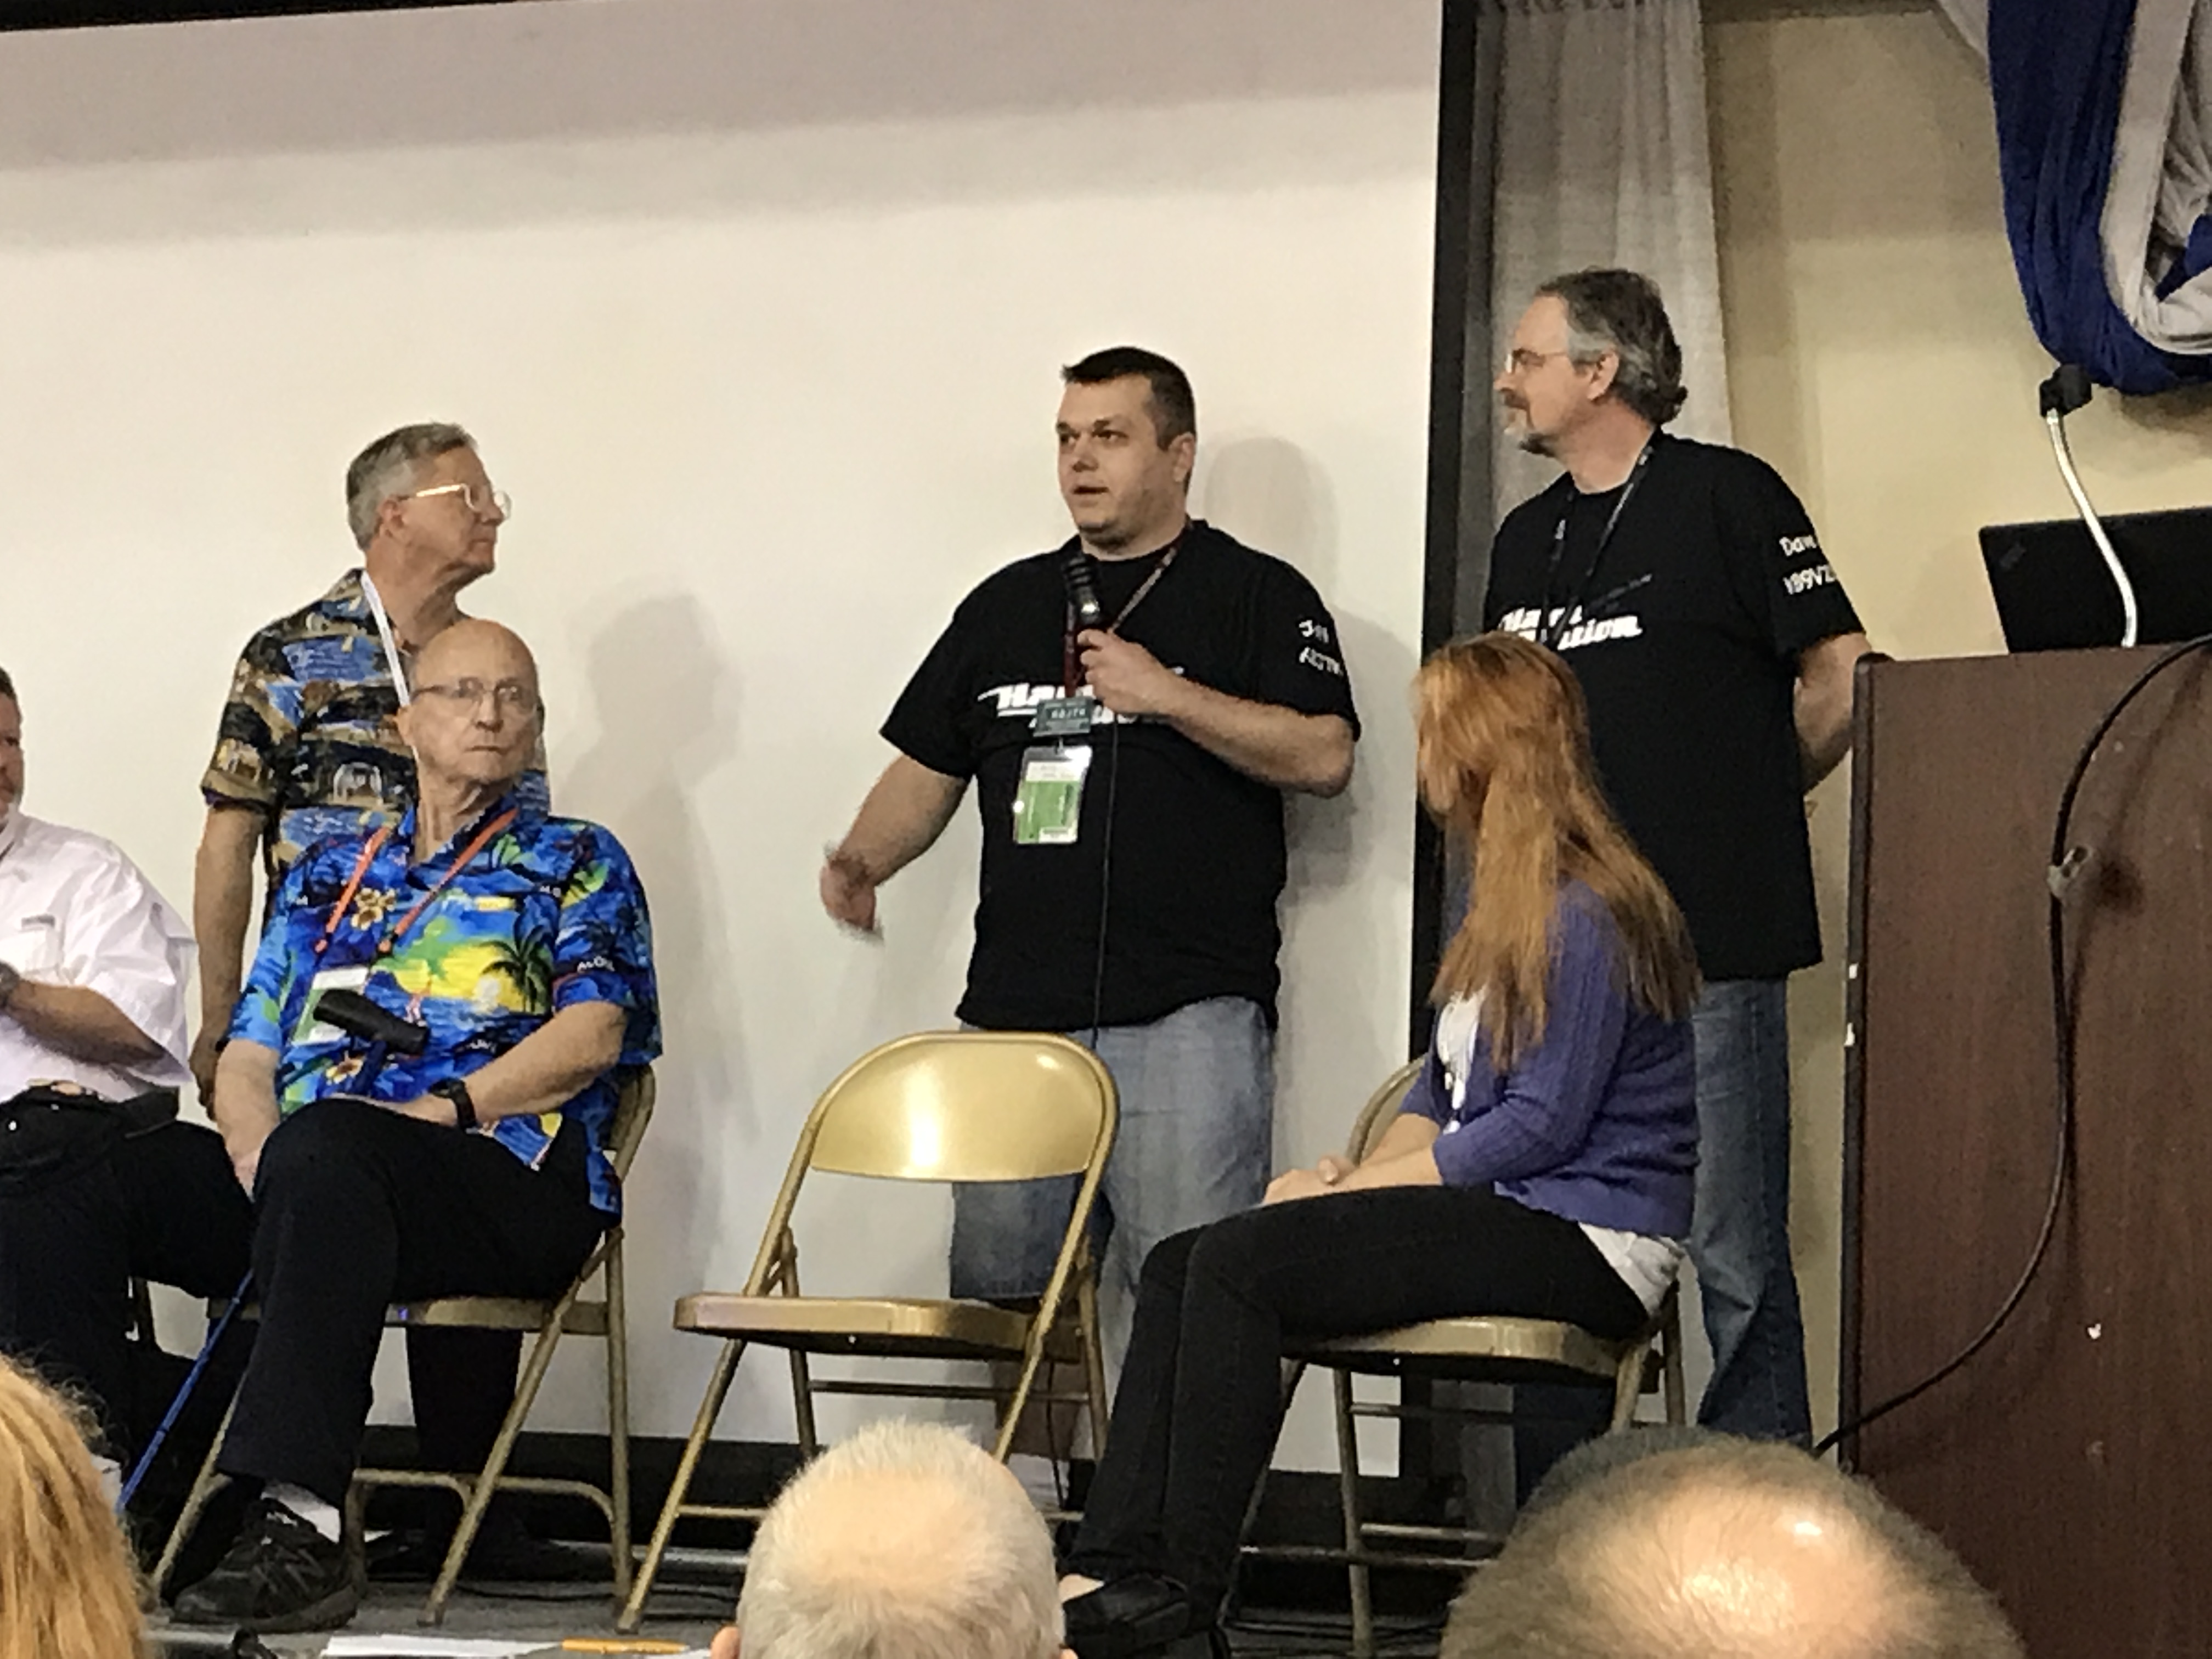 in the new room. I got to be apart of the forum promoting the D-STAR After Show net. Show hosts and net controllers were invited to the ARRL booth afterward to get our picture taken with Tom Gallagher – NY2RF.
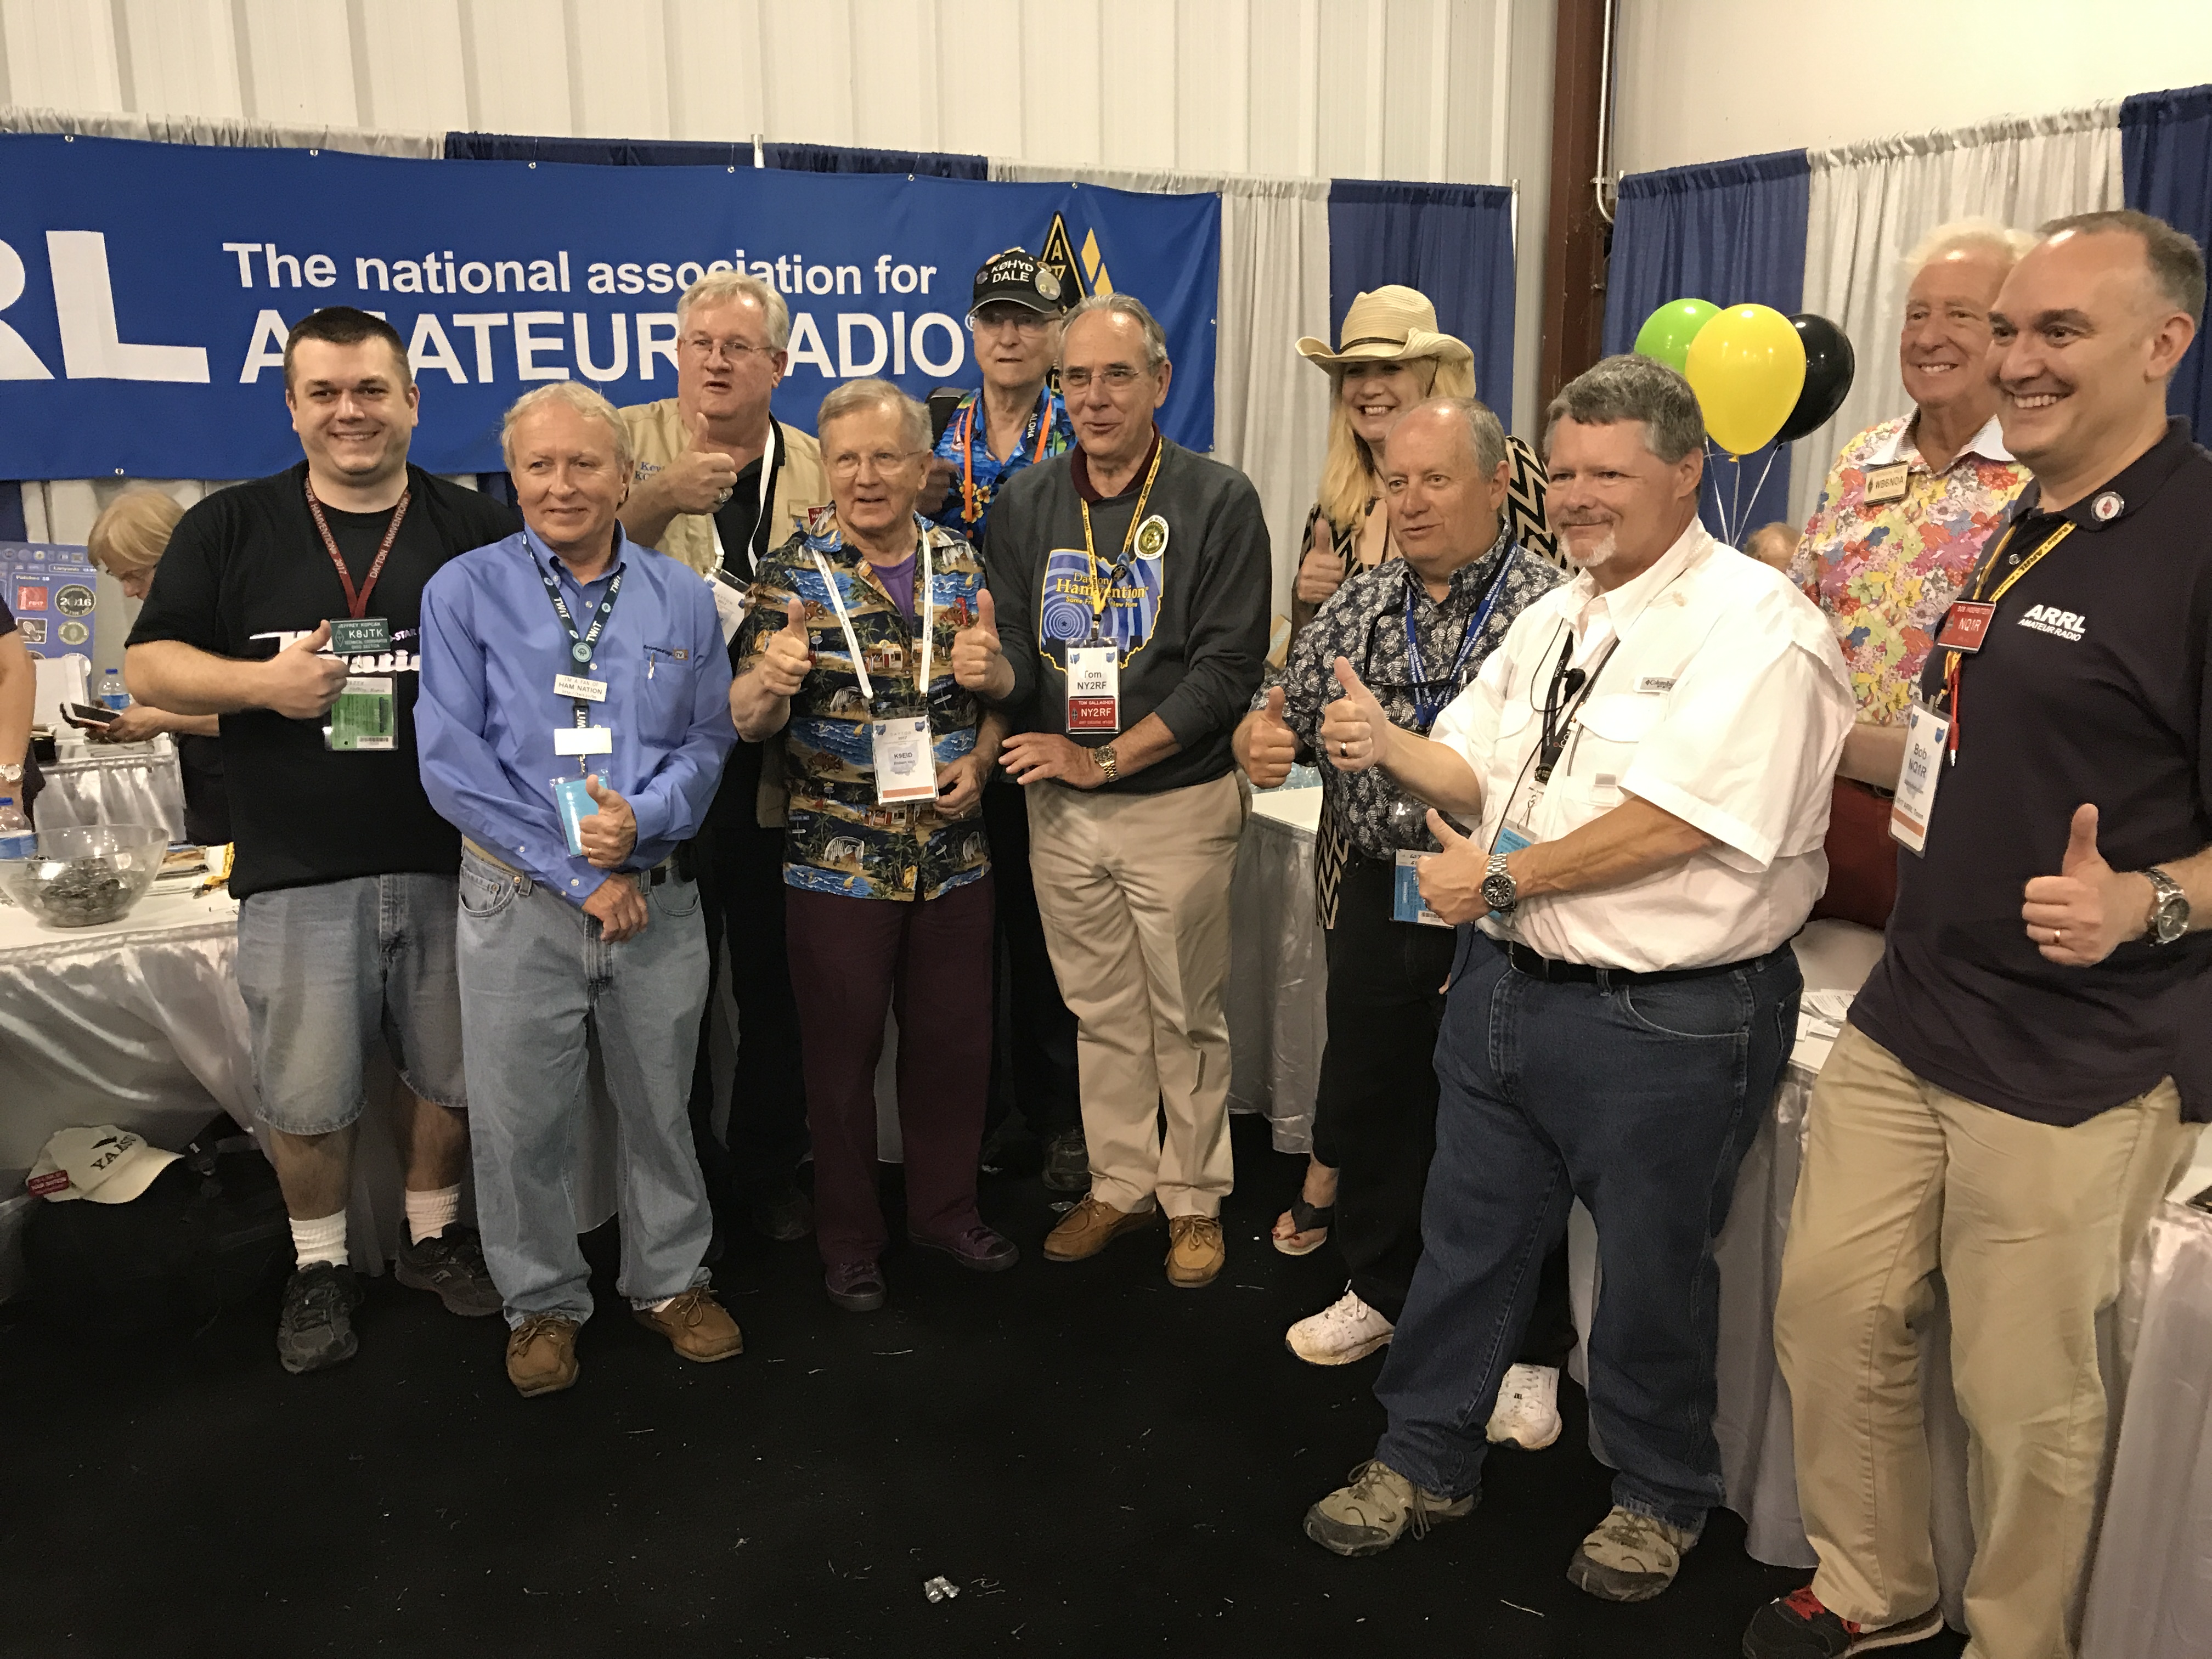 off the following Wednesday with episode 301. For one week, show hosts, after show net controllers, many with 1 x 1 special event call signs where on the HF bands and digital modes. With nearly an estimated 10,000 contacts made, digital didn’t get the numbers we hoped. There were pileups for the nets but quickly dropped off for the remainder of the week. The idea for digital was to involve more hams that don’t have privileges or means for an HF setup. Those that participated were happy digital was involved.
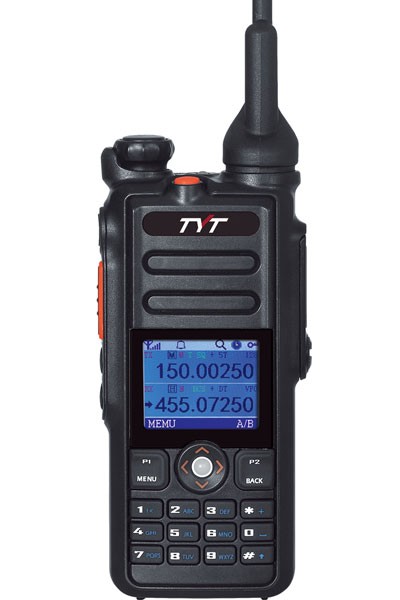 even though there are not many VHF DMR repeaters – unless you’re in New England it seems. The review indicated the channel selector knob was replaced with a Blackberry Curve-style roller trackball. My enthusiasm quickly deflated. WHY??!! I had a BB Curve. The trackball was a nice idea at the time but it was overly sensitive, got gummed up quickly – especially in a dirty environment, was hard to clean, and had to be replaced about once a year. The radio itself is similar to the MD-380 but differences include programming cable, software, code plugs, and a VFO. An MD-380 code plug won’t open in the MD-2017 CPS. I’m sure a hacked program will be available to load code plugs on different radios. Seemed like a good radio otherwise, though I won’t be getting one. Ham Radio 2.0 Episode 99: Debut of the TYT MD-2017 Dual Band DMR HT: http://www.livefromthehamshack.tv/2017/05/29/episode-99-debut-tyt-md-2017-dual-band-dmr-ht/
 points – including Winlink messages. I love to receive messages about your setup, stations operating, or social activities taking place. These can be sent via the National Traffic System (NTS) or Winlink – K8JTK at Winlink.org. Winlink post: https://winlink.org/content/field_day_send_11_winlink_messages_200_points